Introduction
The release of Power Platform Wave 2 2021 has brought in some amazing features and functionalities. One of which is the Side Panes and the ability to incorporate multiple panels in it.
Earlier we had the provision to open a single panel using the method below
Xrm.Panel.loadPanel(URL, title)
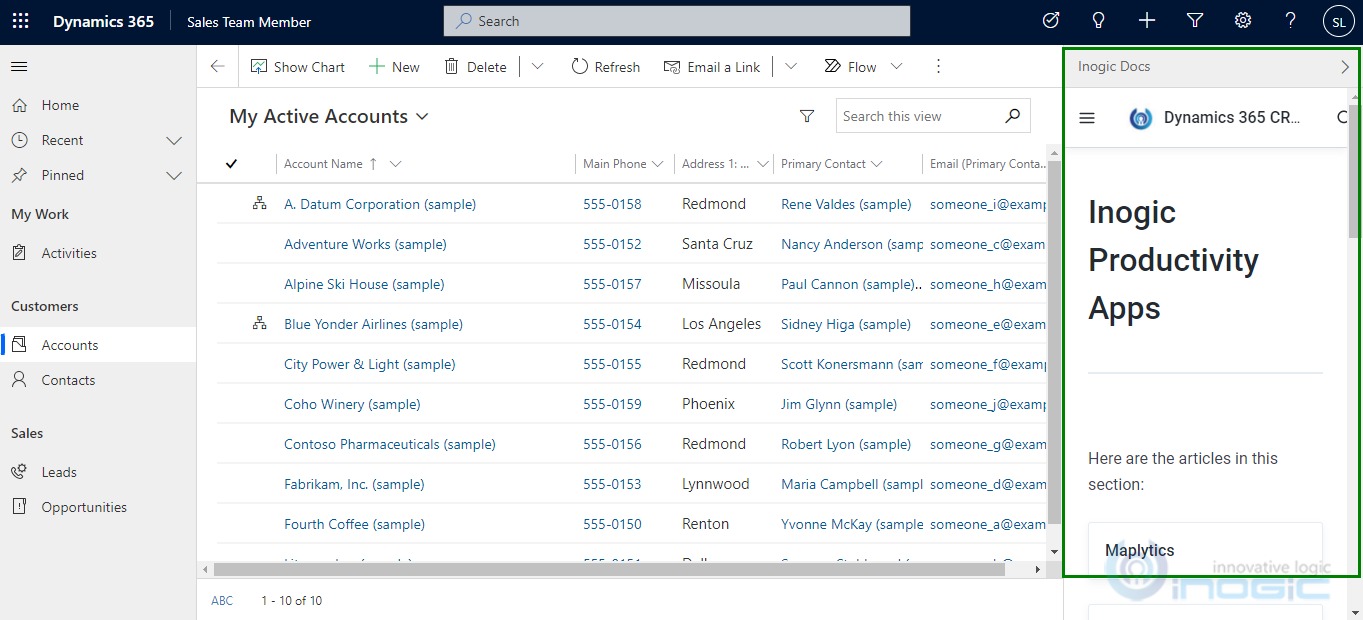
Although this was an intuitive addition it had some limitations like the ability to open only one panel at once, and we could only bind items to it using an URL. As can be seen in our screen shot below, how using the loadPanel method we could only show the Inogic docs in the side panel at once.
Xrm.Panel.loadPanel(“https://docs.inogic.com/“, “Inogic Docs”);
However, using the new multi panel in Side Panes we can not only create and open multiple panels at once but also view different type of pages like entity record, entity list (view), html web resource, custom page, and dashboard, for more information on this you can refer here.
Now let us see an example to witness these functionalities in action.
Example:
We have created a side pane in which we are showing the following panels
- Entity Record

- Entity List
- HTML Web Resource
- Dashboard

Below is the systematic guide to achieve the above.
Step 1:
Start by creating a function by initializing the required variables. Here we take the global context, to get the client URL i.e. CRM URL of the user.
function createMultiplePanels() {
let globalContext = Xrm.Utility.getGlobalContext();
//get client url i.e. CRM URL
let clientUrl = globalContext.getClientUrl();
Step 2:
We store the sidePanes in a variable, which we get from Xrm.App.sidePanes. Here we kept the sidePanes state as zero, which is collapsed (zero – collapsed and one – expanded) by default.
let sidePanes = Xrm.App.sidePanes;
//Here we set the sidePanes state to 0 to keep the panel closed by default.
sidePanes.state = 0;
if(sidePanes.getPane(“accountRecordPane”) == undefined && sidePanes.getPane(“phonePane”) == undefined && sidePanes.getPane(“htmlWebresource”) == undefined && sidePanes.getPane(“myDashboard”) == undefined) {
We added some conditions here to check if the pane already exist or not to prevent duplicate panels with the help of getPane(paneId) method. In getPane method we need to pass the unique pane Id which will return that specific pane properties if it already exist, if not then it will return undefined.
Step 3:
In this step, we will create our first panel, which is of entity record, in our case we are taking an account record; you can take any entity record you want.
//account form shown in panel
let entityRecordSidePane = {
title: “Parent Account”,
imageSrc: clientUrl + “/_imgs/svg_1.svg”,
badge: true,
alwaysRender: false,
paneId: “accountRecordPane”
}
let entityRecordPane = await sidePanes.createPane(entityRecordSidePane);
let entityRecordPageInput = {
pageType: “entityrecord”,
entityName: “account”,
entityId: “a4a1390a-980c-ec11-b6e6-0022480a268d”
};
await entityRecordPane.navigate(entityRecordPageInput);
The object entityRecordSidePane is the sidePane object where we defined the title of the panel, the badge image, paneId (which should be unique from other panels).
From sidePanes.createPane() we create the panel on the sidePane. To open the record in the panel we used pageInput object (entityRecordPageInput) from navigateTo.
Step 4:
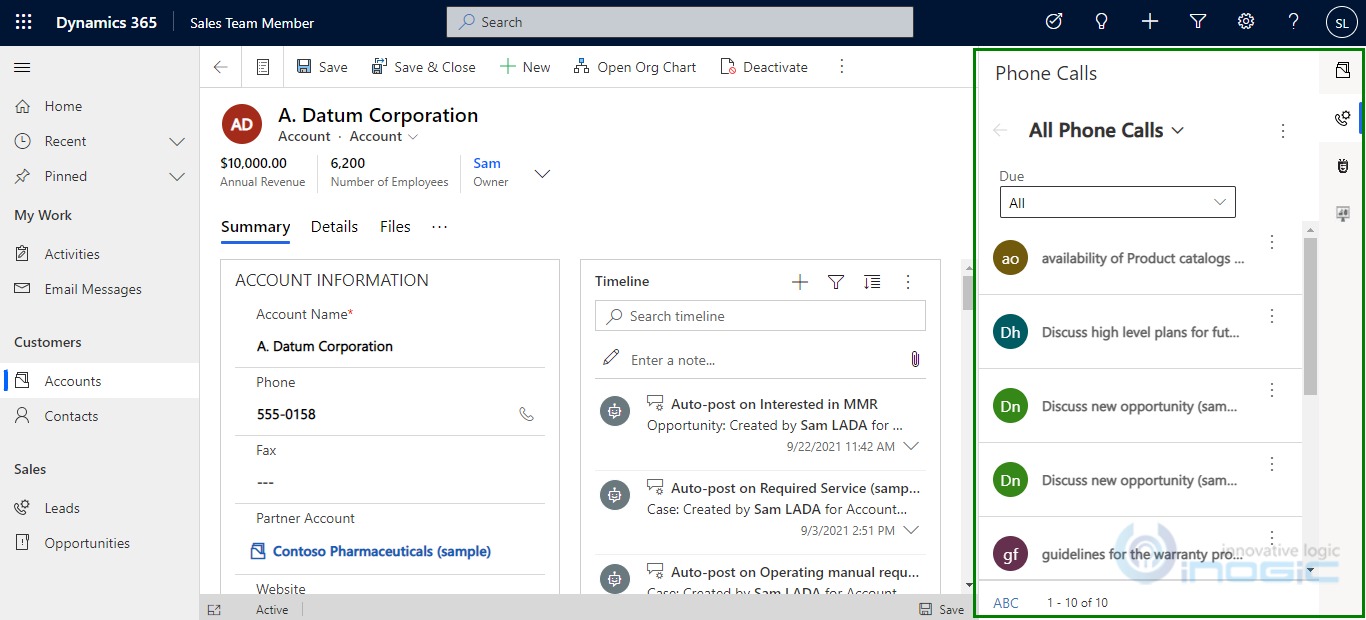
Similar to entity record, we created a panel for entity list (view) as well.
// phone call list for account
var phonecallview = {
title: “Phone Calls”,
imageSrc: clientUrl + “_imgs/svg_4.svg”,
badge: true,
alwaysRender: false,
paneId: “phonepane”
}
var entityListPane = await sidePanes.createPane(phonecallview);
//pageInput object to open this view
var phonecallPageInput = {
pageType: “entitylist”,
entityName: “phonecall”,
viewId: “F6A2F891-6846-4B21-B922-712695AFD65C”
};
await entityListPane.navigate(phonecallPageInput);
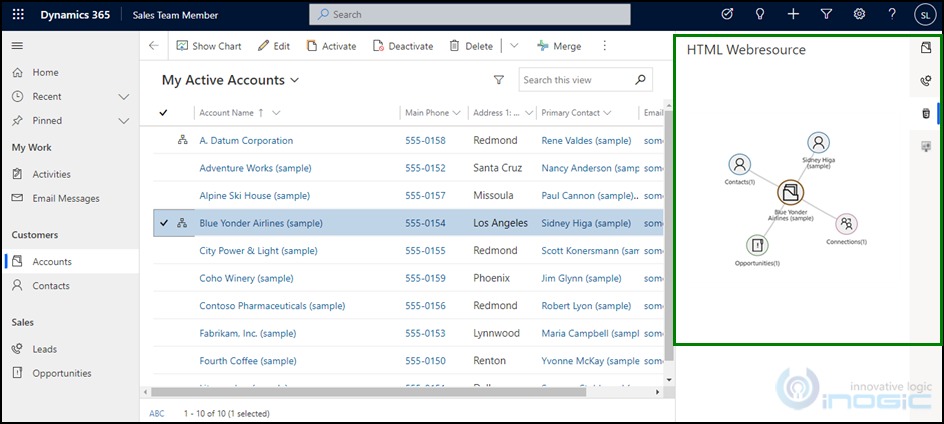
Step 5:
In the next step, we created a panel for html web resource. In that web resource, we are showing relationship view of the selected record as Map My Relationships.
//creating web resource panel
let webResourceSidePane = {
title: “HTML Webresource”,
imageSrc: “https://cdn0.iconfinder.com/data/icons/HTML5/512/HTML_Color_Black.png”,
badge: true,
alwaysRender: false,
paneId: “htmlWebresource”
}
let webResourcePanel = await sidePanes.createPane(webResourceSidePane);
//open this specific web resource in panel
let webResourceInput = {
pageType: “webresource”,
webresourceName: “new_/PanelBlog/panel.html”
}
await webResourcePanel.navigate(webResourceInput);
Step 6:
Just like entity records, views and web resources we can also show dashboards in the panel.
//create dashboard panel in sidePanes
let dashboardPane = {
title: “My Dashboard”,
imageSrc: “https://www.vhv.rs/dpng/d/503-5031020_dashboard-icon-png-download-dashboard-icon-png-free.png”,
badge: true,
alwaysRender: false,
paneId: “myDashboard”
}
let dashboardPanel = await sidePanes.createPane(dashboardPane);
//Open a specific dashboard in panel
let dashboardInput = {
pageType: “dashboard”,
dashboardId: “ACB40FFE-A1E0-47D0-A472-799911009DF6”
}
await dashboardPanel.navigate(dashboardInput);
You can also retrieve the selected pane with the help of getSelectedPane() method and edit them as well.
var selectedPane = Xrm.App.sidePanes.getSelectedPane();
selectedPane.width = 400;
To close a pane programmatically, use the close method as selectedPane.close().
Below is the entire code using which we have shown multiple panels of different page types in a single Side Pane.
function createMultiplePanels() {
//get the global context from which we will get the crm URL
let globalContext = Xrm.Utility.getGlobalContext();
//get the client URL i.e. crm URL
let clientUrl = globalContext.getClientUrl();
//Take SidePanes in a variable
let sidePanes = Xrm.App.sidePanes;
//Here we set the sidePanes state to 0 to keep the panel closed by default.
// 0 – collapsed, 1 – expanded
sidePanes.state = 0;
//validate if the panes already exists that we are going to create.
if(sidePanes.getPane(“accountRecordPane”) == undefined && sidePanes.getPane(“phonePane”) == undefined && sidePanes.getPane(“htmlWebresource”) == undefined && sidePanes.getPane(“myDashboard”) == undefined) {
//Creating a pane to show an Entity Record
//create a side Pane object
var entityRecordSidePane = {
title: “Parent Account”,
imageSrc: clientUrl + “/_imgs/svg_1.svg”,
badge: true,
alwaysRender: false,
paneId: “accountRecordPane”
}
//create a panel on the sidePane
var entityRecordPane = await sidePanes.createPane(entityRecordSidePane);
//pageInput object to open the record
var entityRecordPageInput = {
pageType: “entityrecord”,
entityName: “account”,
entityId: ” a4a1390a-980c-ec11-b6e6-0022480a268d”
}
//on click of badge it will navigate to entity record
await entityRecordPane.navigate(entityRecordPageInput);
//EntityList (View)
//create a side pane object to show phone call view
var phonecallview = {
title: “Phone Calls”,
imageSrc: clientUrl + “_imgs/svg_4.svg”,
badge: true,
alwaysRender: false,
paneId: “phonepane”
}
//creating a panel on the side pane
var entityListPane = await sidePanes.createPane(phonecallview);
//pageInput object to show the phone call view
var phonecallPageInput = {
pageType: “entitylist”,
entityName: “phonecall”,
viewId: “F6A2F891-6846-4B21-B922-712695AFD65C”
}
//on click of badge it will navigate a phone call view
await entityListPane.navigate(phonecallPageInput);
//HTML web resource
let webResourceSidePane = {
title: “HTML Webresource”,
imageSrc: “https://cdn0.iconfinder.com/data/icons/HTML5/512/HTML_Color_Black.png”,
badge: true,
alwaysRender: false,
paneId: “htmlWebresource”
}
let webResourcePanel = await sidePanes.createPane(webResourceSidePane);
//web resource page input
let webResourceInput = {
pageType: “webresource”,
webresourceName: “new_/PanelBlog/panel.html” //web resource name
}
await webResourcePanel.navigate(webResourceInput);
//Dashboard
let dashboardPane = {
title: “My Dashboard”,
imageSrc: “https://www.vhv.rs/dpng/d/503-5031020_dashboard-icon-png-download-dashboard-icon-png-free.png”,
badge: true,
alwaysRender: false,
paneId: “myDashboard”
}
let dashboardPanel = await sidePanes.createPane(dashboardPane);
//dashboard page input
let dashboardInput = {
pageType: “dashboard”,
dashboardId: “ACB40FFE-A1E0-47D0-A472-799911009DF6” //guid of dashboard
}
await dashboardPanel.navigate(dashboardInput);
}
}
Conclusion
Thus with the multi-tab panel you can now show contextual information without the need for any additional navigation.