Quantcast
Channel: Sam's Activities
Viewing all 3363 articles
Browse latest View live

Re-Install Sample records of Entity maps and Dashboards in Maplytics

$
0
0

While we were discussing about Registering Maplytics in our last post we saw once the Maplytics license was installed there’s an option to install Sample Dashboards. This post explains how to restore the sample data installed for Maplytics if you have accidentally deleted the sample records of EntityMap/Dashboard.

If you try to re-install the samples using the Configuration screen like you did while Registering Maplytics, you will receive the following error message since samples can only be installed once.

install

Please follow below steps to re-install the sample data.

1. Go to Settings → Customizations → Customize the system → Map Configuration as shown in below screenshot.

  install1

2. Open the information form and add the Dashboard sample data on form as shown in below screenshot. Save and publish the form.install2

3. Then Go to Settings → Maplytics → Configuration Details as shown below screenshot.install3

4. Open the Configuration Details record and set value of Dashboard sample data to No as shown in below screenshot. Save and close the record.install4

5. Go to Settings → Solution and then open the Maplytics solution and click on Install button to install sample records. 

 install5

 Note: The install option installs all of the sample records for Entity Map and Dashboards so if you had any of them already present, you could end up with duplicate entries for them. So make sure to follow this process only after all of the sample data has been deleted.

Do you Know? Bing Maps licenses are already included with your Maplytics…so no need to buy them separately.


Register Maplytics License in your Dynamics CRM

$
0
0

Business Analytics in Dynamics CRM now has a new name as Maplytics. In our last post we saw how with few simple steps you can get the Maplytics solution installed in your Dynamics CRM.

In this post will learn how to register Maplytics license and get the power of Bing Maps from within your Dynamics CRM.

To register new/upgrade license:

Please follow the below steps to register Maplytics License:

1. Navigate to Settings -> Customizations -> Solutions -> Select the Maplytics solution -> Configuration

2. Browse for the “Maplytics.Lic” file and click on Register button to register the application for use. The Maplytics license file would be provided to you by us when you request for a trial or buy the product.

3. Once the license is installed, the next step is to go ahead and install the sample dashboards that comes along with the product. Make sure you click on Install Samples only the first time you are configuring the product. Once the samples are installed, for license renewals or upgrades, you do not need to follow this step. If you need to re-install the sample dashboards, you can follow steps as shown in this blog post.

4. Before we start exploring further, let’s finish these two points of check list.

  • Create Maplytics team with the list of users whom you would like to give access of Maplytics Features. Please note User will see Detail Map and Heat Map ribbon buttons only after they are added to Maplytics Team. 
  • Once the team is setup we need to Assign Maplytics Security Role for those users to access Maplytics Features and we are ready to go. We ship two security roles along with the Product.

After addition to the Maplytics team the users need to Configure Maplytics organization wide, default settings.

Unable to Register License? Need help? No worries email us on crm@inogic.com and we would be happy to help!

There's much more, for more Dynamics CRM Tips and Tricks head on to Inogic Blog. If you have any questions on Dynamics CRM or need any help in implementation, customization, upgradation of Dynamics CRM or are looking to get more out of your CRM, feel free to reach us at crm@inogic.com today!

The post Register Maplytics License in your Dynamics CRM appeared first on Inogic Blog.

Use RetrieveDuplicateRequest in Dynamics CRM

$
0
0

Introduction:

Recently we had a requirement where we had to create Contact records from data received from other System and if Duplicate record found then avoid creation of records based on Duplicate Detection rules specified in the System and get the List of the Duplicate Records found in the system.

The Duplicate Detection rules might be modified or removed whenever needed in future.

We can avoid creation of records using the CreateRequest but as we wanted to get the Duplicate records too we choose the option to use “RetrieveDuplicatesRequest”.

Walkthrough:

We have Published Duplicate Detection rules for Contact in the System by default created for First Name Last Name, Email address and business phone number as you can see below:duplicate detectionIn order to create Contacts using the Duplicate Detection rules we follow below steps:

  • Suppose in System we already have 2 contacts with First Name: Jo and Last Name: Smith
  • Now we received the same data [First Name: Jo, Last Name: Smith] to create Contact in CRM.

So now how we can avoid creation of this record and display the duplicate records information:

Create an Entity object of Contact with all the required attributes as per business requirement firstname and lastname as you can see below:

Entity contactRecord = new Entity("contact");
contactRecord.Attributes["firstname"] = "Jo";
contactRecord.Attributes["lastname"] = "Smith ";
contactRecord.Attributes["emailaddress1"] = "jo@test.com";

After you have created an Entity object pass it to the RetrieveDuplicatesRequest as below:

var request = new RetrieveDuplicatesRequest

{
//Entity Object to be searched with the values filled for the attributes to check
BusinessEntity = contactRecord,

//Logical Name of the Entity to check Matching Entity
MatchingEntityName = contactRecord.LogicalName,


};

var response = (RetrieveDuplicatesResponse)_service.Execute(request);
var request = new RetrieveDuplicatesRequest

{
//Entity Object to be searched with the values filled for the attributes to check
BusinessEntity = contactRecord,

//Logical Name of the Entity to check Matching Entity
MatchingEntityName = contactRecord.LogicalName,

};
var response = (RetrieveDuplicatesResponse)_service.Execute(request);

This request retrieves all the Duplicate records satisfying the Published Duplicate detection rules specified in the system.

response.DuplicateCollection.Entities.Count” will give the Duplicate records count found in the system.

If Zero count found then no duplicate records are found in the System and we can simply create the record.

If greater than Zero count found then we can retrieve the Duplicate records fromresponse.DuplicateCollection.

Conclusion:

The RetrieveDuplicatesRequest can be used for detecting duplicate records found using the Duplicate Detection Rules specified in the System.

You may also like to see : Bing Map license are already part of Maplytics.

There's much more, for more Dynamics CRM Tips and Tricks head on to Inogic Blog. If you have any questions on Dynamics CRM or need any help in implementation, customization, upgradation of Dynamics CRM or are looking to get more out of your CRM, feel free to reach us at crm@inogic.com today!

The post Use RetrieveDuplicateRequest in Dynamics CRM appeared first on Inogic Blog.

User Adoption Metrics that matter in your Dynamics CRM

$
0
0

This is a part two of our User Adoption Tracker Series. In Part 1 we saw the features of how User Adoption Tracker can help you track adaptability of your Dynamics CRM.

As we have been talking about adaptability, here in Part 2 lets read more about the Dashboards available in our user adoption tracker for your Dynamics CRM on-premises or online.UAT 2

User Adoption Summary – Basically we have categorized the Dashboard in 4 segments namely

  1. Activities This week – This gives you a graphical view of Activities done by your CRM user this week.
  2. Counts by Action – Again a graphical view of Actions undertaken by the team
  3. Actions by Entity (Today) – Activities undertaken by the Team today.
  4. Revenue by User Adoption – Analyzes the revenue pattern of users vis-à-vis their CRM adaptability.

UAT 2(1)

  That’s not just it, user adoption tracker:

  • Supports tracking on OOB & Custom entities
  • Configure entities and actions to monitor
  • Data is stored in a format that is easy to report on

And a quick recap:

Start with a Trial:
Email us on crm@inogic.com with your CRM version and deployment (on-prem or online) model for your 15 days fully functional trial.

Product Page – http://inogic.com/Product/100/Add-Ons/User-Adoption-Tracker

Presentation – http://www.inogic.com/Assets/WhitePaper/USER ADOPTION TRACKING – PRESENTATION.pptx

What versions of Dynamics CRM does it support?
User Adoption Tracker supports all CRM deployment models namely on-premise, on-line and partner-hosted. It supports Dynamics CRM 2011 and above.

Identify the trigger for an On-load event for Sub-grid in Dynamics CRM

$
0
0

Introduction:

With CRM 2015 SP1, the Client API was extended to allow attaching events to sub-grid to manage the sub-grid data/operations.

The OnLoad event however executes on all of the following operations

  1. Load of parent form.
  2. Save of parent form.
  3. Add a new record in sub-grid
  4. Remove a record from sub-grid
  5. Navigating to prev/next page in sub-grid.

When we register a method on the OnLoad event, it does not indicate in any way which of the above actually fired the onload event.

Workaround to Identifying the operation

We cannot register an event when the record is added/removed from the sub-grid. The only event available is onload, so one way to identify if it was one of the add/remove operations that caused the grid to call the onload event, we can keep a check on the count of records in the grid.

We can register the onload event using the following code

//This function is executed onload event of form
function onLoad() {
    var funtionName = "onLoad";
    try {
        //setting timeout beacuse subgid take some time to load after the form is loaded
        setTimeout(function () {
            //validating to check if the sub grid is present on the form
            if (Xrm.Page != null && Xrm.Page != undefined && Xrm.Page.getControl("contact_subgrid") != null && Xrm.Page.getControl("contact_subgrid") != undefined) {
                //stores the row count of subgrid on load event of CRM Form
                _rowCount = Xrm.Page.getControl("contact_subgrid").getGrid().getTotalRecordCount();
                //registering refreshform function onload event of subgrid
                Xrm.Page.getControl("contact_subgrid").addOnLoad(onGridLoad);
            }
        }, 5000);
    } catch (e) {
        Xrm.Utility.alertDialog(functionName + "Error: " + (e.message || e.description));
    }
}

The rowCount is defined as global variable and is updated here to store the count of records in the grid when the form is loaded initially.

//This function calls the intended function on load of subgrid

function onGridLoad() {
    var functionName = " onGridLoad ";
    var currentRowCount = null;
    try {
        //setting timeout beacuse subgrid take some time to load after the form is loaded
        setTimeout(function () {
            //validating to check if the sub grid is present on the form
            if (Xrm.Page != null && Xrm.Page != undefined && Xrm.Page.getControl("contact_subgrid") != null && Xrm.Page.getControl("contact_subgrid") != undefined) {
                //stores the row count of subgrid on load event of CRM Form
                currentRowCount = Xrm.Page.getControl("contact_subgrid").getGrid().getTotalRecordCount();
                if (currentRowCount > _rowCount) {
                    //call the intended function which we want to call only when records are added to the grid
                    dosomething();
                    //set current row count to the global row count 
                    _rowCount = currentRowCount;
                }
                else if (currentRowCount < _rowCount) {
                    //call the intended function which we want to call only when records are removed from the grid
                    dosomethingelse();
                    //set current row count to the global row count 
                    _rowCount = currentRowCount;
                }
            }
        }, 2000);
    } catch (e) {
        Xrm.Utility.alertDialog(functionName + "Error: " + (e.message || e.description));
    }
}


Conclusion :

In this way we can identify if a record is added or removed from sub grid in Dynamics CRM 2015 SP1.

Before you move on to the next post, check this Inogic Dynamics CRM Solutions – Change the Pace of your Business Decisions.

There's much more, for more Dynamics CRM Tips and Tricks head on to Inogic Blog. If you have any questions on Dynamics CRM or need any help in implementation, customization, upgradation of Dynamics CRM or are looking to get more out of your CRM, feel free to reach us at crm@inogic.com today!

The post Identify the trigger for an On-load event for Sub-grid in Dynamics CRM appeared first on Inogic Blog.

User Adoption Metrics that matter in your Dynamics CRM

$
0
0

This is a part two of our User Adoption Tracker Series. In Part 1 we saw the features of how User Adoption Tracker can help you track adaptability of your Dynamics CRM.

As we have been talking about adaptability, here in Part 2 lets read more about the Dashboards available in our user adoption tracker for your Dynamics CRM on-premises or online.UAT 2

User Adoption Summary – Basically we have categorized the Dashboard in 4 segments namely

  1. Activities This week – This gives you a graphical view of Activities done by your CRM user this week.
  2. Counts by Action – Again a graphical view of Actions undertaken by the team
  3. Actions by Entity (Today) – Activities undertaken by the Team today.
  4. Revenue by User Adoption – Analyzes the revenue pattern of users vis-à-vis their CRM adaptability.

UAT 2(1)

  That’s not just it, user adoption tracker:

  • Supports tracking on OOB & Custom entities
  • Configure entities and actions to monitor
  • Data is stored in a format that is easy to report on

And a quick recap:

Start with a Trial:
Email us on crm@inogic.com with your CRM version and deployment (on-prem or online) model for your 15 days fully functional trial.

Product Page – http://inogic.com/Product/100/Add-Ons/User-Adoption-Tracker

Presentation – http://www.inogic.com/Assets/WhitePaper/USER ADOPTION TRACKING – PRESENTATION.pptx

What versions of Dynamics CRM does it support?
User Adoption Tracker supports all CRM deployment models namely on-premise, on-line and partner-hosted. It supports Dynamics CRM 2011 and above.

Scheduling multiple appointments for the same time and same person

$
0
0

Introduction

Often you would come across scenarios where you would want to schedule more than one appointment for a user for the same time.

In Microsoft Dynamics CRM, if you try to do this most often you would come across the following warning.

Being a warning you can always click on continue and go ahead and successfully schedule the appointment.

But if you were to use the inbuilt scheduling engine of CRM and have it recommend people for an appointment for that time, this user will not be provided as an option if there is already an appointment scheduled for this person for the given time.

So how do I let scheduling engine know that a user is available for more than one appointments?

If you find a way out to do this, you wouldn’t even receive a warning if you were to manually add a user to an appointment. The key to this is setting up User Capacity.

User Capacity

As the word suggests it is a way to tell the system what is the capacity of the user and therefore how many jobs/appointments can this user handle at a time.

Where is this setting?

Unfortunately, hidden in a corner in the User Work hours section.

As you can see in this screenshot, you can specify capacity for each of the work slots that have been defined and you can set different capacity values for each of the slots defined.

Is that it? Yes.

Where else is this capacity used?

When you define a Service, and set up the selection rules for the resource, you can specify the capacity required of the resource to do the service.

Depending on the capacity provided, it would check for the users available capacity before recommending the availability of a user for an appointment for a given time.

By default the capacity for the user is set as 1, so when you schedule one appointment for the user, in the system the available capacity of this user is now 0 and therefore when you try to manually schedule an appointment for the user, you are shown the warning.

If you want multiple appointments to be scheduled, depending on the use case, you can set the user capacity and accordingly allow the system to now handle the scheduling of multiple appointments for the user.

Conclusion

Look into the little gems hidden all around in Dynamics CRM. They might just help you solve some annoying errors/warnings/popups.

There's much more, for more Dynamics CRM Tips and Tricks head on to Inogic Blog. If you have any questions on Dynamics CRM or need any help in implementation, customization, upgradation of Dynamics CRM or are looking to get more out of your CRM, feel free to reach us at crm@inogic.com today!

The post Scheduling multiple appointments for the same time and same person appeared first on Inogic Blog.

Geocode Records in Microsoft Dynamics CRM

$
0
0

In our last post we saw about how to configure Maplytics Default values in your Dynamics CRM. Here in this post we cover geocoding of the records.

Geocoding refers to getting the latitude and longitude i.e the geographic coordinates of your address. Geocordinates help in plotting the addresses accurately on the map.

Maplytics ships along with Geo-coding workflow to geo-code addresses for use with Maplytics application. We ship this workflow configured for Account, Lead and Contact entities. The workflows are configured to execute automatically on creation of records as well as any time any of the address fields are modified.geocode

By referring the sample workflows that are shipped along with the product you can design the Geo-coding workflow for other entities including custom and OOB entities.

Note: To run workflows please make sure the Microsoft Dynamics CRM Asynchronous processing service is running as shown in below screenshot. geocode1Steps to Configure Geo-coding workflows for custom entities and other OOB entities:

  1. Design a new Workflow Process
  2. Choose the desired Entity
  3. Set the Scope as organization

In Start when: Choose Record is created and Record fields change options.

For the Record fields change option make sure to select all of the address fields to ensure the address is geo-coded when any of the address field is changed.

Select the Inogic.Maplytics.Geocoding workflow assembly from the Add step menu.geocode2

Set the address parameter as shown in the below screenshot for the workflow assembly.geocode3In the next step choose Update Entity.

Select the same entity as the one for which the workflow is being configured.

In Update window set the Latitude and Longitude to the output parameters returned by the workflow assembly as shown in the below screenshot.geocode4

Note: If you want to geocode your records in bulk, you can use Batch Geo-coding tool which is shipped along with Maplytics.

Unable to set latitude-longitude? Need help? Contact us on crm@inogic.com.

There's much more, for more Dynamics CRM Tips and Tricks head on to Inogic Blog. If you have any questions on Dynamics CRM or need any help in implementation, customization, upgradation of Dynamics CRM or are looking to get more out of your CRM, feel free to reach us at crm@inogic.com today!

The post Geocode Records in Microsoft Dynamics CRM appeared first on Inogic Blog.


Configure Entity Map in Maplytics™ for Microsoft Dynamics CRM

$
0
0

To enable entities for use with Maplytics you need to configure the entity to provide the information required for the entity records to be plotted on the map. Here in this post will see steps to set up entity map for OOB or custom entities

Maplytics™ ships along with the Entity Maps already configured for the following OOB entities

  1. Account
  2. Contact
  3. Invoice
  4. Leade
  5. Opportunity
  6. Quote
  7. Salesorder

The samples are installed at the time of registering Maplytics license.

Note : Only users with Maplytics Administrator Role can create or modify entity map.

To plot Map for default or any custom entity, first you have to create the entity map for that entity as shown in below screenshot, Go to Settings -> Entity Map -> New Entity Map

Here is a sample entity map for Opportunity entityentity map

Entity Name:

The logical name of the entity. You can get the logical name of the entity from the Customizations view as shown in the screenshot belowentity map1

Link To:

This is the logical name of the lookup attribute from which the address details need to be referred.

This would only be provided if the address details need to be read from a related lookup record of the primary entity. For a primary entity that has address fields for itself like account or contact, this would be left blank.

In case of an entity like Opportunity, usually address details are not provided on the opportunity but is implied to be picked up from the customer associated with the opportunity. The attribute that stores the customer name on opportunity is “customerid” and this is provided in the Link To field.

Attribute Mapping:

In attribute mappings tab, enter the logical name of all the address fields to be used to plot the map. If link to attribute is specified then address attributes should be of that linked entity. Now lets see how toconfigure Tooltip and Grid for these entities.

Maplytics allows you to color code your pushpins, do Proximity Search, and much more. Not tried yet?Evaluate without installation or For a Demo or trial contact us on crm@inogic.com.

There's much more, for more Dynamics CRM Tips and Tricks head on to Inogic Blog. If you have any questions on Dynamics CRM or need any help in implementation, customization, upgradation of Dynamics CRM or are looking to get more out of your CRM, feel free to reach us at crm@inogic.com today!

The post Configure Entity Map in Maplytics™ for Microsoft Dynamics CRM appeared first on Inogic Blog.

Configure tooltips in Maplytics for Microsoft Dynamics CRM

$
0
0

In our last post we saw about how to configure entity map in your Maplytics. One of the parts of configuring the entity map is to define the data that you would like displayed in the tooltip of the pushpin. This post covers setting up the attributes to be displayed.

Tooltips are callouts that pop up and show quick information about the record associated with the pushpin.

Here is how a tooltip shows up for a pushpin in Maplytics.tooltip

Follow these steps to configure your tooltip

  1. Go to Settings -> Entity Map -> Select the Entity Map. This brings up the following entity map form.tooltip1
  2. Scroll to the Fields Mapping section. This section allows for configuring the fields for both the Tooltip as well as the Listing of the search results. For this article we would choose the Tooltip option as shown in the below screenshot.tooltip2
  3. The Record Type will list out the Primary entity name and if the Link To field has been provided then it will also list out the entity associated with the lookup field provided there. You are allowed to include fields from any of the entities listed in the Record Type drop down. Choose the appropriate entity from the Record Type picklist.tooltip3
  1. It will list out all attributes (including custom) from the selected entity. Select the attribute you want to add, after selecting any attribute the attribute is automatically displayed in the Field Label, you can change that label as per your choice. Then click on forward arrow button to add attribute.
  2. Using the Up and Down buttons provided you can design the sequence in which these fields should appear on the tooltip.
  3. After configuring attributes, click on save button to save the changes and preview the results.tooltip4

With Maplytics all your client information is within your Dynamcis CRM and at your tip.

There's much more, for more Dynamics CRM Tips and Tricks head on to Inogic Blog. If you have any questions on Dynamics CRM or need any help in implementation, customization, upgradation of Dynamics CRM or are looking to get more out of your CRM, feel free to reach us at crm@inogic.com today!

The post Configure tooltips in Maplytics for Microsoft Dynamics CRM appeared first on Inogic Blog.

Configure data columns for results listing in Maplytics for Microsoft Dynamics CRM

$
0
0

In our last post we saw how to configure tooltip data. Once you perform search using Maplytics, apart from plotting the results as puspin on the map, it also provides a listing of the records plotted on the map for a quick reference and further filtering options. In this post will walk through the steps to define the data columns to be listed for the search results.

Follow these steps to configure your tooltip

  1. Go to Settings à Entity Map à Select the Entity Map. This brings up the following entity map form.grid
  2. Scroll to the Fields Mapping section. This section allows for configuring the fields for both the Tooltip as well as the Listing of the search results. For this article we would choose the Grid option as shown in the below screenshot.grid1
  3. The Record Type will list out the Primary entity name and if the Link To field has been provided then it will also list out the entity associated with the lookup field provided there. You are allowed to include fields from any of the entities listed in the Record Type drop down. Choose the appropriate entity from the Record Type picklist.grid3
  1. It will list out all attributes (including custom) from the selected entity. Select the attribute you want to add, after selecting any attribute the attribute is automatically displayed in the Field Label, you can change that label as per your choice. Then click on forward arrow button to add attribute.
  2. Using the Up and Down buttons provided you can design the sequence in which these fields should appear on the tooltip.
  3. After configuring attributes, click on save button to save the changes and preview the results.grid4

The columns listed in the grid are filterable. You can click on the column header and apply appropriate filters. Once the filter is applied, the map is auto-refreshed to display the pushpins for the filtered data only.

Another quick way to filter the pushpins plotted is by check/uncheck record in the grid. Unchecking a record will also hide the associated pushpin from the map.

Search results listed in the grid in Maplytics can be saved as a view which can be later use to build marketing list within your Dynamics CRM.

There's much more, for more Dynamics CRM Tips and Tricks head on to Inogic Blog. If you have any questions on Dynamics CRM or need any help in implementation, customization, upgradation of Dynamics CRM or are looking to get more out of your CRM, feel free to reach us at crm@inogic.com today!

The post Configure data columns for results listing in Maplytics for Microsoft Dynamics CRM appeared first on Inogic Blog.


Configure your own Dashboards in Maplytics for Microsoft Dynamics CRM

$
0
0

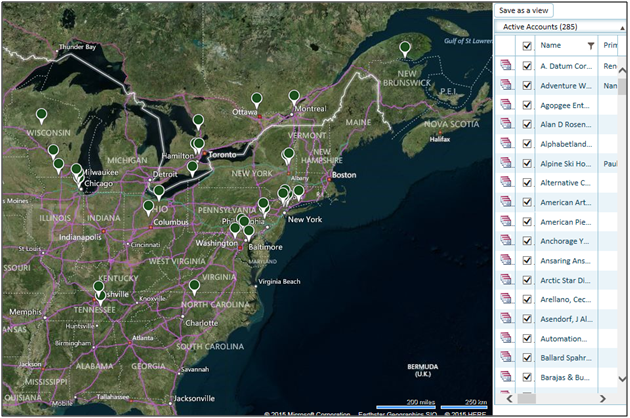
Dashboards are the one of the most used feature of Maplytics-Bing Map Integration for Dynamics CRM. You can design geographical dashboards using components from Maplytics as can be seen in the screenshot below.

Dashboard

Maplytics ships with the following 5 pre-defined Dashboards for various Sales and Service Modules for different user roles.

  1. Maplytics Customer Service Representative Dashboard
  2. Maplytics Overview Dashboard
  3. Maplytics Sales Activity Dashboard
  4. Maplytics Sales Performance Dashboard
  5. Maplytics Service Manager Dashboard

Dashboards are based on the Dashboard views that are configured in Maplytics. In this article we will walk you through the steps to add a Dashboard view and then include the same in a Dashboard.

Steps to Configure Dashboard Views:

Go to Settings -> Dashboard Details -> NewDashboard1

Name:

Unique name for the Dashboard. You will use this name to define the view to be included in the Dashboard.

Entity Name:

Logical Name of entity for which the view is to be configured for. 

Query:

FetchXML query for selecting the data to be plotted on the Map. You can create queries using Advanced Find and download the FetchXML generated and set that here.

When you want to design queries that would read the address information from the related entity make sure to use the alias as “map” in the link clause of the fetch query.

For lookups that are of the type customer, i.e it can either hold an account or contact when linking with the account and contact entity make sure to use the alias “maplyticsacc” and “maplyticscont” respectively. An example of the customer type of lookup would be the “customerid” attribute on the opportunity or case.

Note: Make sure to include address1_latitude and address1_longitude attributes in the query for the map for the record to be plotted on the map.

Category:

The schema name of the attribute to be used for categorization of the result set. The pushpins are color coded based on the attribute defined here. Each unique value of the category would be assigned a different color.

Category is only used if the Map type selected is Detail. For Heat Map representation the value of this field is ignored.

Map Type:

Decide if you would like a Detail Map representation or a Heat Map representation of the result set. Detail Map will plot individual pushpins for the records while Heat map will present a heat map based on the query result.

Mode:

Choose the default mode in which the map should be presented. Choices available are Aerial or Road.

Measure:

This field is used for heat map if you want to show the heat map based on value. The default hear map representation decides the intensity of the heat in a region based on the count of records retrieved for that region. If you wanted the intensity to be calculated instead on the value of the record rather than the count, provide the schema name of the field that should be considered to determine the intensity.
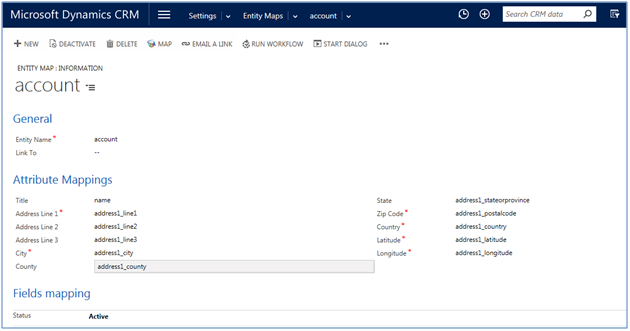
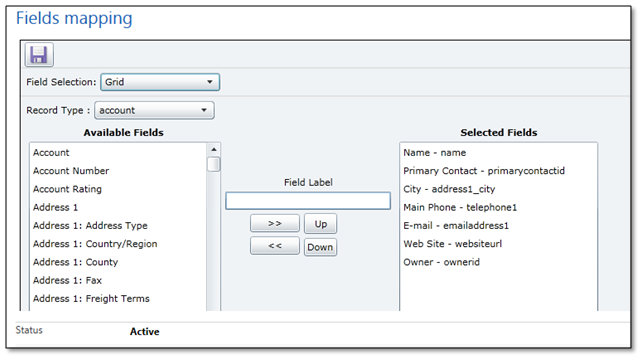
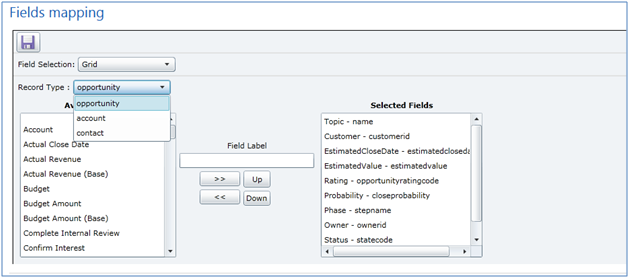
Tooltip Attribute:

Provide the list of attributes that need to be displayed as a tooltip on the pushpins. You can use Fields Mapping UI to configure tooltip attributes.

Note: Make sure that all the attributes you have added for tooltip must be included in the fetchxml. You can view the article here to learn how to configure tooltips.

Note: Tooltips are not displayed for Heat Maps.

Steps to add Maplytics View to Dashboard:

To include the Maplytics component in Dashboard, click on Web Resource from within a Dashboard design  form

Dashboard2

Set the webresource properties as shown below

Dashboard3

Choose “ikl_/Maplytics/Maplytics.Dashboard.html” as the web resource to be used.

You can provide an appropriate name and label to the web resource component.

Provide the name of the Dashboard view to be presented in the web resource in the “Custom Parameter(data)” property of the web resource. If this information is missing or incorrect the map will not show up on the Dashboard.

Save and publish the Dashboard and you are ready to see the map on your dashboard.

No need to switch your screen to search anything on Bing Maps…Maplytics works from within your Dynamics CRM. Check out now.

There's much more, for more Dynamics CRM Tips and Tricks head on to Inogic Blog. If you have any questions on Dynamics CRM or need any help in implementation, customization, upgradation of Dynamics CRM or are looking to get more out of your CRM, feel free to reach us at crm@inogic.com today!

The post Configure your own Dashboards in Maplytics for Microsoft Dynamics CRM appeared first on Inogic Blog.

RsProcessingAborted Error for Dynamics CRM Custom Reports

$
0
0

Introduction:

We developed a custom SSRS report that is working just fine on the dev environment, which is a single box with CRM and SQL installed on the same machine. But when it was moved to production where CRM is installed on a separate box than the SQL server, it would not work and simple throw the “rsProcessingAborted” error as shown below.RsProcessing

All OOB report were working  just fine and it was showing this error for any custom report deployed on this CRM.

Resolution:

Looking at this error we did not get the exact cause of this issue. One of the solutions that worked previously is to open the 808 port, another is to ensure the fields referred in the query exist in the specified entity. But both of these were just fine in this case. To check the exact error look for the look files which can usually be found at the following location

<SQL INSTALLDIR>\MSRS11.MSSQLSERVER\Reporting Services\LogFiles.RsProcessing1

When we checked the error log file and found the exact error. We are getting following error in log file.

To resolve this issue you need to run SETSPN command. Below is syntax for this command.

setspn –a HTTP/NETBIOSNAME DOMAIN\SERVICEACCOUNT

1. NETBIOSNAME: You will get this name from IIS where your CRM is running as shown in   below  screenshot.

2. SERVICEACCOUNT: Use account under which CRMAppPool is running.RsProcessing3

Here is our final command that we run from command prompt.

setspn –a HTTP/AD7  adventure7\administrator

Once we execute the command then after our issue is resolved and we able to run the custom report successfully.

Conclusion:

To resolve the rsProcessingAborted  issue of custom reports, look into the log files to find out the actual error message. Most often than not, especially if SQL Server and CRM Server are 2 different servers you need to Kerberos by using the setspn command.

There's much more, for more Dynamics CRM Tips and Tricks head on to Inogic Blog. If you have any questions on Dynamics CRM or need any help in implementation, customization, upgradation of Dynamics CRM or are looking to get more out of your CRM, feel free to reach us at crm@inogic.com today!

The post RsProcessingAborted Error for Dynamics CRM Custom Reports appeared first on Inogic Blog.

Error Upgrading CRM 2011 On-Premises to CRM 2013 On-Premises

$
0
0

We were upgrading Dynamics CRM 2011 On-Premises to CRM 2013 On-Premises. As every CRM developer would be aware that CRM upgrades are never a smooth sailing ride.

We stumbled upon an error while importing organization in Deployment Manager.

The error we came across was,

Violation of UNIQUE KEY constraint ‘UQ_LocalizedLabelCheck’. Cannot insert duplicate key in object ‘MetadataSchema.LocalizedLabel’. The duplicate key value is (e23fb506-2341-db11-898a-0007e9e17ebd, DisplayName, 1033, Jan  1 1900 12:00AM, 0).

Initially, we thought it would be the case of multiple languages in CRM 2011, but after investigating CRM 2011, it was not the case.

Once of the articles suggested this was planned to be addressed in an upcoming rollup. We decided to upgrade our CRM 2013 to the latest Rollup available i.e., Update Rollup 3.

Once it was upgraded to the latest rollup, importing the organization through the deployment manager, we still came across the same error.

The next step was to then upgrade CRM 2013 to SP1 and then retried the importing process.

BINGO!!! it worked.

Conclusion:

Before upgrades, ensure that you have the latest rollup installed for the intermediary CRM versions to ensure the upgrade goes through smoothly.

You may also like to see : User Adoption Metrics that matter in your Dynamics CRM

There's much more, for more Dynamics CRM Tips and Tricks head on to Inogic Blog. If you have any questions on Dynamics CRM or need any help in implementation, customization, upgradation of Dynamics CRM or are looking to get more out of your CRM, feel free to reach us at crm@inogic.com today!

The post Error Upgrading CRM 2011 On-Premises to CRM 2013 On-Premises appeared first on Inogic Blog.

Design Auto Complete Text controls in Dynamics CRM 2016

$
0
0

Introduction:

On Dec 1st Microsoft released another great version of Dynamics CRM – CRM 2016 that has loads of new features and not to forget developer enhancements too.

One of the developer enhancements added to Dynamics CRM 2016 is “Auto Complete” which allows us to provide auto complete feature for the single line text fields.

Configuring a control for Auto-Complete

Let us take an example to provide an auto complete list of cities for the City field on an entity.

In the above source code, we have used three newly added functions in CRM 2016.

  1. showAutoComplete()
  2. hideAutoComplete()
  3. addOnKeyPress()

1. showAutoComplete()

This function is use to show the drop down list based on the string entered by the user in the text box. In our example, if you type “A” in the text box then it will display all the cities starting with “A” as shown below.20162. hideAutoComplete()

This function is use to hide the hide the drop down list. Or else you can simply click anywhere on the form then also this drop down list will get hide.

3. addOnKeyPress()

This function is called whenever we type any character in the text box.

Xrm.Page.getControl(“address1_city”).addOnKeyPress(keyPressFcn);

So to make this Auto complete functionality work, we need to call the function on the form load as shown below. In this example, we have called “ListOfCities” function on form load as shown below.

2016-1

Conclusion:

With auto-complete feature becoming a part of our daily use on the web, this now helps us provide a quick lookup to possible allowed values, without requiring the field to be converted into a Lookup.

Maplytics InfoCentre – Bing Maps Integration for Microsoft Dynamics CRM.

There's much more, for more Dynamics CRM Tips and Tricks head on to Inogic Blog. If you have any questions on Dynamics CRM or need any help in implementation, customization, upgradation of Dynamics CRM or are looking to get more out of your CRM, feel free to reach us at crm@inogic.com today!

The post Design Auto Complete Text controls in Dynamics CRM 2016 appeared first on Inogic Blog.


Maplytics InfoCentre Launched – User guides, ebooks are Passé

$
0
0

Maplytics – One of the most comprehensive maps solution integrating your Microsoft Dynamics CRM on-premises or online installation with Bing Maps.

First it was printed hard copies then it moved to e-books and now in this age of connected world it’s all about being always accessible on the Web for anyone at anytime. No installation or downloads or login required. 

map

Today we launch Maplytics InfoCenter. Your online guide to one of the most comprehensive Bing Maps integration solution for Microsoft Dynamics CRM. InfoCentre would be the goto page for any information you may need relating to the product or even to learn more about a feature and how to use it.

We have initiated with some of most asked questions we come across like :-

This is just the start; we are in the process to enhance this portfolio to other areas like navigation, features, technical FAQ’s, videos etc.

Everything in Maplytics is now a search away at our Maplytics InfoCentre..

Welcome to our new world!

There's much more, for more Dynamics CRM Tips and Tricks head on to Inogic Blog. If you have any questions on Dynamics CRM or need any help in implementation, customization, upgradation of Dynamics CRM or are looking to get more out of your CRM, feel free to reach us at crm@inogic.com today!

The post Maplytics InfoCentre Launched – User guides, ebooks are Passé appeared first on Inogic Blog.

Design Auto Complete Text controls in Dynamics CRM 2016

$
0
0

Introduction:

On Dec 1st Microsoft released another great version of Dynamics CRM – CRM 2016 that has loads of new features and not to forget developer enhancements too.

One of the developer enhancements added to Dynamics CRM 2016 is “Auto Complete” which allows us to provide auto complete feature for the single line text fields.

Configuring a control for Auto-Complete

Let us take an example to provide an auto complete list of cities for the City field on an entity.

In the above source code, we have used three newly added functions in CRM 2016.

  1. showAutoComplete()
  2. hideAutoComplete()
  3. addOnKeyPress()

1. showAutoComplete()

This function is use to show the drop down list based on the string entered by the user in the text box. In our example, if you type “A” in the text box then it will display all the cities starting with “A” as shown below.20162. hideAutoComplete()

This function is use to hide the hide the drop down list. Or else you can simply click anywhere on the form then also this drop down list will get hide.

3. addOnKeyPress()

This function is called whenever we type any character in the text box.

Xrm.Page.getControl(“address1_city”).addOnKeyPress(keyPressFcn);

So to make this Auto complete functionality work, we need to call the function on the form load as shown below. In this example, we have called “ListOfCities” function on form load as shown below.

2016-1

Conclusion:

With auto-complete feature becoming a part of our daily use on the web, this now helps us provide a quick lookup to possible allowed values, without requiring the field to be converted into a Lookup.

Maplytics InfoCentre – Bing Maps Integration for Microsoft Dynamics CRM.

There's much more, for more Dynamics CRM Tips and Tricks head on to Inogic Blog. If you have any questions on Dynamics CRM or need any help in implementation, customization, upgradation of Dynamics CRM or are looking to get more out of your CRM, feel free to reach us at crm@inogic.com today!

The post Design Auto Complete Text controls in Dynamics CRM 2016 appeared first on Inogic Blog.

No need to purchase Bing Maps Licenses for Dynamics CRM

$
0
0

With Microsoft Dynamics CRM and Bing Maps, organizations can visualize, understand and interpret their CRM data within a location-based context to help make smarter business decisions. Bing Maps License is already part of Maplytics so no need to purchase it separately.map

Bing Maps License for CRM On-Premises: Microsoft introduced the Bing Maps controls for OOB entities with address fields. However, to get the Bing Maps control to work, you are required to provide the Bing Maps Key. Bing Maps services is not free to be availed in an internal use application and therefore requires you to subscribe to Bing Maps services to get the Bing Map control to work.

The question then that comes to your mind is the type of Bing Maps license required for your on premises deployment of Dynamics CRM.

Follow this link http://www.microsoft.com/maps/Licensing/licensing.aspx answer the questions asked here to chose which type of license you need.

Bing Maps License for CRM Online: With CRM Online you do not need to provide the Bing Maps Key.

Refer this link to learn how you can manage Bing Maps for your Dynamics CRM organizationhttps://technet.microsoft.com/en-us/library/dn659862.aspx

The question is Why pay for just Bing Maps Licenses when you can get a Comprehensive Maps solutionfor Microsoft Dynamics CRM which includes Bing Maps Licenses as well.

  • Bing Maps Licenses Already Included – So why not give that extra analytical power to your Sales Team, Marketing and Managers.
  • Supports Both Dynamics CRM On-premises as well as Online – Maplytics is well supported on all CRM deployment models namely on-premises, Online and partner-hosted. It supports Dynamics CRM 2011 and above. (Do you know Maplytics has been a trusted solution since CRM v4, we don’t support that version now though!)
  • Works from within Dynamics CRM – It has something for everyone route planning and optimizing your routes for your Sales Team, build a marketing list for your Marketing team using Proximity Search while the Managers and in fact all would love to see the Maplytics Dashboards with their daily planning and analytics now on maps within your Dynamics CRM.

Btw, everything in Maplytics is now a search away at our Maplytics InfoCentre. For a free trial or a live demo get in touch with us on crm@inogic.com.

There's much more, for more Dynamics CRM Tips and Tricks head on to Inogic Blog. If you have any questions on Dynamics CRM or need any help in implementation, customization, upgradation of Dynamics CRM or are looking to get more out of your CRM, feel free to reach us at crm@inogic.com today!

The post No need to purchase Bing Maps Licenses for Dynamics CRM appeared first on Inogic Blog.

Execute fetchxml using Web API in Dynamics CRM 2016

$
0
0

Introduction

Microsoft Dynamics CRM Online 2016 Update and Microsoft Dynamics CRM 2016 (on-premises) introduced new concept called The Web API. It can be used across a wide variety of programming languages, platforms, and devices. The Web API implements the OData (Open Data Protocol), version 4.0, an OASIS standard for building and consuming Restful APIs.

Basically Web API is advanced version of old OData. With the help of Web API you can perform following operation.

  • Create
  • Update
  • Delete
  • Retrieve
  • Retrieve multiple( using odata query and fetch)
  • Execute Web API functions
  • Execute Web API Actions
  • Execute Web API Query Functions

Walkthrough

As earlier version of Odata does not support to execute the fetchxml. To execute fetchxml you have to use SOAP. Now using Web API you can execute the fetchxml.

Below is example that used to execute the fetchxml.

First define your fetchxml and execute using Web API using following code.

If you want retrieve formatted value and data about lookup properties. You have add following line in request header.

Below is the entire code.

// This function is used to retrieve records using fetchxml
            fetch: function (originalFetch, entitySetName, retrieveUsingFetchSuccess, retrieveUsingFetchError) {

                var fetch = null;
                try {
                    //create the fetch
                    fetch = ["<fetch mapping='logical'>", originalFetch, "</fetch>"].join("");
                    //encode the fetchxml
                    fetch = escape(fetch);
                    //create AJAX request
                    $.ajax({
                        type: "GET",
                        contentType: "application/json; charset=utf-8",
                        datatype: "json",
                        //async: false,
                        url: this.getWebAPIPath() + entitySetName + "?fetchXml=" + fetch,
                        beforeSend: function (xhr) {
                            //Specifying this header ensures that the results will be returned as JSON.
                            xhr.setRequestHeader("Accept", "application/json");
                            xhr.setRequestHeader("Content-Type", "application/json; odata.metadata=minimal");
                            xhr.setRequestHeader("OData-MaxVersion", "4.0");
                            xhr.setRequestHeader("OData-Version", "4.0");
                            ////xhr.setRequestHeader("Prefer", "odata.include-annotations=OData.Community.Display.V1.FormattedValue");
                            xhr.setRequestHeader("Prefer", "odata.include-annotations=*");
                        },
                        success: function (data, textStatus, xhr) {

                            if (data != null) {

                                var entityObj = [];                              
                                var pagingInfo = null;

                                //Check if results contains cookies 
                                //if yes then retrieve next set of records
                                if (data["@Microsoft.Dynamics.CRM.fetchxmlpagingcookie"] != null) {

                                    //get the pagingcookie
                                    pagingInfo = Inogic.ApiLib.getPagingCookie(data["@Microsoft.Dynamics.CRM.fetchxmlpagingcookie"]);
                                
                                    //call this function create json object
                                    Inogic.ApiLib.createJsonObject(data, entityObj);

                                    //call this to retrieve more records
                                    Inogic.ApiLib.fetchMore(originalFetch, entitySetName, retrieveUsingFetchSucess, retrieveUsingFetchError,pagingInfo.pageCokies,pagingInfo.pageNumber, entityObj);

                                }
                            }
                                //get the results and create json object
                            else {

                                var entityObj = [];

                                // This function is used to create the json object
                                Inogic.ApiLib.createJsonObject(data, entityObj);

                                //call successcallback
                                retrieveUsingFetchSuccess(entityObj);
                            }
                        },
                        error: function (xhr, textStatus, errorThrown) {
                            retrieveUsingFetchError(Inogic.ApiLib.errorHandler(xhr));
                        }
                    });
                } catch (e) {
                    throw new Error(e);
                }

            };

Web API return 5000 records at time, to retrieve more than 5000 records you have to use paging cookie. To identify more records you can use @Microsoft.Dynamics.CRM.fetchxmlpagingcookie. If query has more records then @Microsoft.Dynamics.CRM.fetchxmlpagingcookie contains value. The format of it given below

From above pagingcookie  you can extract the cookie part & pagenumber and add this to fetchxml  and pass this updated fetchxml to retrieve more records.

When you execute fetch it return data in json format.

To get the value of from result use following code.

1. String/Number etc

var name = data.value[0].name;

2. Lookup(Entity Reference)

id: data.value[0]._primarycontactid_value,

name: data.value[0]["_primarycontactid_value@OData.Community.Display.V1.FormattedValue"],

logicalname: data.value[0]["_primarycontactid_value@Microsoft.Dynamics.CRM.lookuplogicalname"],

3. Option set/Money/DataTime/Boolean

value: data.value[0].revenue

formattedValue :data.value[0]["revenue@OData.Community.Display.V1.FormattedValue"]

Conclusion

In this way, We can use Web API to execute fetchxml instead of SOAP.

Before you move on to the next post, check our Maplytics InfoCenter.

There's much more, for more Dynamics CRM Tips and Tricks head on to Inogic Blog. If you have any questions on Dynamics CRM or need any help in implementation, customization, upgradation of Dynamics CRM or are looking to get more out of your CRM, feel free to reach us at crm@inogic.com today!

The post Execute fetchxml using Web API in Dynamics CRM 2016 appeared first on Inogic Blog.

No need to purchase Bing Maps Licenses for Dynamics CRM

$
0
0

With Microsoft Dynamics CRM and Bing Maps, organizations can visualize, understand and interpret their CRM data within a location-based context to help make smarter business decisions. Bing Maps License is already part of Maplytics so no need to purchase it separately.map

Bing Maps License for CRM On-Premises: Microsoft introduced the Bing Maps controls for OOB entities with address fields. However, to get the Bing Maps control to work, you are required to provide the Bing Maps Key. Bing Maps services is not free to be availed in an internal use application and therefore requires you to subscribe to Bing Maps services to get the Bing Map control to work.

The question then that comes to your mind is the type of Bing Maps license required for your on premises deployment of Dynamics CRM.

Follow this link http://www.microsoft.com/maps/Licensing/licensing.aspx answer the questions asked here to chose which type of license you need.

Bing Maps License for CRM Online: With CRM Online you do not need to provide the Bing Maps Key.

Refer this link to learn how you can manage Bing Maps for your Dynamics CRM organizationhttps://technet.microsoft.com/en-us/library/dn659862.aspx

The question is Why pay for just Bing Maps Licenses when you can get a Comprehensive Maps solutionfor Microsoft Dynamics CRM which includes Bing Maps Licenses as well.

  • Bing Maps Licenses Already Included – So why not give that extra analytical power to your Sales Team, Marketing and Managers.
  • Supports Both Dynamics CRM On-premises as well as Online – Maplytics is well supported on all CRM deployment models namely on-premises, Online and partner-hosted. It supports Dynamics CRM 2011 and above. (Do you know Maplytics has been a trusted solution since CRM v4, we don’t support that version now though!)
  • Works from within Dynamics CRM – It has something for everyone route planning and optimizing your routes for your Sales Team, build a marketing list for your Marketing team using Proximity Search while the Managers and in fact all would love to see the Maplytics Dashboards with their daily planning and analytics now on maps within your Dynamics CRM.

Btw, everything in Maplytics is now a search away at our Maplytics InfoCentre. For a free trial or a live demo get in touch with us on crm@inogic.com.

There's much more, for more Dynamics CRM Tips and Tricks head on to Inogic Blog. If you have any questions on Dynamics CRM or need any help in implementation, customization, upgradation of Dynamics CRM or are looking to get more out of your CRM, feel free to reach us at crm@inogic.com today!

The post No need to purchase Bing Maps Licenses for Dynamics CRM appeared first on Inogic Blog.

Viewing all 3363 articles
Browse latest View live


<script src="https://jsc.adskeeper.com/r/s/rssing.com.1596347.js" async> </script>