Introduction:
In our last blog, we spoke about how to move attachments from Notes to SharePoint.
In this blog, our focus would be to discuss on moving Email Attachments and leaving a link back in Notes for the user to locate the attachments.
Let’s consider a scenario, a service based company who get a lot of emails from clients with Attachments in almost all of them. The Attachments are taking up a lot of space in their Dynamics 365 storage. They want a mechanism in place to move those attachments in a timely manner over to the SharePoint with a link back to the SharePoint path for the Service Reps to access in the need of the hour. And, not to forget majority of those emails are regarding the Case entity.
Without further much ado, let’s delve into the steps we need to configure on Microsoft Flow to make this happen.
At the heart of everything, like the requirement is, “The attachments should be moved over in a timely fashion.” We need to configure recurring Microsoft Flow.
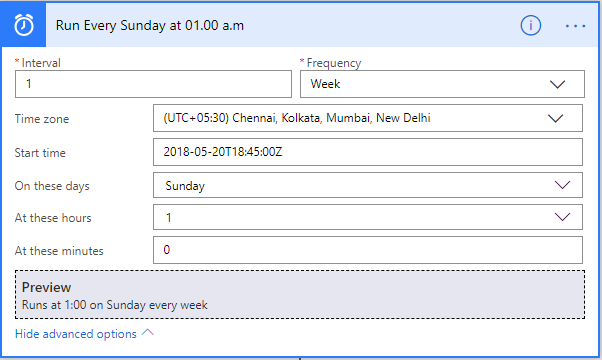
Steps for setting up Recurrence
Step 1:
Select the “Schedule – Recurrence” Trigger.

Step 2:
Configure the recurrence Interval.
Now, let’s configure the extraction steps.
Steps for moving Email Attachments
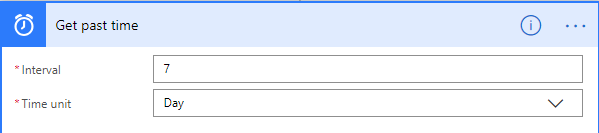
Step 1:
After setting the recurrence, next step is to get the past time. This is for the reason that, we’ll be moving all the emails that have entered Dynamics 365 over the last week.
For this choose the Action as “Date Time – Get Past Time”. (Where Date Time is the connector and Get Past Time is the Action)
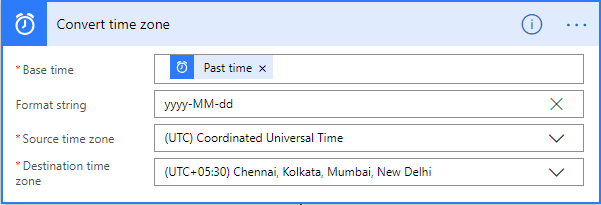
Step 2:
After this convert the time that has been obtained in the above step to the local time.
For this choose the Action as “Date Time – Convert time zone”.
Step 3:
Retrieve all the Emails, since last Sunday.
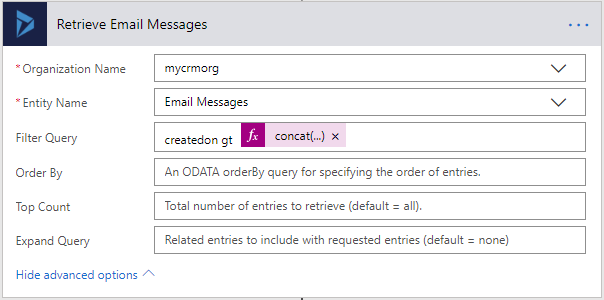
In the Filter Query, we have concatenated the Time part to the Date obtained in the previous step.
Formula Used: concat(body(‘Convert_time_zone’),’T00:00:00Z’)
Note: The time format that we are using here for the comparison is in UTC format.
Step 4:
Now, loop through all the Email Messages that we have retrieved.
For this choose the “Add an apply to each” step.
Step 5:
Now, add the Condition step.
In this step begin with checking the condition as shown below.
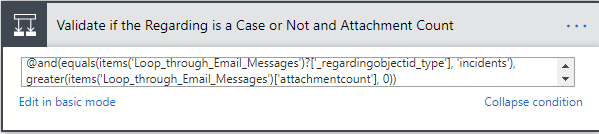
Formula Used: @and(equals(items(‘Loop_through_Email_Messages’)?['_regardingobjectid_type'], ‘incidents’), greater(items(‘Loop_through_Email_Messages’)['attachmentcount'], 0))
Note:
- Since, the Basic Mode only allow one condition to verify, we need to use the advance mode to check multiple condition.
- We would only be proceeding if the Email is regarding a Case entity and the Email has attachments.
Step 6:
In the true part of the condition, Retrieve the Case by using “Dynamics 365 – Get record” action. This is needed in order for us to create the folder in SharePoint.
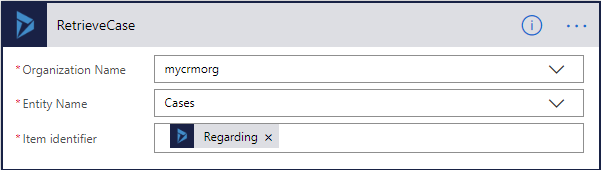
Item identifier: The Regarding selected above is from the retrieved Email step.
Note:
- In this blog, we are considering the basic scenario where all the Case records have the Document Location pre-created in Dynamics 365 CE. And, the format of the folder in SharePoint is “CaseTitle_CaseGUID”.
- For the complex scenarios like the Document Location could be custom or the Document Location doesn’t exist in Dynamics 365 CE please referMove Dynamics 365 Attachments to SharePoint using Microsoft Flow
Step 7:
Next, retrieve Activity Mime Attachments associated with the Email.
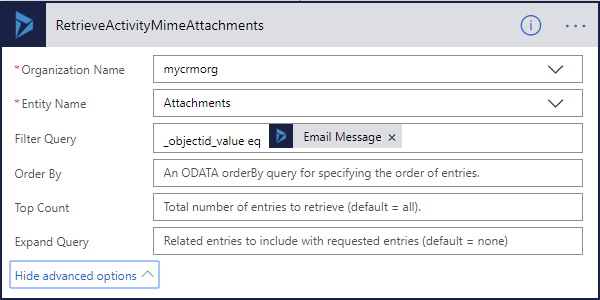
Filter Query: Email Message parameter is the Email GUID. This is available throughout all the steps.
Note:
There are two Attachments entities available for the selection.
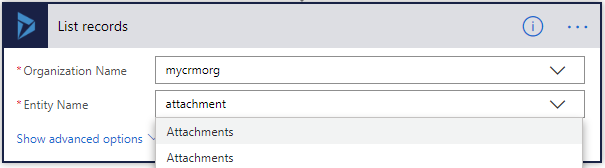
The first one is the Attachment entity.
The second one is the Activity Mime Attachment entity.
- For this step, we need to select the second in the list.
Step 8:
Retrieve Attachment related to the Activity Mime Attachment for the Body and File Name.
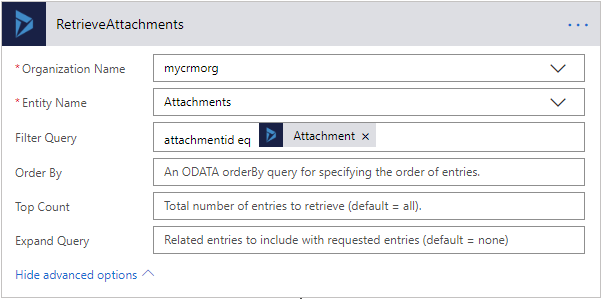
Entity Name: Attachment entity is the first one from the list.
Filter Query: Dynamic Value “Attachment” is the Attachment Id that we get when we retrieve the Activity Mime Attachment. The usage of Dynamics Value “Attachment”, would enclose the entire retrieve “Attachment” step in an “Add an apply for each” loop.
Step 9:
Here comes the final step of creating a file in SharePoint.
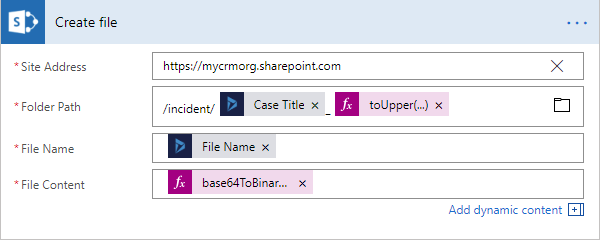
Folder Path: /incident/Case Title (obtained from RetrieveCase step)_Case GUID(obtained from RetrieveCase step)
Formula used for Case GUID: toUpper(replace(body(‘RetrieveCase’)?['incidentid'], ‘-‘,”))
Note: Since, in this example we are only considering Emails related to case therefore the hard-coded incident in the path.
File Name: File Name (Obtained from RetrieveAttachment step)
File Content: Body (Obtained from RetrieveAttachment step)
Formula used for File Content: base64ToBinary(items(‘LoopThroughAttachments’)?['body'])
Step 10:
Create a Notes record against the Email for the reference of SharePoint path.
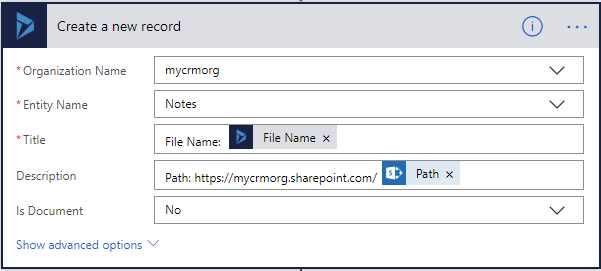
Dynamics Value Path is obtained from the Create File step.
Step 11:
Finally, delete the Activity Mime Attachment.
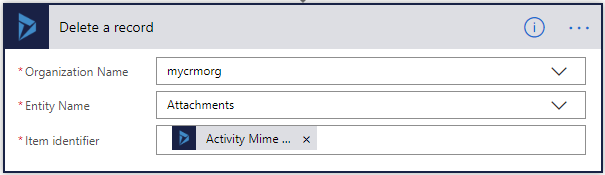
Entity Name: The Attachment entity selected here is the second one from the list.
Item Identifier: Activity Mime Attachment Id obtained from the RetrieveActivityMimeAttachment step.
Conclusion:
Using the simple steps described above the user can step up recurring Microsoft Flow for moving Email Attachment from Dynamics 365 to SharePoint.