Quantcast
Channel: Sam's Activities
Viewing all 3363 articles
Browse latest View live

A Tip while Working with Field Level Security

$
0
0

Recently we came across a situation. We had a workflow in which we used a field which had field level security enabled on it. There was a custom field called “Credit Amount” that existed on the Account and had a field security enabled on it.

The workflow in which we were using this field checked a condition whether the field Credit Amount contained value in it. You can see in the below screen that the workflow was also set to execute under a logged in user’s context.

Workflow

Now, the problem was that when the workflow was executed, it was not performing its operations. Since the Credit Amount field was a secured field and the user who was running this workflow did not have the privilege to read the field value, while checking the value of this field condition in workflow, it always returned NULL even if there was an existing value in this field. Due to this the workflow did not meet with condition and perform the operations. To overcome this situation, we simply modified the workflow to execute it as the OWNER of the workflow.

Workflow

So before using fields in the workflow conditions, please check if the field has field security enabled on it or the workflow should run under the user who has appropriate security role.

Hope this helps!


Introduction of Rollup Fields in CRM 2015

$
0
0

Among the many new features added in Dynamics CRM 2015, Rollup Fields is one of the interesting new feature which provides a way to perform a record level aggregation from child records to its parent record. This avoids plug-in development and can be easily achieved by end users through simple setup and settings itself without any code involved.

Let’s take an example to explore implementation and working of rollup fields. Suppose we want to show total count of all the active contacts associated with an active Account and its Child Accounts on Account form.

Rollup field setup:

To achieve this we will first start with creating new Rollup field for Account as shown below:

Account Rollup Field

Here you can see that the field type which we have selected is of type “Rollup” and the data type which we have selected is of type “Whole Number”. The Data Type of the Rollup field must match the Data Type of the field for which we want to calculate the rollup. So if we want to show rollup of a field for Contact on Account form then the data type of rollup field must match the data type of the field for which we want to calculate rollup.

Also, you can see the “Edit” button besides “Rollup” selected Field Type. Whenever we select field type as “Rollup”, Edit button appears next to the Field Type and that brings up one editor screen which is similar to the “Business Rules” screen. Please refer the below screen:

Rollup Field Editor

Here we can specify the filters, conditions and aggregations which will be applied to the rollup field. The details are explained below,

  1. The source entity which is taken by default to be the entity for which the rollup field is created. In our example it is “Account” entity hence the “Source” is by default “Account”
  2. Use Hierarchy can be set to Yes/No for utilizing parent-child relationship. In our example we want to get aggregation for all Child Accounts of an Account hence we have set it to “Yes”
  3. We can apply filters for source entity using the “Filters” option where we can specify the conditions to apply. In our example we have specified the condition that the Account status needs to be “Active” so rollup happens for active records only.
  4. When we want to get aggregation of related entity data in our rollup then we specify the “Related Entity”. In our example since we want to show total count of all the active contacts present for an Account and its Child Accounts, we have selected “Contacts (Company Name)” as the “Related” entity.
  5. If we want to apply filters for related entity then we can do that by adding filter conditions in “Related Entity”. In our example since we want to show total count of all the active contactspresent for an Account and its Child Accounts we have added filter condition to check if “Status” equals “Active” for related opportunities
  6. And finally we specify the aggregation function which we want to apply and for which field. In our example since we want to show all active Contacts for an Account,  we have selected the aggregate function as “Count”.

User Interface:

The Rollup Field that we just created will be seen on the “Source Entity” form i.e. account form:

Total Contacts Rollup Field

So the total Contacts for a particular Account will be calculated and shown in this “Total Contacts” Rollup field for that Account . If the Account has Child Accounts then the total of Contacts for that Account along with  its Child Account’s Contacts will be calculated and shown in this “Total Contacts” Rollup field for that Account.

Rollup fields are read only. On this Rollup field you can see the “Refresh” icon attached to the Rollup field. Since rollup operates asynchronously, it is calculated on hourly basis. But we can also self-trigger the rollup field calculation by hitting this “Refresh” icon and perform the re-calculation.

Developer Notes:

Each rollup attribute for an entity has two supporting attributes for the rollup attribute which automatically gets created when a rollup field is created:

  • <attribute SchemaName>_Date: DateTime – When the rollup was last calculated
  • <attribute SchemaName>_State: Integer – The state of the rollup calculation

Following are the State values:

0 – NotCalculated: Attribute value is yet to be calculated

1 – Calculated: Attribute value has been calculated per the last update time in <attribute SchemaName>_Date attribute

2 – OverflowError: Attribute value calculation lead to overflow error

3 – OtherError: Attribute value calculation failed due to an internal error, next run of calculation job will likely fix it

4 – RetryLimitExceeded: Attribute value calculation failed because the maximum number of retry attempts to calculate the value were exceeded likely due to high number of concurrency and locking conflicts

5 – HierarchicalRecursionLimitReached: Attribute value calculation failed because maximum hierarchy depth limit for calculation was reached

6 – LoopDetected: Attribute value calculation failed because a recursive loop was detected in the hierarchy of the record

Request/Response Messages provided for Rollup Field calculation:

Developers can calculate a rollup attribute value on demand using “CalculateRollupField” message which is supported by Rollup attributes.

Request/ResponseMembers
CalculateRollupFieldRequestTarget: EntityReference for the record.FieldName: String representing the logical name of the attribute.
CalculateRollupFieldResponseEntity: Entity containing the rollup attribute and the supporting<attribute SchemaName>_Date and <attribute SchemaName>_Stateattributes.

Supported Data types:

Rollup field is not supported by all data types and only following data types support rollup field:

  1. Whole Number
  2. Decimal
  3. Currency
  4. Date & Time

Limitations:

  1. Rollup works on 1:N relationship. They don’t work on N-N relationship
  2. Rollup field cannot use another Calculated or Rollup field for rollup
  3. For Complex field calculations we need to still rely on plug-in or java script
  4. Rollup fields don’t raise the event to trigger workflows
  5. We can have maximum of 100 rollup fields within an organization and each entity can have no more than 10 rollup fields.

Simplified Process to Add New Records on the Fly in Dynamics CRM 2015

$
0
0

Introduction:

Quick Create Forms were introduced in CRM 2013 to help create records of core entities in a simpler way from anywhere in the system. It actually was not that simpler when we wanted to create subsequent records for the lookup field available on current Quick Create form.

Let’s take a look at how we used to create a new subsequent record from current Quick Create form.

CRM 2013:

Consider we are creating a contact record using quick create. We want to set the company name for it. So in CRM 2013 it would look as below:

Quick Create Record

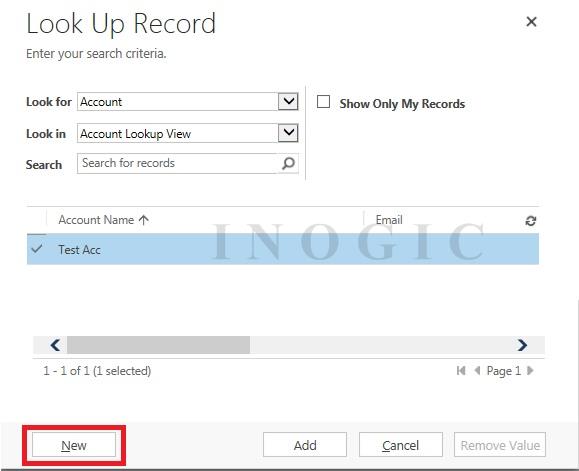
Now, suppose we want to create a new Account for this contact, then we would have to click on Look up More records dropdown, & then click on “New” as highlighted below.

Look Up Record

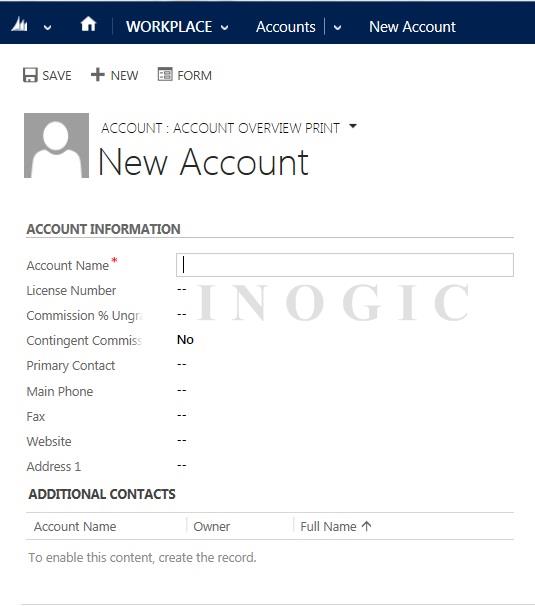
On clicking New it would pop out another screen displaying the default form for Account Entity as below:

Account Entity form

As we can see default form is popped out. We need to enter the entire necessary details and save and close the form. This was quite tedious process as we actually were not able to create records quickly.

CRM 2015:

Whereas with release of CRM 2015, the same process can be done with more ease thereby justifying the term Quick Create.

So here comes the term “Nested Quick Create”. As the name suggests there would be subsequent Quick Create forms inside Quick Create form. Let’s go through the same previous example in CRM 2015.

Quick Create form

As we can see we have the “New” option just at the right corner of the Look Up More Records dropdown which will get the Quick Create form of Account instead of the default form that was seen in CRM 2013.

Quick Create Account form

Now  if we again select “New” for the Primary Contact lookup or any other lookup for current Account record, then it would again display subsequent Quick Create form of Contact/ respective entity as below:

Quick Create Contact form

Now, as we have understood Nested Quick Create forms the next question that would strike us would be till what extent we could do this? So the limit for this nested Quick Create Forms is 10.

After 10 the “New” Option disappears from the drop down.

Nested Quick Create Form

This new feature will definitely save your time in creating core records in your CRM implementation.

Inogic at Convergence 2015 – Time To Take Your Business Ahead

$
0
0

Microsoft’s biggest event– the Convergence conference is returning once again this year to the Georgia World Congress Center, Atlanta, USA from 16th-19th March. It gives the attendees an opportunity to learn something new, create business relationships and explore the true potential of Microsoft Dynamics solutions. Its main purpose is to provide the attendees a platform to ask questions, troubleshoot problems and have relevant discussion regarding the products and solutions for Dynamics CRM. As always, Convergence features top keynote speakers, and this year will be no different. The presence of the newly created CEO of Microsoft Satya Nadella and executive VP of Microsoft Business Solutions Group, Kirill Tatarinov has created a lot of buzz around this year’s Convergence.

Convergence Booth Number

Microsoft Convergence                                Register Now                               Agenda 2015

What to look forward at Convergence?

  1. Sessions presented by the Product group themselves. Get to know more about the product and most often hear first-hand the first time announcements made none other by CRM team at the CRM Keynote.
  2. Case studies presented by Customers using the Dynamics Product sharing their experiences and benefits they derive off the product.
  3. Free Technical support. Yes you can get your Technical issues sorted by the support staff at the booth exclusively for this purpose.
  4. Focus group round tables where you can discuss/share your ideas with other like-minded people in the same implementation setup.
  5. Ask the MVPs, a Q n A session organized by all the MVP in attendance at Convergence where you can have all of your queries answered.

Plan

There is just so much to do at Convergence that you can often end up missing sessions that you so wanted to attend.

As the convergence date approaches, you would have the schedule builder tool up on the site, should help you plan your itinerary. Most sessions are repeated across the three days so that you can easily catch up on them.

Schedule some time to spend on the Expo Floor. It’s a huge place with a lot partners presenting their solutions. If you are looking for a particular solution, you might as well look up the exhibitor guide to make a note of all the booths you would like to attend.

Partners are happy to present a demo of their solution so make sure you have enough time to review the demos of most partners.

Inogic Will Be At Booth #1751: See You There!

Are you attending Convergence this year? If yes, then do visit us at our booth to learn, share and understand all about Microsoft Dynamics CRM. This year will be our third consecutive year that we would be showcasing our products and we can’t help but get excited about that. Apart from product showcase, we would also be highlighting on the CRM services that we offer in the form of pre-sales proto-typing, remote installation and configurations, customizations, and support, etc. We will have our experts to help you identify and discuss your CRM needs, learn about your upgrade plans, new implementations, process improvements, building an effective strategic roadmap, and much more.

The countdown has just begun and we can’t help but feel excited about it. So visit us at Booth no. 1751 and we would be happy to discuss how our solutions can help your business. We would be at the booth for the entire day, so feel free to walk in any time you feel.

Clone Records in Dynamics CRM

$
0
0

Very often we are troubled with writing huge codes and end up spending our valuable time for cloning an entity record. Just imagine the time needed if you are asked to create a cloned record with more than 100 attributes. Don’t you think it’s a time consuming effort and how great would it be if all this could happen just with a two line code?

The below sample code will guide you on how to create a cloned record using Clone() function of Microsoft.Xrm.Client Namespace:

//Add references

using Microsoft.Crm.Sdk;

using Microsoft.Xrm.Sdk;

using OrganizationXrm;

using Microsoft.Crm.Sdk.Messages;

using Microsoft.Crm.Sdk.Samples;

using Microsoft.Xrm.Sdk.Client;

//Used for Clone Function

using Microsoft.Xrm.Client;


//Declare Variables

Entity parentaccount= new Entity(“account”);

Guid parentaccountid = Guid.Empty;

Entity childaccount;

Guid childaccountid = Guid.Empty;


try

{

//Set attributes of the Parent Account

parentaccount.Attributes["name"] = “Parent Account”;

parentaccount.Attributes["telephone1"] = “Telephone1″;

//create the parent account

parentaccountid = _service.Create(parentaccount);

//Clone the Account Record using Clone function;

//Clone function takes a bool parameter which relates the Related Entities of the parent

//record to the cloned records, if set to true.

//The bool parameter passed to Clone method is set to true by default.

childaccount = parentaccount.Clone(true);

//Remove all the attributes of type primaryid as all the cloned records will have their own primaryid

childaccount.Attributes.Remove(childaccount.LogicalName + “id”);

//Remove the telephone1 attribute from the cloned record to differentiate between the parent and cloned record

childaccount.Attributes.Remove(“telephone1″);

//create the cloned record

childaccountid = _service.Create(childaccount);

}

catch (SaveChangesException ex)

{

throw ex;

}

Notes:

  • It is limited to an On-Premise environment only.
  • Add reference Microsoft.Xrm.Client.
  • Works with commonly used OOB and Custom entities.
  • Removing primaryid attribute from the attribute collection of cloned instance is mandatory.

Cloning a record using JavaScript

Cloning a record is not only limited to a Custom Workflow or a Plug-in, the same functionality can be very well achieved in JavaScript with the below workaround.

Below example explains how to Clone Line Items of one Quote onto another Quote.

1. Retrieve Data:

The first step to start off with is to retrieve the records that we need to clone.  In this example since we are Cloning the Line Items, so we`ll retrieve all the Line Items of the Quote from which we need to Clone. All the retrieved Line Items will be stored in a variable called “retrievedProducts”. This variable will be later on used to “Create” the Line Items for other Quote.

//Retrieve the Values

XrmServiceToolkit.Rest.RetrieveMultiple

(“QuoteDetailSet”,

//Here you can have some selected fields or all the fields

options,

function successCallback(results) {

//get the retrieved result in a variable

retrievedProducts = results;

},

function errorCallback(error) {

showError(error, functionName);

},

function onComplete() { },

false);

2. Delete Extra Data

The next step is to remove the extra data. The extra data involves all the ID attributes that can create Duplicity issue. And, the “__metadata” attribute, this attribute contains extra data that is not needed for us to Clone the record and hence we`ll remove it. To remove the unwanted data from the “retrievedProducts” Object, we`ll use thedeletefunctionality.

In this example the “deleteExtraData” function is called at the time of creating the records.

//This function deletes the extra data from the Object

function deleteExtraData(retrievedObject) {

//Remove all the extra fields

delete retrievedObject.__metadata;

delete retrievedObject.QuoteId;

delete retrievedObject.QuoteDetailId;


//Check for all the __metadata fields and remove it

delete retrievedObject.__metadata;

//Loop through Objects in Object

for (var key in retrievedObject) {

if (retrievedObject.hasOwnProperty(key)) {

//Check if the value is null if it is null then do nothing

if (retrievedObject[key] == null) {


} else {

//Check the type is the type is object, remove metadata

if (typeof (retrievedObject[key]) == “object”) {

//deletes the metadata from the object

delete retrievedObject[key].__metadata;

}

}

}

}

}

3. Create the Record

The final step is the creation of the record. In this step we`ll loop through the retrieved values which in this example is stored in the variable “retrievedProducts ” and create the Line Items one by one for the desired Quote. Since we have removed the Quote Id we need to associate a Quote Id.And, in this step we`ll pass the “retrievedProducts ” Object to the     “deleteExtraData” function. And, the formatted value would be passed for the creation.

for (var j in retrievedProducts) {

//Get the formatted value. formattedQuoteProduct is an Object.

formattedQuoteProduct[j] = deleteExtraData(retrievedProducts[j]);

//Since we removed the Quote Id we need to associate it with another Quote Id as the Quote Line Items needs to have a Quote Id.newQuoteId can be the Quote Id of the Quote on which you need to clone the Line Items

formattedQuoteProduct[j].QuoteId = {

Id: newQuoteId,

LogicalName: “quote”

};

//Create the products

XrmServiceToolkit.Rest.Create(formattedQuoteProduct[j],

“QuoteDetailSet”,

function successCallback() { },

function errorCallback(error) {

showError(error, functionName);

}, false);


}

Creating a cloned record using fetch expression:

We have introduced how to clone record using  .Clone()function in On-Premise environment and also by using  JavaScript and now  we would like to introduce another method of cloning records which can be used on any environment and allows us to define the attributes to be replicated on the cloned record.

Working:

At first, we will fetch the entity for which we have to clone the records and in the attributes we will add only those attributes which we need to copy to the cloned records.

Here, we have taken the “Account” entity of the CRM to create cloned records:

string sourceqry = @”<fetch version=’1.0′ output-format=’xml-platform’ mapping=’logical’ distinct=’false’>” +

“<entity name=’account’>”+

“<attribute name=’name’/>”+

“<attribute name=’primarycontactid’/>”+

“<attribute name=’telephone1′/>”+

“<attribute name=’accountid’/>”+

“<order attribute=’name’ descending=’false’/>”+

“<filter type=’and’>”+

“<condition attribute=’name’ operator=’eq’ value=’XXXXXX’/>” +

“</filter>”+

“</entity>”+

“</fetch>”;


//Declare an entity collection to hold the entities retreived by the query

EntityCollection AccountsCollection = service.RetrieveMultiple(newFetchExpression(sourceqry));


if (AccountsCollection.Entities.Count > 0)

{

for (int count = 0; count < AccountsCollection.Entities.Count; count++)

{

Entity account = AccountsCollection.Entities[count];


//Set the EntityState to null, so that a new cloned record can be created

account.EntityState = null;


//remove the PrimaryId of the record

account.Attributes.Remove(account.LogicalName + “id”);


//Set any field of the cloned record to differentiate between the parent and the cloned record

account.Attributes["name"] = “Cloned record created at: ” + System.DateTime.Now;


//set a unique id to the cloned record

account.Id = Guid.NewGuid();


//Create the new cloned record

service.Create(account);

}

}

}

catch (SaveChangesException ex)

{

throw ex;

}

catch (FaultException<OrganizationServiceFault> ex)

{

throw ex;

}

catch (Exception ex)

{

throw ex;

}

In the above code snippet we have cloned the “Account” entity records where name of the “Account” is “XXXXX” and we have just added only few attributes in the fetch expression which we need to get copied to the new cloned records.

Note:

  • Set the “EntityState” to”null”.
  • Remove the “PrimaryId” of the record.
  • Any (OOB + Custom) entity can be cloned.

How to apply script on Header fields and BPF fields

$
0
0

CRM 2013 now allows java script coding on header fields as well as BPF fields. Sometimes we come across with the requirement where we need to write script on the fields existing in the business process flow and not on the form. Same with the fields on header of any form.

When a form displays a business process flow control in the header, additional controls gets added for each attribute that is been displayed in that BPF. These controls hold unique names like:header_process_<attribute name>. So using this control we can write script around these fields.

The Controls displayed in the form header are also accessible and hold unique name like:header_<attribute name>.

We can perform all those operations that we can perform on the attribute added on the form. Below we have mentioned some of the sample scripts around such fields.

  • Show/Hide field

We can also show/hide the fields from the BPF same like we do for the other form attributes. Below we have hidden the field based on the value selected on the form.

img1

We can simply use below line of code to show/hide the field from the BPF.

Xrm.Page.getControl(“header_process_parentcontactid”).setVisible(false);

You can use below line of code to show/hide the field from the Header.

Xrm.Page.getControl(“header_leadsourcecode”).setVisible(false);

  • Make the field Read only

The field will be read only after applying script on the BPF controls.

img2

Below is a line of code where we have disabled the control from the BPF.

//Check if the control exist on the form

if (Xrm.Page.getControl(“header_process_parentcontactid”) != null) {

//Set the control disabled

Xrm.Page.getControl(“header_process_parentcontactid”).setDisabled(true);

}

The same script you can use to apply to the header fields.

//Check if the control exist on the form

if (Xrm.Page.getControl(“header_leadsourcecode”) != null) {

//Set the control disabled

Xrm.Page.getControl(“header_leadsourcecode”).setDisabled(true);

}

  • Filter Lookup

We can also filter on lookup based on another. Below we have written script to filter Existing Contact lookup based on Existing Account selected.

We have selected Fourth Coffee Account in the Existing Account as you can see in below screen shot:

img3


And the Existing Contact lookup will now show only Account associated Contacts in this lookup, where as previously it was showing All the contacts exist in CRM regardless of any condition.


img4


Below is a code snippet which will help you to filter a lookup:

function filterLookup() {

//Check if the control exist on the form

if (Xrm.Page.getControl(“header_process_parentcontactid”) != null) {

// add the event handler for PreSearch Event

Xrm.Page.getControl(“header_process_parentcontactid”).addPreSearch(addFilter);

}

}

function addFilter() {

var accountId = null;

var accountLookup;

var fetchQuery;

try {

//Check if control exist on form

if (Xrm.Page.getControl(“header_process_parentaccountid”) != null && Xrm.Page.getControl(“header_process_parentaccountid”).getAttribute().getValue() != null) {

//Get Account lookup value

accountLookup = Xrm.Page.getControl(“header_process_parentaccountid”).getAttribute().getValue();

//Get the account id

accountId = accountLookup[0].id;

}

//Build fetch

if (accountId != null || accountId != undefined) {

fetchQuery = “<filter type=’and’>” +

“<condition attribute=’statecode’ operator=’eq’ value=’0′ />” +

“<condition attribute=’parentcustomerid’ operator=’eq’ value=’” + accountId + “‘ />” +

“</filter>”;

//add custom filter

Xrm.Page.getControl(“header_process_parentcontactid”).addCustomFilter(fetchQuery);

}

} catch (e) {

Xrm.Utility.alertDialog(“addFilter Error: ” + (e.description || e.message));

}

}

  • Get/Set Value

We need to use below method to get/set the value on the BPF fields.

Xrm.Page.getControl(“header_process_descriptions”).getAttribute().getValue();

Xrm.Page.getControl(“header_process_description”).getAttribute().setValue(“Hello World”);

If you want to write a script on the header fields then you can use below line of code for this.

Xrm.Page.getControl(“header_leadsourcecode”).getAttribute().setValue(parseInt(value));

Key Points:

  • We can only perform actions like set/get value, show/hide fields, add custom filter etc. but we cannot add event handlers on the BPF fields. For this we need to add the same field on the form and then add event handler on that field.
  • As we cannot apply OOB filter lookups on the BPF fields, achieving through scripts is an advantage.

Thank You for Visiting Our Booth

$
0
0

Microsoft Convergence 2015 was a huge success once again for Inogic. Thank You, from Inogic Team for visiting our booth (No. 1751) and talking to us about our solutions and services. And a special word of Thanks for the Microsoft Team for the amazing arrangements and a great partnership.

Now that you’ve gotten to know us, it’s time to take our business forward.

Main Highlight at Convergence was our solution Maplytics™.  We use MAPS day in and out for our personal use so why not use maps for our business. Our Mapalytics enables you to take advantage of Dynamics CRM by gathering new insights through visual representation of data that can help you gain a thorough understanding of your market and in pursuing new market opportunities. It gives you insights to monitor your business from every aspect, be it the sales people or your prospects. As displayed during the convergence Mapalytics is not just for your Sales, since it supports custom entities you can use it for all purposes say to find Feedback from customers in a specific area or inquiries within a distance . Its easily customizable by us so you can manage your business in a much more effective way.

Apart from this we also showcased our QuickBooks to Dynamics CRM integrator solution – InoLink, that allows you to have a 360 degree view of your customer, contact details, order and payment history by simultaneously updating the information in both the applications. This helps in eliminating the need for double entry by auto transferring the data into other system thereby managing your data efficiently and reducing duplicity.

Every year we have something special at Convergence and this year we had 2 new add-ons introduced this time at Convergence. Click2Export is an add-on that helps you to export any Dynamics CRM report in the system with single click and attach it to an email or note or just download it without much efforts. It is an easy to install/ configure with user friendly user interface. In one click UI, you can export any report and decide the actions that should take place after exporting it. The next one was User Adoption Tracker which enables managers to monitor the actions of team members with respect to using Dynamics CRM for their day to day operation and not with the intent of monitoring what exact data was entered by the user.

Convergence also gave us an opportunity to educate our audience and showcase our services in order to prepare organizations for the road ahead. We had various interactive sessions, presentations, discussion, etc. that revolved around our offerings such as CRM customizations, integrations, implementations, portal development, troubleshooting and much more.

So do not hesitate to contact us with questions, to request a bid, or to talk with us about anything else we can do to help you regarding Dynamics CRM implementation.

Attending Convergence 2015 has been a great experience and we hope you have enjoyed the event as much as we have. We are looking forward to take this journey ahead and await to meet next year.

How to pass Object or collection of Objects to a web resource in CRM 2011

$
0
0

In Dynamics CRM if we want to pass data to a web resource, then we use Xrm.Utility.openWebResource function and pass as second parameter. But in this case we can’t pass Object or Array as parameter.

So to solve this problem one can use JSON. Using JSON we can convert Object or Collection of Object (Array) in string format. This converted data can be used to pass data to web resource. Let us take an example of passing collection of object to web resource. Here I have used collection of array that contains Id, Description and Name of Record. 

               var arrayObject = new Array();

              arrayObject[0] = new Object();

              arrayObject[0].name = "Sample Record 1";

              arrayObject[0].id = “1.";

              arrayObject[0].decription = "Test Description ";

Then after defining collection of object we will pass that object to JSON.stringify. This function will return collection in JSON String format. Then this JSON string is encoded to get parameter that is going to passed to the web resource.

                       var customParameters = encodeURIComponent(JSON.stringify(arrayObject));

This encoded JSON string can be passed to web resource using below code: 

                       Xrm.Utility.openWebResource("new_/Records.html", customParameters);

Here “Records.html” is used for displaying this collection of object on HTML page. In web resource “Records.html”, passed parameter can be collected as follows:

                         var queryParam = Xrm.Page.context.getQueryStringParameters();

The collected parameter is in JSON string format so we have to convert array using JSON.parse to convert it into collection of object.

                         if (queryParam.Data) {

                                   arrayObject = JSON.parse(queryParam.Data);

                          }

In this way we can pass collection of object as parameter to web resource. Similarly we can do for object as well. 

We have used above code for passing some data to HTML web resource Records.html. This web resource takes collection of objects. And then show in table format as you can see in below screen shot.

But when we pass parameter to web resource it is passed as query string. Query string has limitation based on browsers used. So when we pass parameter to web resource it trims/neglects extra characters from the query string. So it will cause problem while converting JSON string object into Object. And this problem of query string limitation can be solved using window.opener. 

The opener property returns a reference to the window that created the window. When opening a window with window.open(), you can use this property from the destination window to return details of the source (parent) window. By using window.opener we can access global parameters defined in parent web resource. In this way we can access Objects or collection without any limitations.

Let us take same example of passing collection of object to web resource. We will take collection of object defined as follows. 

               var _arrayObject = new Array();

              arrayObject[0] = new Object();

              arrayObject[0].name = "Record 1";

              arrayObject[0].id = "1.";

              arrayObject[0].decription = "Test Description";

              arrayObject[0] = new Object();

              arrayObject[0].name = "Record 2";

              arrayObject[0].id = "2.";

              arrayObject[0].decription = "Test Description";

Then we open web resource i.e. Records.html using Xrm.Utility.openWebResource.

               Xrm.Utility.openWebResource("new_/Records.html");

In web resource, passed data can be collected as follows:

                if (window.opener._arrayObject != null) {

                     var  _arrayObject = window.opener._arrayObject

            }

By using above we can pass large amount of data to HTML web resource.

I have used the windows.opener to collect the data from _arrayObject global object. This collection is converted into HTML table format. I have used this code for displaying selected records into grid.

-------------------------------------------------

Posted by: Inogic

For more information/discussions (documents, sample code snippets, detailed work flow or diagrams)

Please be free to visit the following links or email us:

Web: http://www.inogic.com

Blog: http://inogic.blogspot.com

Email: news@inogic.com

--------------------------------------------------


Scripting on Business Process Flow in CRM 2015- Part I

$
0
0

With the introduction of MS CRM 2015, came many new features. The one we are going to discuss here is advancement of Business Process Flow and especially the Scripting part, which came as boon.

Before CRM 2015, the Business Process Flow exist, but no API availability made it impossible for the developers to interact with the BPF via programming.

CRM 2015 gave it a new look, while creating a Business Process Flow, we have the option of creating Branched stages, which in simple terms is we can conditionally decide which stage to be shown after the current stage. The branching decisions can be made on the basis of the value of any step used for the current stage.

Previously we were not allowed to visit an entity more than once before, now we can visit an entity more than once.

Above are the few highlights of features added for BPF, let`s delve into the Programmability enhancement.

The most important part is, How to hook to the Stage change or Stage Select events of BPF? This is indeed the simplest part.

Example:

If you want to hook to the Stage change event, you can do this by writing the below code. And, you have the freedom to place this code either onLoad or onSave of the form or else on change of any field.

//Register a function on change of the stage

Xrm.Page.data.process.addOnStageChange(stageChange);


stageChange – It is the function to be called when the stage is changed.


Similarly, you can hook onto the Stage select event.

//Register a function on select of a stage

Xrm.Page.data.process.addOnStageSelected(stageSelected);


stageSelected – It is the function to be called when the stage is selected.


We have the options to unhook the events as well.

//Unbind a function on change of the stage

Xrm.Page.data.process.removeOnStageChange(stageChange);

//Unbind a function on select of a stage

Xrm.Page.data.process.removeOnStageSelected(stageSelected);

By hooking onto either stage change or stage select events, we have plethora of options to use.

Like we mentioned above, that we can Branch the entities conditionally. We can leverage this functionality by showing different fields for an entity depending on the value selected for the step on the previous stage.

Let us explain you few of the available methods in this part of the Blog, and the rest in this.

  • Collapse or Expand the Business Process Flow:

We have the option to collapse the Business Process Flow by default, on load of the form.

Snippet:

Xrm.Page.ui.process.setDisplayState(string)

string: “expanded”  or “collapsed” are the two variables that can be passed.


  • Show/Hide the Business Process Flow:

We can show or hide the business flow. It can be useful when we don`t need few of the Security Roles to see the BPF.

Snippet:

Xrm.Page.ui.process.setVisible(bool)

bool: “true” to show and “false” to hide.


  • Active Process:

We can get the Current Active Process and we can set the Current Active Process. This is useful if you want different security profiles to see different processes.

  • getActiveProcess

This will give you the object of the current Active Process. Object will have,

Process Name, Process Id(GUID), Render State(Visible/Hidden) & Collection of Stage Objects.

Snippet:

var procObj = Xrm.Page.data.process.getActiveProcess();

  • setActiveProcess

This will allow you to set the Active Process.

Snippet:

Xrm.Page.data.process.setActiveProcess(procGUID, callbackFunction);

procGUID: Id of the process to be set.

callbackFunction: Function that will be called in order we have any necessary actions to be performed on setting the process.


  • Active Stage:

We can get the Current Active Stage and we can also set the Current Active Stage. This is useful if you want a user to move back to previous stage, when he selects “x” value for a step on current Active stage.

  • getActiveStage

This  will give you the object of current Active Stage. Object will have, Stage Name, Stage ID(GUID), Base Entity, Stage Status(active/inactive) & Collection of Step objects.

            Snippet:

var actStg = Xrm.Page.data.process.getActiveStage();

  • setActiveStage

This will allow you to set an Active Stage.

Note: Only completed stage for the current entity can be set using this method.

            Snippet:

Xrm.Page.data.process.setActiveStage(stgGUID, callbackFunction);

stgGUID: ID of the stage to be set.

callbackFunction: If in case any actions are to be performed after setting the Active Stage.

Dynamics CRM 2015 Update 1 – Features that will change the way you work with Dynamics CRM

$
0
0

The next release of CRM 2015 had been announced a few months back. It is going to be an “Online only” release which means only users of CRM Online will receive this update. Feature updates to CRM made in this release update will not be made available to On-Premise until the end of the year.

This release is going to take the version from the current 7.0 to 7.1.x. This would be called the “CRM Online 2015 Update 1”

  1. The first big change that you notice and the most talked about change is the Navigation Change.

nav_bar

These would now be “Pull-down” menus instead of the earlier “scroll” menus.

  1. Color your tiles: These look nice and colorful. Yes colors, you now choose the color of the tiles for your entities. The color can be specified for the entity through the entity customizations area

entity_color

  1. Style your CRM: So you have been either doing this or wanting to do this for a while now. Some did get this done in earlier versions in unsupported way. Well, now you have a supported way to do this.

 In this version product team has provided you with greater control over how you would like your CRM to “look”

 You can create “Themes”. In the theme you can set the logo, Navbar color, how your hyperlinks should color

theme


The logo would appear at the top left of the nav bar as shown below.


logo

  1. Pin Recent Records/Views: In the previous version we had the ability to quickly views the recently accessed records, but it did not provide a way to pin certain records or views or permanent quick access.


The little timer control at the top is the “Recently Accessed Records”.


mru

This not only lists the views but also the records. Most importantly it lists the views/records/ dashboards from across the application. This means you could be in Sales and from this button quick access Cases without having to switch to Service area.


  1. Edit-Ready forms: In the previous version when you opened any form, it was not immediately available to you for editing or performing any operation on the form. You had to wait until the form completely loads and you get control of the form to type in.

 Now, the moment the form loads, it is available to you to type in. So you no longer have to wait for it to load completely. This is a huge performance improvement and it is definitely going to save a lot of time for a lot of people.


Well, there are many more improvements to look forward in the next release. There will be many more blogs to follow in the coming days targeted towards sharing the new improvements in the new release.

Listener services "not running"

$
0
0

Hi,

I have gone through various blogs and setup the connector for CRM/MDM but the listener and publisher services show up as "not running" in the integration options in MDM.

1. CRM and MDM are both in same online tenant.

2. Azure is not on the same tenant. it is a different subscription all together.

here is a screenshot of how it looks

Any pointers to resolve this?

Thanks!

Sam

Microsoft Dynamics Marketing for Microsoft Dynamics CRMers

$
0
0


I have been working with Microsoft Dynamics CRM since CRM 3.0 and any new update in CRM does not really makes me nervous looks and feels being on familiar ground.

And here I was starting off with Microsoft Dynamics Marketing, something I was avoiding for quite some time now… reason simply being… not familiar with “Marketing”. There are some good courses on the Dynamics Learning Portal and should you have access to the site, you should try out the courses there as a good starting point to understanding MDM.


To begin with, when you login to MDM you find yourself with a menu that has what would appear to someone using MSDCRM as just too broad and too many areas to learn and understand. Well that was my first mental block looking at MDM… there is just so much to do… where do I start…

Well the hierarchy is

Programs -> Campaigns -> Events -> Jobs -> Tasks

Though it is not mandatory that you have all of these in your marketing process and you can skip the ones that you do not really require.


MDM Terms/Concept

MDM can be used for different purposes in each of the implementation. MDM design supports the following

  1. Company implementing MDM for its own organizations marketing activities.
  2. Company implementing MDM to manage the marketing activities of its own branches, these could be     multiple divisions or even separate companies
  3. An advertising firm using MDM to manage the marketing activities of its customers

Site Company

This is the company that you set in the Settings Area. This is the base organization that is using MDM. It could be any of the above.

Companies

These are the equivalent of Accounts in CRM. You would store the organization information in here. If you had branches for which you wanted to manage the marketing activities you would create them as Company in MDM. It would be Client Company.

Company can be categorized as Client and/or Vendor. A third category available is Marketing.

Note: Categorization is very important in MDM. Depending on the category chosen you would see these companies under “Client Companies” listing or “Vendor Companies” listing. Marketing Companies are companies that have been received as part of a marketing database. When you integrate MDM with CRM using the MDM connector, the Accounts and Contacts from CRM are brought in categorized as Marketing in MDM and appear under Marketing Companies and Contacts listing.

Contacts

Contacts in MDM is any person. Users of MDM are also Contacts. Contacts can be categorized as “Client, “Vendor”, “Staff” or “Marketing”.

MDM UI Navigation

The menu structure is pull-down menus something that MSDCRM inspired from. It might help getting around with MDM if you knew a few of the following. Coming from Dynamics CRM, I was looking for common actions that I performed in CRM and how do I get around that here

1.      Where are Views?

There are no Views in MDM that you can quickly access as in CRM. You have the option of search and filtering records though.

 You can filter directly within the columns in the grid. A button to toggle between My/All and Active/All records.

 You can also drag columns that you want to group by and have the grid group the data based on that column


2.      Where is the lookup button?

 There is no explicit lookup button to select the record from a related entity. Now this is something I had a hard time to figure out. Perhaps it is our connection speed. There is supposed to be auto-drop-down that shows up as you start typing. In my case that never showed up. Now it is very important that the list show up and you select a record from the list coz otherwise when you tab out anything you have typed is cleared out, even if you had typed in the correct name of the related record L

A way to explicitly have the drop-down list show up is by typing %% in the text box and then hit spacebar


3.      Where are my sub-grids?

 Instead of adding multiple sub-grids on the form. They have instead added a single “Entity Selector” that lists all the related entities. Select the one you want to work on, and the data for that entity would be listed in the grid along with appropriate buttons on the ribbon bar.


4.      Can I customize?

 No.

 You cannot change the layout of the form or re-arrange the fields on the form. No, you cannot add custom fields. The product ships with User Defined Fields already added to most entities. You can rename the label and start using this fields for your own purpose. Again these are a limited count for each data type and you need to make do with them


5.      How do I find the User Defined Fields to repurpose?

 Good question J First look across the menus, you wouldn’t find anything familiar that you would seem related to custom fields J Alteast I didn’t. Found it in the initially unseemingly menu option Settings à Languages.


This is where you are allowed to change the labels and messages. And since adding custom fields is nothing but changing their labels, this is where you do it.


The language will list out all labels for all entities. An easy way to filter out labels of User defined fields, we can search for user


The above screen lists out the 10 custom fields available for Company.

 Change the Site Label of the UDF to indicate to the system that you are using it as a custom field. The moment you change the label to be different from the default label, this field will now be available on the form.

 In the above screenshot we have changed User 4 (text) and User 5 (Category).


6.      Where is my custom field on the form?

 Custom fields are not placed on the default top section of the form. You will find custom fields added to the Details tab. You can find the Details tab in the Tab/View/Entity selector for the record.


7.      How do I add options to my custom picklist field?

 That is done in Categories. The values for picklist options are maintained as Categories in MDM. All picklist fields throughout MDM can be found here.

Settings -> Categories


Choose your field and add options there


And now back to the Company form, you see these options there


8.      How do I manage Workflows/Process flows?

There is a visual designer provided to point-click-drag and design your entire process flow.


No code required :)


These were some on the questions that I was exploring and I thought some of these could be common to others as well and this should help them familiarize themselves with Microsoft Dynamics Marketing.

I would continue to post here as I move along in my journey to understand and master Microsoft Dynamics Marketing.


A Tip while Working with Field Level Security

$
0
0

Recently we came across a situation. We had a workflow in which we used a field which had field level security enabled on it. There was a custom field called “Credit Amount” that existed on the Account and had a field security enabled on it.

The workflow in which we were using this field checked a condition whether the field Credit Amount contained value in it. You can see in the below screen that the workflow was also set to execute under a logged in user’s context.

Workflow

Now, the problem was that when the workflow was executed, it was not performing its operations. Since the Credit Amount field was a secured field and the user who was running this workflow did not have the privilege to read the field value, while checking the value of this field condition in workflow, it always returned NULL even if there was an existing value in this field. Due to this the workflow did not meet with condition and perform the operations. To overcome this situation, we simply modified the workflow to execute it as the OWNER of the workflow.

Workflow

So before using fields in the workflow conditions, please check if the field has field security enabled on it or the workflow should run under the user who has appropriate security role.

Hope this helps!

Introduction of Rollup Fields in CRM 2015

$
0
0

Among the many new features added in Dynamics CRM 2015, Rollup Fields is one of the interesting new feature which provides a way to perform a record level aggregation from child records to its parent record. This avoids plug-in development and can be easily achieved by end users through simple setup and settings itself without any code involved.

Let’s take an example to explore implementation and working of rollup fields. Suppose we want to show total count of all the active contacts associated with an active Account and its Child Accounts on Account form.

Rollup field setup:

To achieve this we will first start with creating new Rollup field for Account as shown below:

Account Rollup Field

Here you can see that the field type which we have selected is of type “Rollup” and the data type which we have selected is of type “Whole Number”. The Data Type of the Rollup field must match the Data Type of the field for which we want to calculate the rollup. So if we want to show rollup of a field for Contact on Account form then the data type of rollup field must match the data type of the field for which we want to calculate rollup.

Also, you can see the “Edit” button besides “Rollup” selected Field Type. Whenever we select field type as “Rollup”, Edit button appears next to the Field Type and that brings up one editor screen which is similar to the “Business Rules” screen. Please refer the below screen:

Rollup Field Editor

Here we can specify the filters, conditions and aggregations which will be applied to the rollup field. The details are explained below,

  1. The source entity which is taken by default to be the entity for which the rollup field is created. In our example it is “Account” entity hence the “Source” is by default “Account”
  2. Use Hierarchy can be set to Yes/No for utilizing parent-child relationship. In our example we want to get aggregation for all Child Accounts of an Account hence we have set it to “Yes”
  3. We can apply filters for source entity using the “Filters” option where we can specify the conditions to apply. In our example we have specified the condition that the Account status needs to be “Active” so rollup happens for active records only.
  4. When we want to get aggregation of related entity data in our rollup then we specify the “Related Entity”. In our example since we want to show total count of all the active contacts present for an Account and its Child Accounts, we have selected “Contacts (Company Name)” as the “Related” entity.
  5. If we want to apply filters for related entity then we can do that by adding filter conditions in “Related Entity”. In our example since we want to show total count of all the active contactspresent for an Account and its Child Accounts we have added filter condition to check if “Status” equals “Active” for related opportunities
  6. And finally we specify the aggregation function which we want to apply and for which field. In our example since we want to show all active Contacts for an Account,  we have selected the aggregate function as “Count”.

User Interface:

The Rollup Field that we just created will be seen on the “Source Entity” form i.e. account form:

Total Contacts Rollup Field

So the total Contacts for a particular Account will be calculated and shown in this “Total Contacts” Rollup field for that Account . If the Account has Child Accounts then the total of Contacts for that Account along with  its Child Account’s Contacts will be calculated and shown in this “Total Contacts” Rollup field for that Account.

Rollup fields are read only. On this Rollup field you can see the “Refresh” icon attached to the Rollup field. Since rollup operates asynchronously, it is calculated on hourly basis. But we can also self-trigger the rollup field calculation by hitting this “Refresh” icon and perform the re-calculation.

Developer Notes:

Each rollup attribute for an entity has two supporting attributes for the rollup attribute which automatically gets created when a rollup field is created:

  • <attribute SchemaName>_Date: DateTime – When the rollup was last calculated
  • <attribute SchemaName>_State: Integer – The state of the rollup calculation

Following are the State values:

0 – NotCalculated: Attribute value is yet to be calculated

1 – Calculated: Attribute value has been calculated per the last update time in <attribute SchemaName>_Date attribute

2 – OverflowError: Attribute value calculation lead to overflow error

3 – OtherError: Attribute value calculation failed due to an internal error, next run of calculation job will likely fix it

4 – RetryLimitExceeded: Attribute value calculation failed because the maximum number of retry attempts to calculate the value were exceeded likely due to high number of concurrency and locking conflicts

5 – HierarchicalRecursionLimitReached: Attribute value calculation failed because maximum hierarchy depth limit for calculation was reached

6 – LoopDetected: Attribute value calculation failed because a recursive loop was detected in the hierarchy of the record

Request/Response Messages provided for Rollup Field calculation:

Developers can calculate a rollup attribute value on demand using “CalculateRollupField” message which is supported by Rollup attributes.

Request/ResponseMembers
CalculateRollupFieldRequestTarget: EntityReference for the record.FieldName: String representing the logical name of the attribute.
CalculateRollupFieldResponseEntity: Entity containing the rollup attribute and the supporting<attribute SchemaName>_Date and <attribute SchemaName>_Stateattributes.

Supported Data types:

Rollup field is not supported by all data types and only following data types support rollup field:

  1. Whole Number
  2. Decimal
  3. Currency
  4. Date & Time

Limitations:

  1. Rollup works on 1:N relationship. They don’t work on N-N relationship
  2. Rollup field cannot use another Calculated or Rollup field for rollup
  3. For Complex field calculations we need to still rely on plug-in or java script
  4. Rollup fields don’t raise the event to trigger workflows
  5. We can have maximum of 100 rollup fields within an organization and each entity can have no more than 10 rollup fields.

Simplified Process to Add New Records on the Fly in Dynamics CRM 2015

$
0
0

Introduction:

Quick Create Forms were introduced in CRM 2013 to help create records of core entities in a simpler way from anywhere in the system. It actually was not that simpler when we wanted to create subsequent records for the lookup field available on current Quick Create form.

Let’s take a look at how we used to create a new subsequent record from current Quick Create form.

CRM 2013:

Consider we are creating a contact record using quick create. We want to set the company name for it. So in CRM 2013 it would look as below:

Quick Create Record

Now, suppose we want to create a new Account for this contact, then we would have to click on Look up More records dropdown, & then click on “New” as highlighted below.

Look Up Record

On clicking New it would pop out another screen displaying the default form for Account Entity as below:

Account Entity form

As we can see default form is popped out. We need to enter the entire necessary details and save and close the form. This was quite tedious process as we actually were not able to create records quickly.

CRM 2015:

Whereas with release of CRM 2015, the same process can be done with more ease thereby justifying the term Quick Create.

So here comes the term “Nested Quick Create”. As the name suggests there would be subsequent Quick Create forms inside Quick Create form. Let’s go through the same previous example in CRM 2015.

Quick Create form

As we can see we have the “New” option just at the right corner of the Look Up More Records dropdown which will get the Quick Create form of Account instead of the default form that was seen in CRM 2013.

Quick Create Account form

Now  if we again select “New” for the Primary Contact lookup or any other lookup for current Account record, then it would again display subsequent Quick Create form of Contact/ respective entity as below:

Quick Create Contact form

Now, as we have understood Nested Quick Create forms the next question that would strike us would be till what extent we could do this? So the limit for this nested Quick Create Forms is 10.

After 10 the “New” Option disappears from the drop down.

Nested Quick Create Form

This new feature will definitely save your time in creating core records in your CRM implementation.


Inogic at Convergence 2015 – Time To Take Your Business Ahead

$
0
0

Microsoft’s biggest event– the Convergence conference is returning once again this year to the Georgia World Congress Center, Atlanta, USA from 16th-19th March. It gives the attendees an opportunity to learn something new, create business relationships and explore the true potential of Microsoft Dynamics solutions. Its main purpose is to provide the attendees a platform to ask questions, troubleshoot problems and have relevant discussion regarding the products and solutions for Dynamics CRM. As always, Convergence features top keynote speakers, and this year will be no different. The presence of the newly created CEO of Microsoft Satya Nadella and executive VP of Microsoft Business Solutions Group, Kirill Tatarinov has created a lot of buzz around this year’s Convergence.

Convergence Booth Number

Microsoft Convergence                                Register Now                               Agenda 2015

What to look forward at Convergence?

  1. Sessions presented by the Product group themselves. Get to know more about the product and most often hear first-hand the first time announcements made none other by CRM team at the CRM Keynote.
  2. Case studies presented by Customers using the Dynamics Product sharing their experiences and benefits they derive off the product.
  3. Free Technical support. Yes you can get your Technical issues sorted by the support staff at the booth exclusively for this purpose.
  4. Focus group round tables where you can discuss/share your ideas with other like-minded people in the same implementation setup.
  5. Ask the MVPs, a Q n A session organized by all the MVP in attendance at Convergence where you can have all of your queries answered.

Plan

There is just so much to do at Convergence that you can often end up missing sessions that you so wanted to attend.

As the convergence date approaches, you would have the schedule builder tool up on the site, should help you plan your itinerary. Most sessions are repeated across the three days so that you can easily catch up on them.

Schedule some time to spend on the Expo Floor. It’s a huge place with a lot partners presenting their solutions. If you are looking for a particular solution, you might as well look up the exhibitor guide to make a note of all the booths you would like to attend.

Partners are happy to present a demo of their solution so make sure you have enough time to review the demos of most partners.

Inogic Will Be At Booth #1751: See You There!

Are you attending Convergence this year? If yes, then do visit us at our booth to learn, share and understand all about Microsoft Dynamics CRM. This year will be our third consecutive year that we would be showcasing our products and we can’t help but get excited about that. Apart from product showcase, we would also be highlighting on the CRM services that we offer in the form of pre-sales proto-typing, remote installation and configurations, customizations, and support, etc. We will have our experts to help you identify and discuss your CRM needs, learn about your upgrade plans, new implementations, process improvements, building an effective strategic roadmap, and much more.

The countdown has just begun and we can’t help but feel excited about it. So visit us at Booth no. 1751 and we would be happy to discuss how our solutions can help your business. We would be at the booth for the entire day, so feel free to walk in any time you feel.

Clone Records in Dynamics CRM

$
0
0

Very often we are troubled with writing huge codes and end up spending our valuable time for cloning an entity record. Just imagine the time needed if you are asked to create a cloned record with more than 100 attributes. Don’t you think it’s a time consuming effort and how great would it be if all this could happen just with a two line code?

The below sample code will guide you on how to create a cloned record using Clone() function of Microsoft.Xrm.Client Namespace:

//Add references

using Microsoft.Crm.Sdk;

using Microsoft.Xrm.Sdk;

using OrganizationXrm;

using Microsoft.Crm.Sdk.Messages;

using Microsoft.Crm.Sdk.Samples;

using Microsoft.Xrm.Sdk.Client;

//Used for Clone Function

using Microsoft.Xrm.Client;


//Declare Variables

Entity parentaccount= new Entity(“account”);

Guid parentaccountid = Guid.Empty;

Entity childaccount;

Guid childaccountid = Guid.Empty;


try

{

//Set attributes of the Parent Account

parentaccount.Attributes["name"] = “Parent Account”;

parentaccount.Attributes["telephone1"] = “Telephone1″;

//create the parent account

parentaccountid = _service.Create(parentaccount);

//Clone the Account Record using Clone function;

//Clone function takes a bool parameter which relates the Related Entities of the parent

//record to the cloned records, if set to true.

//The bool parameter passed to Clone method is set to true by default.

childaccount = parentaccount.Clone(true);

//Remove all the attributes of type primaryid as all the cloned records will have their own primaryid

childaccount.Attributes.Remove(childaccount.LogicalName + “id”);

//Remove the telephone1 attribute from the cloned record to differentiate between the parent and cloned record

childaccount.Attributes.Remove(“telephone1″);

//create the cloned record

childaccountid = _service.Create(childaccount);

}

catch (SaveChangesException ex)

{

throw ex;

}

Notes:

  • It is limited to an On-Premise environment only.
  • Add reference Microsoft.Xrm.Client.
  • Works with commonly used OOB and Custom entities.
  • Removing primaryid attribute from the attribute collection of cloned instance is mandatory.

Cloning a record using JavaScript

Cloning a record is not only limited to a Custom Workflow or a Plug-in, the same functionality can be very well achieved in JavaScript with the below workaround.

Below example explains how to Clone Line Items of one Quote onto another Quote.

1. Retrieve Data:

The first step to start off with is to retrieve the records that we need to clone.  In this example since we are Cloning the Line Items, so we`ll retrieve all the Line Items of the Quote from which we need to Clone. All the retrieved Line Items will be stored in a variable called “retrievedProducts”. This variable will be later on used to “Create” the Line Items for other Quote.

//Retrieve the Values

XrmServiceToolkit.Rest.RetrieveMultiple

(“QuoteDetailSet”,

//Here you can have some selected fields or all the fields

options,

function successCallback(results) {

//get the retrieved result in a variable

retrievedProducts = results;

},

function errorCallback(error) {

showError(error, functionName);

},

function onComplete() { },

false);

2. Delete Extra Data

The next step is to remove the extra data. The extra data involves all the ID attributes that can create Duplicity issue. And, the “__metadata” attribute, this attribute contains extra data that is not needed for us to Clone the record and hence we`ll remove it. To remove the unwanted data from the “retrievedProducts” Object, we`ll use thedeletefunctionality.

In this example the “deleteExtraData” function is called at the time of creating the records.

//This function deletes the extra data from the Object

function deleteExtraData(retrievedObject) {

//Remove all the extra fields

delete retrievedObject.__metadata;

delete retrievedObject.QuoteId;

delete retrievedObject.QuoteDetailId;


//Check for all the __metadata fields and remove it

delete retrievedObject.__metadata;

//Loop through Objects in Object

for (var key in retrievedObject) {

if (retrievedObject.hasOwnProperty(key)) {

//Check if the value is null if it is null then do nothing

if (retrievedObject[key] == null) {


} else {

//Check the type is the type is object, remove metadata

if (typeof (retrievedObject[key]) == “object”) {

//deletes the metadata from the object

delete retrievedObject[key].__metadata;

}

}

}

}

}

3. Create the Record

The final step is the creation of the record. In this step we`ll loop through the retrieved values which in this example is stored in the variable “retrievedProducts ” and create the Line Items one by one for the desired Quote. Since we have removed the Quote Id we need to associate a Quote Id.And, in this step we`ll pass the “retrievedProducts ” Object to the     “deleteExtraData” function. And, the formatted value would be passed for the creation.

for (var j in retrievedProducts) {

//Get the formatted value. formattedQuoteProduct is an Object.

formattedQuoteProduct[j] = deleteExtraData(retrievedProducts[j]);

//Since we removed the Quote Id we need to associate it with another Quote Id as the Quote Line Items needs to have a Quote Id.newQuoteId can be the Quote Id of the Quote on which you need to clone the Line Items

formattedQuoteProduct[j].QuoteId = {

Id: newQuoteId,

LogicalName: “quote”

};

//Create the products

XrmServiceToolkit.Rest.Create(formattedQuoteProduct[j],

“QuoteDetailSet”,

function successCallback() { },

function errorCallback(error) {

showError(error, functionName);

}, false);


}

Creating a cloned record using fetch expression:

We have introduced how to clone record using  .Clone()function in On-Premise environment and also by using  JavaScript and now  we would like to introduce another method of cloning records which can be used on any environment and allows us to define the attributes to be replicated on the cloned record.

Working:

At first, we will fetch the entity for which we have to clone the records and in the attributes we will add only those attributes which we need to copy to the cloned records.

Here, we have taken the “Account” entity of the CRM to create cloned records:

string sourceqry = @”<fetch version=’1.0′ output-format=’xml-platform’ mapping=’logical’ distinct=’false’>” +

“<entity name=’account’>”+

“<attribute name=’name’/>”+

“<attribute name=’primarycontactid’/>”+

“<attribute name=’telephone1′/>”+

“<attribute name=’accountid’/>”+

“<order attribute=’name’ descending=’false’/>”+

“<filter type=’and’>”+

“<condition attribute=’name’ operator=’eq’ value=’XXXXXX’/>” +

“</filter>”+

“</entity>”+

“</fetch>”;


//Declare an entity collection to hold the entities retreived by the query

EntityCollection AccountsCollection = service.RetrieveMultiple(newFetchExpression(sourceqry));


if (AccountsCollection.Entities.Count > 0)

{

for (int count = 0; count < AccountsCollection.Entities.Count; count++)

{

Entity account = AccountsCollection.Entities[count];


//Set the EntityState to null, so that a new cloned record can be created

account.EntityState = null;


//remove the PrimaryId of the record

account.Attributes.Remove(account.LogicalName + “id”);


//Set any field of the cloned record to differentiate between the parent and the cloned record

account.Attributes["name"] = “Cloned record created at: ” + System.DateTime.Now;


//set a unique id to the cloned record

account.Id = Guid.NewGuid();


//Create the new cloned record

service.Create(account);

}

}

}

catch (SaveChangesException ex)

{

throw ex;

}

catch (FaultException<OrganizationServiceFault> ex)

{

throw ex;

}

catch (Exception ex)

{

throw ex;

}

In the above code snippet we have cloned the “Account” entity records where name of the “Account” is “XXXXX” and we have just added only few attributes in the fetch expression which we need to get copied to the new cloned records.

Note:

  • Set the “EntityState” to”null”.
  • Remove the “PrimaryId” of the record.
  • Any (OOB + Custom) entity can be cloned.

How to apply script on Header fields and BPF fields

$
0
0

CRM 2013 now allows java script coding on header fields as well as BPF fields. Sometimes we come across with the requirement where we need to write script on the fields existing in the business process flow and not on the form. Same with the fields on header of any form.

When a form displays a business process flow control in the header, additional controls gets added for each attribute that is been displayed in that BPF. These controls hold unique names like:header_process_<attribute name>. So using this control we can write script around these fields.

The Controls displayed in the form header are also accessible and hold unique name like:header_<attribute name>.

We can perform all those operations that we can perform on the attribute added on the form. Below we have mentioned some of the sample scripts around such fields.

  • Show/Hide field

We can also show/hide the fields from the BPF same like we do for the other form attributes. Below we have hidden the field based on the value selected on the form.

img1

We can simply use below line of code to show/hide the field from the BPF.

Xrm.Page.getControl(“header_process_parentcontactid”).setVisible(false);

You can use below line of code to show/hide the field from the Header.

Xrm.Page.getControl(“header_leadsourcecode”).setVisible(false);

  • Make the field Read only

The field will be read only after applying script on the BPF controls.

img2

Below is a line of code where we have disabled the control from the BPF.

//Check if the control exist on the form

if (Xrm.Page.getControl(“header_process_parentcontactid”) != null) {

//Set the control disabled

Xrm.Page.getControl(“header_process_parentcontactid”).setDisabled(true);

}

The same script you can use to apply to the header fields.

//Check if the control exist on the form

if (Xrm.Page.getControl(“header_leadsourcecode”) != null) {

//Set the control disabled

Xrm.Page.getControl(“header_leadsourcecode”).setDisabled(true);

}

  • Filter Lookup

We can also filter on lookup based on another. Below we have written script to filter Existing Contact lookup based on Existing Account selected.

We have selected Fourth Coffee Account in the Existing Account as you can see in below screen shot:

img3


And the Existing Contact lookup will now show only Account associated Contacts in this lookup, where as previously it was showing All the contacts exist in CRM regardless of any condition.


img4


Below is a code snippet which will help you to filter a lookup:

function filterLookup() {

//Check if the control exist on the form

if (Xrm.Page.getControl(“header_process_parentcontactid”) != null) {

// add the event handler for PreSearch Event

Xrm.Page.getControl(“header_process_parentcontactid”).addPreSearch(addFilter);

}

}

function addFilter() {

var accountId = null;

var accountLookup;

var fetchQuery;

try {

//Check if control exist on form

if (Xrm.Page.getControl(“header_process_parentaccountid”) != null && Xrm.Page.getControl(“header_process_parentaccountid”).getAttribute().getValue() != null) {

//Get Account lookup value

accountLookup = Xrm.Page.getControl(“header_process_parentaccountid”).getAttribute().getValue();

//Get the account id

accountId = accountLookup[0].id;

}

//Build fetch

if (accountId != null || accountId != undefined) {

fetchQuery = “<filter type=’and’>” +

“<condition attribute=’statecode’ operator=’eq’ value=’0′ />” +

“<condition attribute=’parentcustomerid’ operator=’eq’ value=’” + accountId + “‘ />” +

“</filter>”;

//add custom filter

Xrm.Page.getControl(“header_process_parentcontactid”).addCustomFilter(fetchQuery);

}

} catch (e) {

Xrm.Utility.alertDialog(“addFilter Error: ” + (e.description || e.message));

}

}

  • Get/Set Value

We need to use below method to get/set the value on the BPF fields.

Xrm.Page.getControl(“header_process_descriptions”).getAttribute().getValue();

Xrm.Page.getControl(“header_process_description”).getAttribute().setValue(“Hello World”);

If you want to write a script on the header fields then you can use below line of code for this.

Xrm.Page.getControl(“header_leadsourcecode”).getAttribute().setValue(parseInt(value));

Key Points:

  • We can only perform actions like set/get value, show/hide fields, add custom filter etc. but we cannot add event handlers on the BPF fields. For this we need to add the same field on the form and then add event handler on that field.
  • As we cannot apply OOB filter lookups on the BPF fields, achieving through scripts is an advantage.

Thank You for Visiting Our Booth

$
0
0

Microsoft Convergence 2015 was a huge success once again for Inogic. Thank You, from Inogic Team for visiting our booth (No. 1751) and talking to us about our solutions and services. And a special word of Thanks for the Microsoft Team for the amazing arrangements and a great partnership.

Now that you’ve gotten to know us, it’s time to take our business forward.

Main Highlight at Convergence was our solution Maplytics™.  We use MAPS day in and out for our personal use so why not use maps for our business. Our Mapalytics enables you to take advantage of Dynamics CRM by gathering new insights through visual representation of data that can help you gain a thorough understanding of your market and in pursuing new market opportunities. It gives you insights to monitor your business from every aspect, be it the sales people or your prospects. As displayed during the convergence Mapalytics is not just for your Sales, since it supports custom entities you can use it for all purposes say to find Feedback from customers in a specific area or inquiries within a distance . Its easily customizable by us so you can manage your business in a much more effective way.

Apart from this we also showcased our QuickBooks to Dynamics CRM integrator solution – InoLink, that allows you to have a 360 degree view of your customer, contact details, order and payment history by simultaneously updating the information in both the applications. This helps in eliminating the need for double entry by auto transferring the data into other system thereby managing your data efficiently and reducing duplicity.

Every year we have something special at Convergence and this year we had 2 new add-ons introduced this time at Convergence. Click2Export is an add-on that helps you to export any Dynamics CRM report in the system with single click and attach it to an email or note or just download it without much efforts. It is an easy to install/ configure with user friendly user interface. In one click UI, you can export any report and decide the actions that should take place after exporting it. The next one was User Adoption Tracker which enables managers to monitor the actions of team members with respect to using Dynamics CRM for their day to day operation and not with the intent of monitoring what exact data was entered by the user.

Convergence also gave us an opportunity to educate our audience and showcase our services in order to prepare organizations for the road ahead. We had various interactive sessions, presentations, discussion, etc. that revolved around our offerings such as CRM customizations, integrations, implementations, portal development, troubleshooting and much more.

So do not hesitate to contact us with questions, to request a bid, or to talk with us about anything else we can do to help you regarding Dynamics CRM implementation.

Attending Convergence 2015 has been a great experience and we hope you have enjoyed the event as much as we have. We are looking forward to take this journey ahead and await to meet next year.

How to pass Object or collection of Objects to a web resource in CRM 2011

$
0
0

In Dynamics CRM if we want to pass data to a web resource, then we use Xrm.Utility.openWebResource function and pass as second parameter. But in this case we can’t pass Object or Array as parameter.

So to solve this problem one can use JSON. Using JSON we can convert Object or Collection of Object (Array) in string format. This converted data can be used to pass data to web resource. Let us take an example of passing collection of object to web resource. Here I have used collection of array that contains Id, Description and Name of Record. 

               var arrayObject = new Array();

              arrayObject[0] = new Object();

              arrayObject[0].name = "Sample Record 1";

              arrayObject[0].id = “1.";

              arrayObject[0].decription = "Test Description ";

Then after defining collection of object we will pass that object to JSON.stringify. This function will return collection in JSON String format. Then this JSON string is encoded to get parameter that is going to passed to the web resource.

                       var customParameters = encodeURIComponent(JSON.stringify(arrayObject));

This encoded JSON string can be passed to web resource using below code: 

                       Xrm.Utility.openWebResource("new_/Records.html", customParameters);

Here “Records.html” is used for displaying this collection of object on HTML page. In web resource “Records.html”, passed parameter can be collected as follows:

                         var queryParam = Xrm.Page.context.getQueryStringParameters();

The collected parameter is in JSON string format so we have to convert array using JSON.parse to convert it into collection of object.

                         if (queryParam.Data) {

                                   arrayObject = JSON.parse(queryParam.Data);

                          }

In this way we can pass collection of object as parameter to web resource. Similarly we can do for object as well. 

We have used above code for passing some data to HTML web resource Records.html. This web resource takes collection of objects. And then show in table format as you can see in below screen shot.

But when we pass parameter to web resource it is passed as query string. Query string has limitation based on browsers used. So when we pass parameter to web resource it trims/neglects extra characters from the query string. So it will cause problem while converting JSON string object into Object. And this problem of query string limitation can be solved using window.opener. 

The opener property returns a reference to the window that created the window. When opening a window with window.open(), you can use this property from the destination window to return details of the source (parent) window. By using window.opener we can access global parameters defined in parent web resource. In this way we can access Objects or collection without any limitations.

Let us take same example of passing collection of object to web resource. We will take collection of object defined as follows. 

               var _arrayObject = new Array();

              arrayObject[0] = new Object();

              arrayObject[0].name = "Record 1";

              arrayObject[0].id = "1.";

              arrayObject[0].decription = "Test Description";

              arrayObject[0] = new Object();

              arrayObject[0].name = "Record 2";

              arrayObject[0].id = "2.";

              arrayObject[0].decription = "Test Description";

Then we open web resource i.e. Records.html using Xrm.Utility.openWebResource.

               Xrm.Utility.openWebResource("new_/Records.html");

In web resource, passed data can be collected as follows:

                if (window.opener._arrayObject != null) {

                     var  _arrayObject = window.opener._arrayObject

            }

By using above we can pass large amount of data to HTML web resource.

I have used the windows.opener to collect the data from _arrayObject global object. This collection is converted into HTML table format. I have used this code for displaying selected records into grid.

-------------------------------------------------

Posted by: Inogic

For more information/discussions (documents, sample code snippets, detailed work flow or diagrams)

Please be free to visit the following links or email us:

Web: http://www.inogic.com

Blog: http://inogic.blogspot.com

Email: news@inogic.com

--------------------------------------------------


Viewing all 3363 articles
Browse latest View live


<script src="https://jsc.adskeeper.com/r/s/rssing.com.1596347.js" async> </script>