Inogic blogged about How to handle Special Characters in Fetch XML on .
↧
Inogic blogged about How to handle Special Characters in Fetch XML on Microsoft Dynamics CRM - Tips, Tricks & Add-ons - Inogic .
↧
Inogic blogged about Using Indicators in SSRS Reports on Microsoft Dynamics CRM - Tips, Tricks & Add-ons - Inogic .
Inogic blogged about Using Indicators in SSRS Reports on .
↧
↧
Inogic blogged about How Security Role Privileges are Inherited from Team to User on Microsoft Dynamics CRM - Tips, Tricks & Add-ons - Inogic .
Inogic blogged about How Security Role Privileges are Inherited from Team to User on .
↧
Inogic blogged about Scheduling Dynamics CRM 2015 Update on Microsoft Dynamics CRM - Tips, Tricks & Add-ons - Inogic .
Inogic blogged about Scheduling Dynamics CRM 2015 Update on .
↧
Inogic blogged about ILMerge Issues on Microsoft Dynamics CRM - Tips, Tricks & Add-ons - Inogic .
Inogic blogged about ILMerge Issues on .
↧
↧
Inogic blogged about How to Show Filtered Lookup Dialog in Dynamics CRM Through Script on Microsoft Dynamics CRM - Tips, Tricks & Add-ons - Inogic .
Inogic blogged about How to Show Filtered Lookup Dialog in Dynamics CRM Through Script on .
↧
Inogic blogged about A Tip while Working with Field Level Security on Microsoft Dynamics CRM - Tips, Tricks & Add-ons - Inogic .
Inogic blogged about A Tip while Working with Field Level Security on .
↧
Inogic blogged about Introduction of Rollup Fields in CRM 2015 on Microsoft Dynamics CRM - Tips, Tricks & Add-ons - Inogic .
Inogic blogged about Introduction of Rollup Fields in CRM 2015 on .
↧
Inogic blogged about Simplified Process to Add New Records on the Fly in Dynamics CRM 2015 on Microsoft Dynamics CRM - Tips, Tricks & Add-ons - Inogic .
Inogic blogged about Simplified Process to Add New Records on the Fly in Dynamics CRM 2015 on .
↧
↧
Inogic blogged about Inogic at Convergence 2015 – Time To Take Your Business Ahead on Microsoft Dynamics CRM - Tips, Tricks & Add-ons - Inogic .
Inogic blogged about Inogic at Convergence 2015 – Time To Take Your Business Ahead on .
↧
Inogic blogged about Scripting on Business Process Flow in CRM 2015- Part I on Microsoft Dynamics CRM - Tips, Tricks & Add-ons - Inogic .
Inogic blogged about Scripting on Business Process Flow in CRM 2015- Part I on .
↧
Inogic blogged about Thank You for Visiting Our Booth on Microsoft Dynamics CRM - Tips, Tricks & Add-ons - Inogic .
Inogic blogged about Thank You for Visiting Our Booth on .
↧
Inogic posted Listener services "not running" to Microsoft Dynamics Marketing .
Inogic posted Listener services "not running" to .
↧
↧
Inogic replied to Listener services "not running" in Microsoft Dynamics Marketing .
Inogic replied to Listener services "not running" in .
↧
Inogic replied to Listener services "not running" in Microsoft Dynamics Marketing .
Inogic replied to Listener services "not running" in .
↧
Dynamics CRM 2015 Update 1 – Features that will change the way you work with Dynamics CRM
The next release of CRM 2015 had been announced a few months back. It is going to be an “Online only” release which means only users of CRM Online will receive this update. Feature updates to CRM made in this release update will not be made available to On-Premise until the end of the year.
This release is going to take the version from the current 7.0 to 7.1.x. This would be called the “CRM Online 2015 Update 1”
- The first big change that you notice and the most talked about change is the Navigation Change.

These would now be “Pull-down” menus instead of the earlier “scroll” menus.
- Color your tiles: These look nice and colorful. Yes colors, you now choose the color of the tiles for your entities. The color can be specified for the entity through the entity customizations area

- Style your CRM: So you have been either doing this or wanting to do this for a while now. Some did get this done in earlier versions in unsupported way. Well, now you have a supported way to do this.
In this version product team has provided you with greater control over how you would like your CRM to “look”
You can create “Themes”. In the theme you can set the logo, Navbar color, how your hyperlinks should color

The logo would appear at the top left of the nav bar as shown below.
![]()
- Pin Recent Records/Views: In the previous version we had the ability to quickly views the recently accessed records, but it did not provide a way to pin certain records or views or permanent quick access.
The little timer control at the top is the “Recently Accessed Records”.

This not only lists the views but also the records. Most importantly it lists the views/records/ dashboards from across the application. This means you could be in Sales and from this button quick access Cases without having to switch to Service area.
- Edit-Ready forms: In the previous version when you opened any form, it was not immediately available to you for editing or performing any operation on the form. You had to wait until the form completely loads and you get control of the form to type in.
Now, the moment the form loads, it is available to you to type in. So you no longer have to wait for it to load completely. This is a huge performance improvement and it is definitely going to save a lot of time for a lot of people.
Well, there are many more improvements to look forward in the next release. There will be many more blogs to follow in the coming days targeted towards sharing the new improvements in the new release.
↧
Plug-in Tracing in Dynamics CRM 2015 Update 1
Before CRM 2015 SP1 update, an alternative option to debug the Plug-in or Workflow for developers was to use tracing messages which would help to trace the program using custom messages.
The developer had to manually throw an exception in order to trace the program. And then when the plug in/workflow is triggered a dialog is shown up to “Download the Log File” which contains the tracing information.
So, the user/Developer had to read the tracing from the downloaded text file, which was a tedious job itself.
So now in CRM 2015 SP1 update, we have one more option in which we have a new Entity called “Plug-in Trace Logs” which itself creates record for any exception occurred or thrown by the developer.
But in order to enable this feature we need to make following settings in CRM.
- Go to Settings >> Administration
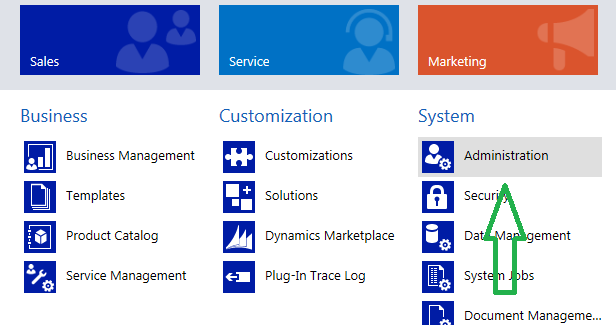
- Under Administration >> System Settings >> Customization Tab
![2]()

So as we can see here there is an option “Enable logging to plug-in trace log”. By default it is Off, we need to select the option “Exception” in order to enable the creation of Plug-in trace log records in case any exception or error occurs.
There’s one more option in addition to this as mentioned in SDK and i.e. “All”. In the preview Version we don’t have it.
It’s mentioned that if we select “All” then the tracing information would be written to Trace Log record upon complete code execution or any error occurred throw custom code.
Once we have enabled the feature, we can view the Trace Log Records under:
Settings >> Plug In Trace Log Entity:

Records are created in CRM as below, which are read only just like System Job records to find out the error occurred.

Now let’s see what this record actually contains and why it simplifies the earlier process of debugging Plug-In and workflow using ITracingService interface.

You can see the record contains attributes like Message Name, Primary Entity, Mode etc which helps to get the information related to Plug-in.
As shown below it contains two fields Message Block and Exception Details which contains the actual data the user / developer is keen to understand.

Message Block: Contains the actual Tracing information which we specify in our Plug-in /Custom Workflow to Trace method. For e.g. tracing.Trace(“Workflow Started”); where tracing is an object of ITracingService.
Exception Details: Contains the Exception related information which has occurred in Plug-in or Custom Workflow.
Also we can view the Trace Log records using Advanced Find. Hence we can even filter out records based on the Query specified in Advance find. Below is an example of that:
We are selecting only those records which are created due to Plug-ins.
In addition to this there’s one more advantage of the Trace Log Entity.
Before, this feature was introduced the developers used to create a Custom Entity for storing Log Records so that they could trace the tracing information or exception details. But it was quite tricky in case of Transactional Plug-ins, as we know if any part of code fails in it, the entire changes would roll back and the custom entity to store the tracing information is not created. Although now, with this System Trace Log Entity the Trace records will be created even if the code fails.
Let’s take an example to understand it. We have registered a Plug-in on “Qualify Lead” on the Post Operation.
Let’s qualify the lead and suppose an exception occurs during execution as below:

We can “Download Log File” and read the “Tracing Information” which we used to do earlier. Or now we have an option to read the related Trace Log Record which is created even if the changes are Roll Back in the system i.e. Lead is not qualified.
The related trace log record created in the system is as below:

Thus, as we can see now the trace log record is created anyhow in the system even if the operations in the Plug-in are roll backed.
Now, who can view these records by default in CRM?
By default, the System Administrators and System Customizers can view these records but the access to view can be granted to other Users too.
NOTE: Trace logs will only be written to the trace log entities if the plug-in developer uses tracing within the plug-in.
If we have enabled this feature in our System, then Trace Log records will henceforth be created in CRM for the entities having Plug-in or Custom Workflow (which implements ITracingService) registered on it. Due to this more number of Trace log records could be created in CRM, so in order to manage this we can create a Bulk Deletion Job which we can schedule such that the trace log records would be deleted over fixed interval of time.
↧
↧
More ways to search a record in Dynamics CRM 2015 Update 1 – Alternate Keys
Prior to Microsoft Dynamic CRM 2015 Update 1 the only way to identify the records in CRM was the record guid. Now with the introduction of the Alternate Keys in Dynamics CRM 2015 Update 1 we can use alternate keys to uniquely identify a record in CRM in place of the primary key (GUID).
Features of Alternate Key:
- Provides a way to uniquely identify record.
- Alternate keys can be Composite keys i.e. more than one attributes can be selected to define the alternate key, thus providing a way to define a key as a combination of multiple attributes.
- Every Alternate Key you define creates an index behind the scene.
- Once you define alternate keys for an entity it acts as inbuilt duplicate detection rule i.e. it will throw an error as can be seen below if you will try to create a record with the same alternate key value which is already set for some another record.

Create Alternate Key
Let us go through the steps to create an Alternate Key.
Alternate Keys are associated with an Entity and therefore you need to create them as a part of entity customizations.
Navigate to Settings -> Customization -> Entity to find a new "Keys" tab added along with Forms and Fields tabs.

On the "Keys" tab click the “New" button to add new keys for the entity.
When you click on "New" you get a list of "Fields" for the entities from which you can choose which Fields to set as Alternate keys. Following screen shot shows a list of fields for Account entity from which we can select to create as Alternate Key.

Only attributes of following types can be added as Alternate Keys -
1. Decimal Number
2. Whole Number
3. Single Line of Text
Note : Per entity you can define a maximum of 5 Alternate Keys only.
Alternate Keys Implementation through Code
Prior to Alternate keys, if we had to say add a new opportunity for a customer. We would like to first search for the customer and get the Guid so that we could assign that as the customer when creating an order. This meant we had to send out an explicit search request prior to the actual operation of creating an order.
With Alternate Keys such explicit calls are no longer required. Platform improvements made with the implementation of Alternate Keys actually take care of this internally.
Let's check the code to see how we can use this
1. Lets Create a new Contact and set the parentcustomerid using keys.
    KeyAttributeCollection keys = new KeyAttributeCollection();
    keys.Add("accountnumber", "ASH0011");

    Entity contactEntity = new Entity("contact");
    contactEntity["lastname"] = "Test last name 1";
    contactEntity["parentcustomerid"] = new EntityReference("account", keys);
    contactEntity["fax"] = "1234579856";

    CreateRequest req = new CreateRequest
       {
         Target = contactEntity
       };

   _service.Execute(req);
This will automatically search for the "Account" from the keys and set it as "parentcustomerid" on the Contact created.
If the keys that are specified in the code do not exist then it will throw an error "A record with the specified key values does not exist in account entity".
2. Upsert an Account using Alternate key
    KeyAttributeCollection acckeys = new KeyAttributeCollection();
    acckeys.Add("emailaddress1", "someone3@example.com");
    acckeys.Add("telephone1", "555-0152");

    Entity accountEntity = new Entity("account", acckeys);
    accountEntity["name"] = "Test Account name 1";
    accountEntity["fax"] = "12345745678";

    UpsertRequest upreq = new UpsertRequest();
    upreq.Target = accountEntity;

    UpsertResponse resp = (UpsertResponse)_service.Execute(upreq);
When we execute the above code if an Account already exists with the Alternate Keys specified in the code then it will update the Account which has the matching Alternate keys and “RecordCreated” attribute is returned as "False" in Upsert response else it will create a new Account record and set the specified Alternate keys as the corresponding attributes values on Account so that we need not provide them separately and the “RecordCreated “ is returned as "true". In above sample code you can find that we have created two Alternate keys (composite keys) i.e. “emailaddress1” and “telephone1” so if the values specified for both the keys i.e. “emailaddress1” and “telephone1” matches with another record than in this case it will find that matching record and update that existing record. If any one of the keys value matches than it will create a new record.
↧
Add Custom View in Lookup and Disable all the other Views
We had a requirement in which we were supposed to use a addCustomView method in order to filter the Lookup. We came across a situation in which we were able to set the custom view(The view with filtered records) as a default view to restrict the users from choosing the other records, but if a user wants, he/she could choose the different view from the Lookup window dialog and select the other records too, which the users were not supposed to choose.
Let us first introduce you to the situation, on the Quote form we have a Lookup field called Project Template. And, on the Quote Product form we have another Lookup field called Project Template Itemswhich should be filtered as per the value chosen for the Project Template.
We`ll start from the point where we have the ID of the chosen Project Template(to get the ID, you need to write a script on the Load of the Quote Product form).
Initially, what we started off was adding our custom view, but it still allowed the user to switch between different views, as a result users were able to choose records from other views.
We`ll explain you both the situations, the Initial Situation(which was adding the custom view) and theIdeal Situation(which was adding the custom view and restricting users from selecting other view) .
First and foremost, for the Lookup that`ll have filtered values, you need to change the below properties. These are the necessary steps.
Step 1:
From the form editor, go to the properties of the Lookup field.
Step 2:

In the Additional Properties section,
Default View – Select a View.
View Selector – Choose “Show Selected Views“.
System Views – Only Select the view which was selected in the Default view.
Initial Situation:
In this situation, we were doing everything right but, we missed something that stopped us from getting the ideal output.
Code
function setCustomView(projectTemplateId) {
var functionName = “setCustomView”;
try {
//Check whether the field exist or not
if (isValid(Xrm.Page.getControl(“new_projecttemplateitemid”))) {
// add the randomly generated GUID for the view id
var viewId = ‘{00000000-0000-0000-0000-000000000001}’;
//add the entity name
var entityName = “new_projecttemplateitem”;
// add the view display name
var viewDisplayName = “Project Template Item Lookup View”;
// fetch xml for filtered Project Template Item records
var fetchXml = “<fetch version=’1.0′ output-format=’xml-platform’ mapping=’logical’ distinct=’false’> ” +
“<entity name=’new_projecttemplateitem’>” +
“<attribute name=’new_name’ />” +
“<filter type=’and’>” +
“<condition attribute=’new_projecttemplate’ operator=’eq’ value=’” + projectTemplateId + “‘ />” +
“</filter>” +
“</entity>” +
“</fetch>”;
//Grid Layout for filtered records
var layoutXml = “<grid name=’resultset’ object=’1′ jump=’productid’ select=’1′ icon=’1′ preview=’1′>” +
“<row name=’result’ id=’new_projecttemplateitemid’>” +
“<cell name=’new_name’ width=’150′ />” +
“<cell name=’createdon’ width=’150′ />” +
“</row>” +
“</grid>”;
// add the custom view for the lookup field
Xrm.Page.getControl(“new_projecttemplateitemid”).addCustomView(viewId, entityName, viewDisplayName, fetchXml, layoutXml, true);
}
} catch (e) {
throwError(e, functionName);
}
}
In the above code everything was right but,
on selecting the Custom view, we were getting the below results:

And, on selecting the System View, we were getting the below results.

Both the views were giving us different results, which we never wanted.
So, in the search of an ideal situation we found the below solution.
Ideal Situation:
Replace the code in the box with the below code.
Code
// add the default View GUID for the view id
var viewId = Xrm.Page.getControl(“new_projecttemplateitemid”).getDefaultView();
This single piece of line works like a charm.
Now, we got the below results on selecting both the views.
Custom View:

System View:

And, this is how we got the desirable result with a small tweak in the code.
↧
How to Show Filtered Lookup Dialog in Dynamics CRM Through Script
We had a requirement where in we were supposed to show a Filtered Custom Lookup on form load. By Filtered Custom Lookup, it meant that we were supposed to create a Lookup dialog similar to CRM Filtered lookup (Filtered Lookup value changes on the basis of other Lookup on which it is dependent) dialog. The lookup has to be filtered on the basis of a value in the lookup field which was there on the form.
Now the question was, how were we supposed to achieve this? We had already done a Lookup Dialog to show all the records for an entity, but this was something new and enthralling.
We dived into it and after a few hours of R&D, we came up with a solution. This blog is entirely dedicated in explaining and implementing that solution.
Let us begin with our entity structure which comprised of an entity called Contractor and it was in N:1 relation with Project and Payment Schedule where as Payment Schedule was in N:1 relation with Project.
The requirement was to show the Filtered Custom Lookup dialog containing Payment Schedule records, related to the Project (Lookup field) selected on the Contractor, on form load of Contractor.
Screenshots:
Note: Lookup Dialog seen in the below screenshots is a Custom Lookup Dialog opened on form load using JavaScript.
Below screenshot shows the Project selected as Test Project having Payment Schedule records for it as a result of which we can see that record in the Lookup Dialog.

Below screenshot shows the Project selected as Test Project 2 and Test Project 2 has no Payment Schedule records for it and as a result we cannot see any records in the Lookup Dialog.

Let’s start with the technical part of it.
Code:
//function to open filtered entity lookup to select record
function openFilteredLookup(defaultType, defaultViewId, currentObjectType, currentId, rDependentAttr, rId, rType, relationshipId) {
var functionName = “openLookup”;
try {
if (isValid(currentObjectType) && isValid(currentId)) {
//prepare lookup url
var url = “/_controls/lookup/lookupinfo.aspx?AllowFilterOff=0&DefaultType=” + defaultType + “&DefaultViewId=%7b” + defaultViewId + “%7d&DisableQuickFind=0&DisableViewPicker=1&IsInlineMultiLookup=0&LookupStyle=single&ShowNewButton=1&ShowPropButton=1&browse=false¤tObjectType=” + currentObjectType + “¤tid=%7b” + currentId + “%7d&dType=1&mrsh=false&objecttypes=” + defaultType + “&rDependAttr=” + rDependentAttr + “&rId=%7b” + rId + “%7d&rType=” + rType + “&relationshipid=” + relationshipId + “”;
} else {
//prepare lookup url
var url = “/_controls/lookup/lookupinfo.aspx?AllowFilterOff=0&DefaultType=” + defaultType + “&DefaultViewId=%7b” + defaultViewId + “%7d&DisableQuickFind=0&DisableViewPicker=1&IsInlineMultiLookup=0&LookupStyle=single&ShowNewButton=1&ShowPropButton=1&browse=false&dType=1&mrsh=false&objecttypes=” + defaultType + “&rDependAttr=” + rDependentAttr + “&rId=%7b” + rId + “%7d&rType=” + rType + “&relationshipid=” + relationshipId + “”;
}
//Set the Dialog Width and Height
var DialogOptions = new Xrm.DialogOptions();
//Set the Width
DialogOptions.width = 500;
//Set the Height
DialogOptions.height = 550;
//open dialog
Xrm.Internal.openDialog(Mscrm.CrmUri.create(url).toString(), DialogOptions, null, null, CallbackFunction);
//Set the variable to false
isOnLoad = false;
} catch (e) {
throwError(e, functionName);
}
}
What are the parameters passed for the above used function?
- defaultType = Object Type Code of the entity which needs to be shown in the Lookup.
- defaultViewId = GUID of the defaultView which will be set for the Look In section of the Lookup Dialog, in order to get the defaultView GUID, you can use the following code :
//Get the Default View id
Xrm.Page.getControl(controlName).getDefaultView().replace(“{“, “”).replace(“}”, “”).trim();
- controlName: It is the name of the Lookup Control.
- currentObjectType = Object Type Code of the current entity.
- currentId = GUID of the current record.
- rDependentAttr = new_contractor.new_projectid
As the name suggest it`ll give the attribute on the basis of which lookup is filtered.
The above rDependentAttr value is used in our current demo.- new_contractor: It is the name of the current entity.
- new_projectid: It is the control/attribute name on the basis of which the Lookup is filtered.
- rId = It is the GUID of the record selected in the new_projectid field.
- rType = It is the Object Type Code of the new_projectid.
- relationshipId = new_new_project_new_paymentschedule.
It is the relationship name of how the Project and Payment Schedule entities are related.
Note:
- We can retrieve Entity Metadata to get the Object Type Code of any entity.
- The above method is an unsupported method to get the Lookup.
- How to use Xrm.Internal.openDialog method?
↧