Quantcast
Channel: Sam's Activities
Viewing all 3363 articles
Browse latest View live

Converting Date and Time based on User Time Zone in PowerApp for Dynamics 365 CE

$
0
0

Introduction

In our previous blog we have explored on how to set date and time fields of dynamics 365 through power app. Handling date and time fields according to time zone is quite tedious task. In today’s blog we will explore more on how to handle date and time fields of dynamics 365 according to user time zone in power apps.

The time zone of dynamics 365 instance is set as “Eastern Time” as shown in below screenshot:

Converting Date and Time based on User Time Zone in Power App for Dynamics 365 CE

But my app is running on the phone where time zone is set as “Indian Standard Time”.

Therefore, we cannot set correct time in the date and time fields due to time zone difference between dynamics 365 and powerapp.

To solve this difference, follow the below steps for updating the date and time fields of records in dynamics 365 through power app:

1. Create a default Canvas app for appointment entity by using Dynamics 365. You can refer our previous blog here

2. Now add “Start Date” and “End Date” fields on the edit screen as shown in the below screenshot:

Converting Date and Time based on User Time Zone in Power App for Dynamics 365 CE

3. Now on “onSelect” property of “IconAccept
Converting Date and Time based on User Time Zone in Power App for Dynamics 365 CE
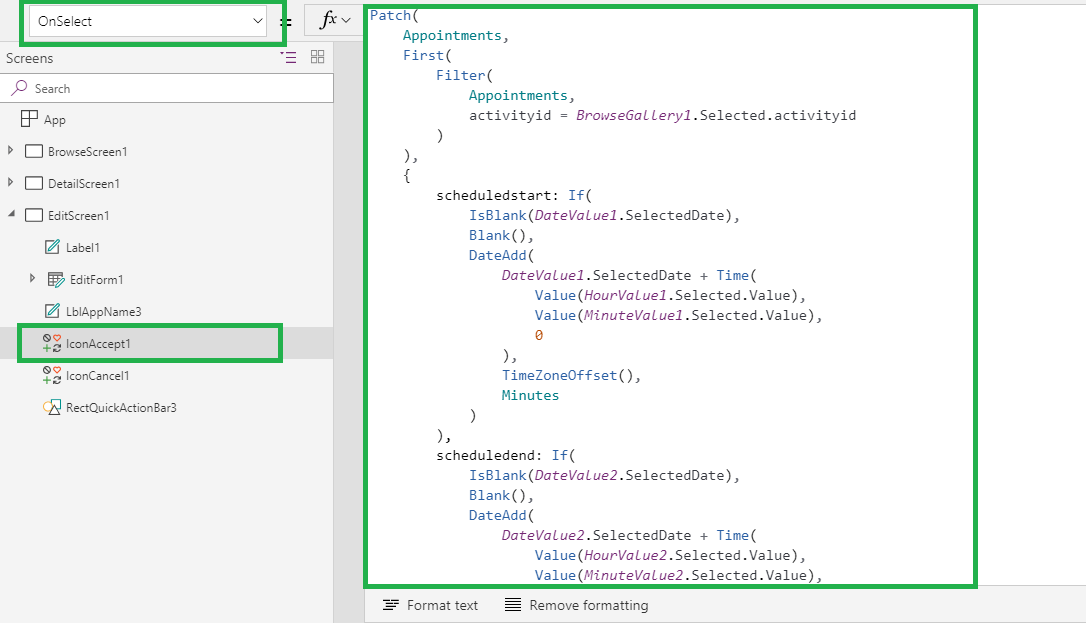
add patch formula as given below:

Patch(

Appointments,

First(

Filter(

Appointments,

activityid = BrowseGallery1.Selected.activityid

)

),

{

scheduledstart: If(

IsBlank(DateValue1.SelectedDate),

Blank(),

DateAdd(

DateValue1.SelectedDate + Time(

Value(HourValue1.Selected.Value),

Value(MinuteValue1.Selected.Value),

0

),

TimeZoneOffset(),

Minutes

)

),

scheduledend: If(

IsBlank(DateValue2.SelectedDate),

Blank(),

DateAdd(

DateValue2.SelectedDate + Time(

Value(HourValue2.Selected.Value),

Value(MinuteValue2.Selected.Value),

0

),

TimeZoneOffset(),

Minutes

)

)

}

)

Converting Date and Time based on User Time Zone in Power App for Dynamics 365 CE

In the above formula we have implemented the “DateAdd” and “TimeZoneOffSet()” function to convert the data and time value into UTC format.

  • DataAdd: The DateAddfunction adds a number of units to a date/time value.
  • TimeZoneOffSet : The TimeZoneOffsetfunction returns difference between the user’s local time and UTC in minutes.

4. Let’s run the app and set “Start Time” and “End Time” for a record in CRM through PowerApp by selecting Converting Date and Time based on User Time Zone in Power App for Dynamics 365 CE in powerApp.

Converting Date and Time based on User Time Zone in Power App for Dynamics 365 CE

5. Now as shown below the “Start Time” and “End Time” values are updated in CRM in Eastern Time:

Converting Date and Time based on User Time Zone in Power App for Dynamics 365 CE

Conclusion

PowerApps allows user to handle date and time fields of dynamics 365 according to user time zone.

https://www.inogic.com/product/productivity-pack/click-2-clone-microsoft-dynamics-crm-records


Clone Dynamics 365 Work Order along with related records using Click2Clone

$
0
0

Work order is an entity which is mostly used by Dynamics 365 users as work order has information of what work needs to be done. It is used to coordinate and schedule resources and activities. It can be used for different types of work, such as installations, repairs, or preventive maintenance. A work order can contain: A description of issue or work to be completed, Customer details including service and billing accounts, Equipment affected, Location, Parts, Products and Services needed, Tasks to follow, Priority and estimated duration and Characteristics (skills) required to complete the work order.

So, if user wants to create a work order with the same details using existing work order with different account then it is time consuming task to manually fill all the details every time. In this case we can use Click2Clone solution to create exact replica of the previous work order. Click2Clone helps user for cloning/copying OOB and Custom Entity records and their child records. It also clones/copies one Entity record to another Entity along with the relationships. With Click2Clone you can Clone/Copy multiple records. It reduces the iterative task of re-entering duplicate Dynamics 365 CRM records.

To clone records of work order is bit different than any other entity because the Work Order has their own plugin and workflows register on it. While cloning the Work Order records user needs to take few preventive measures so that it helps user to successfully clone the work order record.

To clone records of Work Order entity, user need to create Click2Clone Template for Work Order. Creating Click2Clone template is an easy process after which you can clone the attributes and relationships.

Below are the steps mentioned for creating Click2Clone Template.

1. Navigate to Settings -> Click2Clone Group-> Click2Clone Template in the sitemap.

Clone Dynamics 365 Work Order along with related records using Click2Clone

2. Next, click ‘New’to create the Click2Clone template.

Clone Dynamics 365 Work Order along with related records using Click2Clone

3. Fill the following details to Create New Template and click on save as shown below:

Note: Source Entity Name is an autocomplete field.

Clone Dynamics 365 Work Order along with related records using Click2Clone

4. After clicking on SAVE,  Check/uncheck the attributes and the relationships which need to be cloned and then click on ‘Save’ button provided on the grid.

Clone Dynamics 365 Work Order along with related records using Click2Clone

Now  to clone work order record uncheck the “msdyn_name” attribute because name is  an unique name of work order and“msdyn_SystemStatus” attribute, the reason is newly created work order status must be in open-unschedule.

Clone Dynamics 365 Work Order along with related records using Click2Clone

Clone Dynamics 365 Work Order along with related records using Click2Clone

If user hasn’t unchecked above two attributes it will throw an error that Work Order must be unique and for msdyn_SystemStatus you can’t change the status to “Scheduled” because the work order has a booking that’s in progress or has no booking that’s scheduled.

There might be some more scenarios when user want to clone work order along with their related records.

Case 1: Cloning Work Order along with Resource Requirement.

a. To clone Work Order along with the resource requirement, first user needs to select the resource requirement relationship (msdyn_msdyn_workorder_resourcerequirement_WorkOrder) from Attribute relationship grid as shown below.

Clone Dynamics 365 Work Order along with related records using Click2Clone

b. Create Click2Clone template for “Resource Requirement” entity and uncheck attributes ”msdyn_IsPrimary”, “msdyn_FulfilledDuration”, ”msdyn_RemainingDuration”, ”msdyn_WorkOrder”.

Clone Dynamics 365 Work Order along with related records using Click2Clone

If user doesn’t uncheck “msdyn_IsPrimary” attribute then it will throw an error with the message as you can only set one resource requirement under a “Work Order” as primary.

If user doesn’t uncheck “msdyn_FulfilledDuration”,”msdyn_RemainingDuration” attributes then it will throw an error with the message as Fulfilled Duration field and Remaining Duration field can’t be changed manually.

Case 2: Cloning Work Order along with Bookable Resource.

a. To clone Work Order along with the Bookable Resource, first user needs to select the Bookable Resource relationship (msdyn_msdyn_workorder_bookableresourcebooking_WorkOrder) from Attribute relationship grid on Work Order Click2Clone Template as shown below.

Clone Dynamics 365 Work Order along with related records using Click2Clone

b. Create Click2Clone template for “bookableresourcebooking” entity and uncheck attribute ”msdyn_ResourceRequirement otherwise user will get an error the Work Order must match the Work Order on the Resource Requirement.

Clone Dynamics 365 Work Order along with related records using Click2Clone

Case 3: Cloning Work Order along with Work Order Product.

a. To clone Work Order along with the Work Order Product, first user needs to select the Work Order Product relationship (msdyn_msdyn_workorder_workorderproduct_WorkOrder) from Attribute relationship grid on Work Order Click2Clone Template as shown below.

Clone Dynamics 365 Work Order along with related records using Click2Clone

b. Create Click2Clone Template for “msdyn_workorderproduct” entity and uncheck attribute “msdyn_Booking”, ”msdyn_LineOrder”, ”msdyn_LineStatus”.

Clone Dynamics 365 Work Order along with related records using Click2Clone

Clone Dynamics 365 Work Order along with related records using Click2Clone

If you won’t uncheck the above said attributes then while creating work order along with the work order product you will get an errors.

Conclusion

Thus you can see how using Work Order you coordinate and schedule resources and activities with few preventive measures.


Format Table Data to Show Horizontally in Power BI

$
0
0

Introduction

We recently had business requirement to show account details (account number, Email) horizontally by “Account Name” in Power BI Report. When we selected table to display data in our Power BI report, by default it display data vertically, as you can see in our below screenshot:

Format Table Data to Show Horizontally in Power BI

We explored more and figure out that we can’t format table to show values horizontally. So for workaround by using matrix we can format table to display data horizontally.

Please follow below steps to show data horizontally in table:

1. At first we need to select Matrix to display data instead of table, as you can see in below screenshot:

Format Table Data to Show Horizontally in Power BI

2. Now you need to select fields that you want to show in table, here in our case we are showing Account name (name) as a Column, Account Number (account number) and Email (emailaddress1) as a Values. Please check in our below screenshot:

Format Table Data to Show Horizontally in Power BI

3. In final steps you need to turn on “Shows on rows” property under Values in Format tab. Please follow our below screenshots:

Format Table Data to Show Horizontally in Power BI

4. Now as you can see in our below screenshot our table data Account Number and Email are formatted horizontally and showing by Account Name.

Format Table Data to Show Horizontally in Power BI

Conclusions

By using Matrix feature of Power BI, we can aligned values in table horizontally.

Attach2Dynamics

Azure Functions, Web API, PowerApps and other tricks for Dynamics 365 CRM – Most Clicked Blogs of the Year!

$
0
0

PowerApps

Powered by passion – Inogic is a leading Microsoft ISV for Dynamics 365 CRM for over more than a decade. We brew innovative products and fuel Dynamics 365 with our range of solutions. Inogic also offers bespoke high-quality low-cost offshore development services for Microsoft products such as Power BI, Flow, PowerApps, Portals and others.

Given our super modern slick technology, we believe in sharing tips and tricks with our community from time to time. Therefore, we come up with informative blogs and are quite active on community forums. In this blog we are going to compile the top five blogs of 2018 which have been most clicked. Compiling them again for our friends who missed these posts. Thank you so much for sharing our posts and encouraging us to explore Dynamics 365 and Power Platform.

Dynamics 365 v9.0: Xrm.WebApi – CRUD Operations Part – 1

This blog talks about how Xrm.WebApi acts as a boon for developers. In the versions prior to v9.0 one had to create their own libraries or use third party libraries or create XmlHttpRequest and AJAX request. With Xrm.WebApi enhancement in Dynamics 365 CRM v9.0 developers’ life is made easy. In a continuation to this blog Dynamics 365 v9.0: Xrm.WebApi – Operations Part – 2 we have discussed how to Retrieve Multiple records and Execute Actions.

Integrating Dynamics 365 with Azure Functions – Part 1, Part 2, and Part 3

Azure function is a server-less architecture where you can host your code on cloud without any infrastructure. In this blog we have taken example of creating Azure function and called same through workflows. We have also depicted how a function can be executed as an HTTP request. This series of blogs talks about invoking Azure functions from Dynamics 365.

Working on Lookup Field of Dynamics 365 in PowerApps

PowerApps allows building business Apps that run cross platform. Citizen developers with minimal development capabilities can build Apps and deploy them for usability. These apps are modular in nature and these can be dragged and dropped to build an App in short span of time. It allows anyone in an organization unlock new business agility.

Given a business requirement we needed to set lookup fields using PowerApps in Dynamics CRM. This is not inherently supported in PowerApps so after a little research we found out the solution to this. This blog explains the steps to read and set Lookup fields of Dynamics 365 in Power Apps.

Show Lookup Dialog in Dynamics 365 v9.0

This blog discusses about how using the new feature introduced in Microsoft Dynamics 365 v9.0 users can show lookup dialog using Xrm.Utility.lookupObjects method. The parameters required for Xrm.Utility.lookupObjects are list of the entities to be displayed, default entity to be shown in lookup window, Guid of default view, specification whether to allow user to select multiple records and list of views that need to be available for lookup dialog. Using these parameters a lookup dialog can be seen.

JavaScript: “Execution Context” provides Form Values on Web as well as UCI in Dynamics 365 v9.0

After the introduction of UCI there is a generic interface for the end users, this is about UI but behind the scene for developers Microsoft provided “Execution Context” object which is a collection of array. This blog talks about how we can pass the Execution Context using “Primary Control” CRM Parameter to Script function which we can call on Click of Custom Button.

If you want to explore more informative blogs visit this space.

We provide services for PowerApps,Microsoft Flow,Microsoft Portal,Power BI and others. Contact us for any query, suggestion or feedback at crm@inogic.com

Keep Exploring!

Cascading of Two Multi-Select Option Set fields in Dynamics 365 v9.0

$
0
0

Introduction

Microsoft introduced Multi Select Option Set in Dynamics 365 V9.0, which will help us to select more than one option.

Recently we had a business requirement, where the client required multi-select option set values to populate programmatically on selection of another multi-select option set.

To achieve this, first, we need to create two multi-select option set fields in CRM e.g. Mobile Company (Parent Multi-Select option set) and Mobile Handset (Child Multi-Select option set).

Then we need to create one JSON web resource in Dynamics 365 CRM, where we can define child option set values against each parent option set value.

JSON

E.g.

var JsonDataobj =

[{

mobileCompany: 100000010,

mobileHandset: [

{value: 100000011,text: ‘Nokia 6.1’},

{value: 100000012,text: ‘Nokia 7.1’},

{value: 100000013,text: ‘Nokia 8.1’}

]},

{

mobileCompany: 100000020,

mobileHandset: [

{value: 100000021,text: ‘iPhone X’},

{value: 100000022,text: ‘iPhone 7’}

]},

{

mobileCompany: 100000030,

mobileHandset: [

{value: 100000031,text: ‘Samsung S8’}

]

}]

Now onLoad of Entity Form and onChange of parent Multi-Select option set we need to call below script.

Script

cascadingMultiOptionSet(executionContext): void {

/// <summary>

///  This function trigger on onload of form and onchange of Parent multi-option set field and set values of child multi option set field

/// </summary>

/// <returns type=”void” />

var functionName = “cascadingMultiOptionSet”;

var newChildOptArr = [];

var position = 0;

var newSelectedChildOpts = new Array();

try {

//JSON data retrieved from webresource

var parentChildCollection = JsonDataobj;

var formContext = executionContext.getFormContext();

//get parent’s selected  option values

var selectedParentOptValue = formContext.getAttribute(“ikl_mobilecompanies”).getValue();

//check if value selected or not

if (selectedParentOptValue != null && selectedParentOptValue.length > 0) {

//add value from parentChildCollection array to newChildOptArr.

for (var i = 0; i < selectedParentOptValue.length; i++) {

newChildOptArr = newChildOptArr.concat((parentChildCollection.find(x => x.mobileCompany == selectedParentOptValue[i])).mobileHandset);

}

//get all options from child option set

var existingChildOptValues = formContext.getControl(“ikl_mobilehandset”).getOptions();

//get selected options from child optionset

var selectedChildOptValue = formContext.getAttribute(“ikl_mobilehandset”).getValue();

var childOptCount = existingChildOptValues.length;

//remove options from child optionset

for (var i = childOptCount – 1; i >= 0; i–) {

//check if option is not selected or not present in newChildOptArr array then remove that option

if (selectedChildOptValue == null || selectedChildOptValue.indexOf(parseInt(existingChildOptValues[i].value)) <= -1 || (newChildOptArr.find(x => x.value == existingChildOptValues[i].value)) == undefined) {

//remove options from child options set

formContext.getControl(“ikl_mobilehandset”).removeOption(existingChildOptValues[i].value);

}

}

//set position of new element

position = selectedChildOptValue == null ? 0 : selectedChildOptValue.length;

//clear selected values from child option set

formContext.getAttribute(“ikl_mobilehandset”).setValue(null);

//add new options from newChildOptArr to child option set field

for (var i = 0; i < newChildOptArr.length; i++) {

//if value aready selected then don’t add that value

if (selectedChildOptValue == null || selectedChildOptValue.indexOf(parseInt(newChildOptArr[i].value)) <= -1) {

//addOptions with values and position

var optionSet = new Object();

optionSet.value = newChildOptArr[i].value;

optionSet.text = newChildOptArr[i].text;

formContext.getControl(“ikl_mobilehandset”).addOption(optionSet, position++);

}

//add previously selected option set to newSelectedChildOpts array

if (selectedChildOptValue != null && selectedChildOptValue.indexOf(parseInt(newChildOptArr[i].value)) > -1) {

newSelectedChildOpts = newSelectedChildOpts.concat(parseInt(newChildOptArr[i].value, 10));

}

}

}

else//if parent options not selected then clear child options

{

formContext.getAttribute(“ikl_mobilehandset”).setValue(null);

formContext.getControl(“ikl_mobilehandset”).clearOptions();

}

//set value of selected child option set

if (newSelectedChildOpts != null && newSelectedChildOpts.length > 0) {

formContext.getAttribute(“ikl_mobilehandset”).setValue(newSelectedChildOpts);

}

}

catch (ex) {

throw new Error(ex);

}

}

Result

1) If we select Nokia in Mobile Company Multi-select option set, then the Mobile Handset will bind only mobile handsets of Nokia.

Cascading of Two Multi-Select Option Set fields in Dynamics 365

2) If we select Apple and Nokia in Mobile Company, then both Apple and Nokia handset will be displayed in Mobile Handsets multi-select option set and the selected values of Nokia will remain the same.

Cascading of Two Multi-Select Option Set fields in Dynamics 365

3) If we remove Nokia from Mobile Company, then only Apple company handsets will be displayed in Mobile Handset multi-select option set and the selected options of Nokia handset will be cleared.

Cascading of Two Multi-Select Option Set fields in Dynamics 365

4) If the Mobile Company doesn’t contain any value, then Mobile Handset multi-select option will remain empty.

Cascading of Two Multi-Select Option Set fields in Dynamics 365

In order to see saved values of the multi-select option set for both parent and child it is necessary to trigger the above script function on a load of form.

Conclusion

We can achieve cascading of two multi-select option set from the above given script.

Click2Clone-One-Click-Productivity-App-to-Copy_clone-Dynamics-365_CRM-Records

How to retrieve multi select option set field from crm using C#?

How to use htmlEncode functionality in Dynamics 365 CRM

$
0
0

Introduction

Recently we were facing an issue where the presence of special character in string hindered the search of record in Dynamic CRM web and UCI. After working on this issue it was found that there are some more special characters which does not work like:  & “ ‘  < > + ; etc.

Even encoding that string by encodeURIComponent and adding it to FetchXml resulted in display of errors in web and UCI, such as:

  • Invalid Xml.
  • URIError: URI malformed
  • http Error 500

To resolve this issue in Dynamic CRM v9, we finally made use of htmlEncode.

Xrm.Encoding.htmlEncode(arg)

Pass the record name in htmlEncode and use the resultant string to search record. There will be no further hindrance in finding the respective record in Dynamics CRM.

Fetchxml without htmlEncode:

<fetch version=’1.0′ output-format=’xml-platform’ mapping=’logical’ distinct=’false’>

<entity name=’new_projectdetails’>

<all-attributes /><filter type=’and’>

<condition attribute=’ikl_name’ operator=’eq’ value=’Ben & Jerry’s Leads’ />

<condition attribute=’statecode’ operator=’eq’ value=’0’/>

</filter>

</entity>

</fetch>

FetchXml with htmlEncode:

<fetch version=’1.0′ output-format=’xml-platform’ mapping=’logical’ distinct=’false’>

<entity name=’new_projectdetails’>

<all-attributes /><filter type=’and’>

<condition attribute=’ikl_name’ operator=’eq’ value=’Ben &#38; Jerry&#39;s Leads’ />

<condition attribute=’statecode’ operator=’eq’ value=’0’/>

</filter>

</entity>

</fetch>

But in dynamics CRM 8.2 we can’t use htmlEncode to encode the string. To make this possible we have to write one function which converts the special character present in string.

This function in htmlEncode will convert the special character into the Html Number. Html Number is combination of &# and decimal number of that character and ;

For example:

For & special character decimal number is 38, so htmlEncode for & is &#38;

So to convert the special character to html number, we have to write the below function:

function handleSpecialChar(string) {

try {

return string.replace(/[\x26\x2B\x3B\<>'”]/g, function (r) { return “&#” + r.charCodeAt(0) + “;” })

} catch (e) {

showAlert(“handleSpecialChar Error: ” + e || e.message || e.description);

}

}

Use the above function to encode the special character in string.

For example: Ben & Jerry’s Lead

String htmlEncode is:   ‘Ben &#38; Jerry&#39;s Leads

Now pass the resultant string in FetchXml to search record in Dynamics CRM.

Conclusion

In the presence of special characters in string you can use htmlEncode to search records in Dynamics 365 CRM.

Attach2Dynamics


Sync Resco Project with the latest Field Service Mobile App

$
0
0

Introduction

Recently we had a business requirement. Since the new “Field Service Mobile” app by Microsoft is available, we decided to use that app to check its advanced features in the “Resco MobileCRM” app (Example: New Themes). So we have downloaded the latest Field Service Mobile“Version 11.2.202” app on our device from App Store.

Please refer below screenshot,

Sync Resco Project with the latest Field Service Mobile App

Then we installed “Field Service 7.5.5.65” and “Woodford MobileCRM v11.3.1.0” solutions in our CRM environment.

Please refer below screenshot,

Sync Resco Project with the latest Field Service Mobile App

Then we opened the “Woodford Mobile CRM Configuration” tool and imported Resco Project (Which was previously being published for Resco MobileCRM App) and published it with “Version 11-1-9.2” in “Woodford Configuration” tool.

Please refer below screenshots,

Sync Resco Project with the latest Field Service Mobile App

Sync Resco Project with the latest Field Service Mobile App

Note: To be able sync the Resco Project with the Field Service Mobile app, we need to publish the Resco Project with “Version 11-1-9.2”.

After publishing the Resco Project, we tried to sync it with the “Field Service Mobile” app which is installed in our device. But the app did not synced and displayed error “Your organization has not configured the Field Service Mobile app with the correct project”.

Please refer below screenshot,

Sync Resco Project with the latest Field Service Mobile App

So we discussed about this issue with Microsoft and as per that, if we want to synch Resco Project in “Field Service Mobile” app then we have to add our customizations into the default project template (which was provided by them) and publish the project with “Version 11-1-9.2”. But then we could have to move all the customization to that default project template which is very time consuming process. Since there is no direct way to move customisation in latest Resco project.

So to avoid this process we compared our Resco Projects with the default template (Provided by Microsoft) and the “Telemetry.js” file was missing in our Resco Project. So we have uploaded the “Telemetry.js” file in Offline HTM section of Resco Project and published it with the “Version 11-1-9.2”.

Please refer below screenshot,

Sync Resco Project with the latest Field Service Mobile App

And after publishing the project it synced successfully in “Field Service Mobile” app as shown below.

Please refer below screenshot,

Sync Resco Project with the latest Field Service Mobile App

Conclusion

Instead of moving all the customizations in the default project template, we can just add “Telematry.js” file in Offline HTML section of Resco Project and publish it with the “Version 11-1-9.2” to make it compatible with “Field Service Mobile” app.

Map Dynamics CRM


Move Dynamics 365 CRM attachments to Azure Blob and retrieve from there on CRM and Portal

$
0
0

Hello Experts,

What are the alternatives to store attachments somewhere else rather than on CRM,

As we have only 10gb storage and the attachment files are too large,

we basically wants to store attachments somewhere else rather than CRM and want to retrieve those

attachments on CRM and Portal side.

Please help how it can be achieved.

Thanks in advance.

CRM 2016 and Dropbox File Integration

$
0
0

I saw somewhere that the new release of CRM 2016 would include dropbox file integration with CRM.     Please advise if this is real or something rumored.    Thanks, Steve

How to retrieve multi select option set field from crm using C#?

Quick tip for multiple sub grids appearing on the Marketing List form in Dynamics 365 v9.1

$
0
0

Recently one of our customers upgraded to Dynamics 365 V9.1 version and encountered a problem with Marketing List entity.

When the customer tried to view the existing Marketing List record, multiple sub grids were displayed on the Marketing List form.

Follow the given steps to replicate the multiple sub grid issue:

  1. Create the Marketing List record Or Open the existing Marketing List record
  2. Set one of Targeted At field (Contact/Account/Lead), let’s say Contact
  3. Refresh the page
  4. Observe the sub grids on the form
  5. Customer encountered multiple sub grids on form as highlighted below:

Quick tip for multiple sub grids appearing on the Marketing List form in Dynamics 365 v9.1

With further investigation, it came to our notice that 6 sub grids appeared on Marketing List form. Out of these, two of each belonged to Contacts, Accounts and Leads respectively. Among these 6 sub grids 3 were having ‘See the records associated with this view’ button which will let you view the associated records in that sub grid. Given below the respective screenshot:

Quick tip for multiple sub grids appearing on the Marketing List form in Dynamics 365 v9.1

Ideally through OOB, upon creation of Marketing list only one sub grid should appear on the Marketing List form. This sub grid will display records of the selected ‘Targeted At’ field.

For e.g. In case ‘Targeted At=Contact’, then only Contact sub grid and its associated records will be displayed in the Marketing List.

Root cause

After further investigation, we found that under organizations system setting in general tab ‘Use legacy form rendering’ option was set to ‘Yes’ due to which multiple sub grids were appearing on Marketing List form.

Note: ‘Use legacy form rendering’ is by default set as ‘NO’ through OOB.

Quick tip for multiple sub grids appearing on the Marketing List form in Dynamics 365 v9.1

Solution

To fix the multiple sub grids issue, we simply changed ‘Use legacy form rendering’ to ‘No’ and the issue was resolved.

As shown in the below screenshot, only Contact subgrid is displayed when ‘Target At’ field on Marketing List was populated as Contact.

Quick tip for multiple sub grids appearing on the Marketing List form in Dynamics 365 v9.1

Conclusion

For compatibility, if you are going to enable the legacy form rendering engine then keep in mind that the CRM entity performance may be adversely affected.  The Marketing List form will encounter similar problems as discussed in this blog.

Click2Clone-One-Click-Productivity-App-to-Copy_clone-Dynamics-365_CRM-Records


CRM 2015 Package Deployer: No import packages were found...

$
0
0

I'm having an issue with the package deployer from the SDK.  I simply get the message "No import packages were found.  Exiting the program..."

But my package and the corresponding .dll are all in the PackageDeployer directory.  And everything is 'unblocked'.  Would there be some other reason why the PackageDeployer cannot detect my own package?

Retrieval of Many-to-Many (N:N) Relationship Records using Web API in Dynamics 365

$
0
0

Introduction

In this blog we will learn to retrieve Dynamic CRM entity records in respect of Many to Many relationships between two Dynamic CRM entities (OOB/Custom).

So let’s take a look at the following example:

In the below screeshot, there is one Many-to-Many relationship present between Account and Territory Entity of Dynamic CRM.

Web API in Dynamics 365

One Territory entity subgrid is added to the Account entity form.

Web API in Dynamics 365

So, now we need to retrieve Account entity records which are associated with the three territories shown in the above screenshot (i.e California, Nevada, New York). For this, we need to first prepare the fetchXml query for retrieving the Account entity records.

<fetch version=”1.0″ output-format=”xml-platform” mapping=”logical” distinct=”true”>

<entity name=”account”>

<attribute name=”name” />

<order attribute=”name” descending=”false” />

<link-entity name=”new_account_territory_entity_name” from=”accountid” to=”accountid”    visible=”false” intersect=”true”>

<link-entity name=”territory” from=”territoryid” to=”territoryid” alias=”ab”>

<filter type=”and”>

<filter type=”or”>

<condition attribute=”name” operator=”eq” value=”Nevada” />

<condition attribute=”name” operator=”eq” value=”New York” />

</filter>

</filter>

<attribute name=”name” />

<attribute name=”territoryid” />

</link-entity>

</link-entity>

</entity>

</fetch>


Note:

new_account_territory_entity_name: It is defined as IntersectEntityName which you can get from N:N relationship record as shown in the screenshot below.

accountid:  It is defined as Entity1IntersectAttribute attribute which you can get from N:N relationship record.

Web API in Dynamics 365

Now run this fetchXml query using Web API.

//create AJAX request

Maplytics_jQ.ajax({

type: “GET”,

contentType: “application/json; charset=utf-8”,

datatype: “json”,

//async: false,

url: this.getWebAPIPath() + entitySetName + “?fetchXml=” + fetchXml,

beforeSend: function (xhr) {

//Specifying this header ensures that the results will be returned as JSON.

xhr.setRequestHeader(“Accept”, “application/json”);

xhr.setRequestHeader(“Content-Type”, “application/json; odata.metadata=minimal”);

xhr.setRequestHeader(“OData-MaxVersion”, “4.0”);

xhr.setRequestHeader(“OData-Version”, “4.0”);

xhr.setRequestHeader(“Prefer”, “odata.include-annotations=*”);

},

success: function (data, textStatus, xhr) {


},

error: function (xhr, textStatus, errorThrown) {

retrieveUsingFetchError(Inogic.Maplytics.ApiLib.errorHandler(xhr));

}

});

Conclusion

The above query will help to retrieve Account records which are associated with three territories records (i.e Nevada, New York, California).

Easily-Export-Dynamics-365-Reports-in-PDF-Word-or-Excel


Individual User Activity Report

$
0
0

Is there anyway to run a report on Activity/Usage per individual?  We want to do evaluations on whom is using the program and how much they are using it in our annual review.

Any suggestions appreciated.


Integrate Intuit QuickBooks with Dynamics 365 CRM using InoLink to maintain data integrity

$
0
0

Have you ever wondered a scenario where you could view the accounting data of your organization within Dynamics CRM to expedite your business process? We have just the right solution for you! InoLink is a tool that integrates Dynamics 365 CRM with your accounting software Intuit QuickBooks. It allows Sales team of an organization, which does not have access to Intuit QuickBooks or accounting information of its organization, to view this data in Dynamics CRM.

In our last release, we hosted InoLink on Azure, made it real-time, and extended the support of one instance of Dynamics CRM to multiple QuickBooks companies. As we believe in keeping ourselves updated with technology we came up with another recent release. Yes! We have modified InoLink and added one more functionality to it, now you have the option to promote data from Dynamics CRM to QuickBooks based on option set. What is option set? As InoLink supports multiple QuickBooks companies’ data sync with single instance of Dynamics CRM, how can you segregate different QuickBooks companies’ data while syncing?

Here option set comes in the picture, basically, you can have option set type of field on your Account and Contact entity to sync your QuickBooks companies’ data based on the option set field which is present on Account and Contact in Dynamics 365 CRM. This makes promoting data from Dynamics CRM to QuickBooks Company more organized.

Let’s consider a use-case. Suppose you have two companies in your QuickBooks, one to manage SupplierType of customers and another to manage Client Type of customers. Type is a field that exists in Dynamics CRM. Now you want to sync data between QuickBooks and Dynamics CRM in such a way, that data from first QuickBooks customer is synced with SupplierType in Dynamics CRM and data from second QuickBooks customer is synced in Client Type in Dynamics CRM. For this we can use option set field, we define the filter criteria as Type. The data with customer Supplier will search if there is a same record with TypeSupplier in Dynamics CRM. If a same record exists, it will simply update the record and if not, it will create a new record with Type as Supplier in Dynamics CRM and similarly, it will search and perform action for Type Client. Thus data is synced in corresponding companies based on option set. This maintains data integrity and allows data sync in a streamlined manner.

This was the update of our latest release. Let’s understand InoLink’s functionality better.

As you know, InoLink provides two-way synchronization of data in Account, Contact, Products, and Prices, which means as soon there is a data update in QuickBooks or Dynamics CRM in these Entities, it reflects in both the systems by synchronization. Here, if a record doesn’t exist in one of the systems it is auto-created. These entities can be unlinked at any time allowing you to choose to stop synchronization of this data.

There is no provision to send data from Transaction History (Estimate, Credit Memo and Invoice) from QuickBooks to Dynamics CRM in OOB entities, so we ship a custom Entity Sales Transaction with InoLink. We have only one-way one-time promotion from Dynamics 365 CRM to QuickBooks. Once this synchronization takes place you cannot repeat the process. However, you can alter the data in these Entities manually. At any point of time, you can choose to bulk transfer data from Dynamics CRM to QuickBooks or otherwise. This transfer runs in batches as there is concurrency error in QuickBooks if all the data is transferred at once. Apart from bulk transaction, there is also real-time synchronization of data from Dynamics 365 to QuickBooks which means as soon there is an update in Dynamics CRM it is reflected in QuickBooks.

Using InoLink you can also trace the Aging Details i.e., when an invoice is created but payment is still pending, one is able to see for how long the payment has been pending and is reflected in Accounts and Contact entity of Dynamics CRM. As both the systems are linked so there is seamless data synchronization but no duplication. Using InoLink it is also possible to calculate tax in Quote/Order/Invoice.

Thus you have seen how using InoLink all your accounting needs are met from within Dynamics 365 CRM. Let’s explore further and take a glance at the benefits of InoLink:

  • Meets Accounting Needs Quickly

Sales team can easily perform actions and do analysis of the accounting data of their organization without meddling with the process.

Provides deep insight into the accounting information of a customer.

  • Boost Sales Performance

Sales team can make informed decisions to augment the sales process for customer satisfaction.

  • Multiple QuickBooks Companies

Using InoLink you can sync multiple QuickBooks companies with single instance of Dynamics CRM.

Using InoLink you can expedite your business process by increasing the ROI. Isn’t this a seamless way to meet your accounting needs! To download the solution and go through its collaterals visit our Website or Microsoft AppSource.

We hope you enjoyed the blog, please leave your comments in the section below.

In case you have any queries, doubts or want to understand the functionality of InoLink better by an extensive demo, mail at crm@inogic.com

We would be thrilled to interact with you. Before we return with another exciting blog, keep exploring our other articles.

Ciao!

Import Campaign Responses by contact or lead email address

$
0
0

I want to be able to import an excel file of Campaign Responses and to associate these with either a Lead or a Contact that will already exist in the CRM. I have tried using the Import template and adding the email address of the lead or contact to the Customer field, but this is not recognised.

I can't use the Contact or Lead's name as there may be multiple customers in the system with the same name, in which case this will also error.

I also tried just adding the email address into the 'Email' field on the template and uploading, this imported but didn't associate the Campaign Response with the existing Contact.

Is there a way/format I can use to get it to recognise that the Campaign Repsonse is associated with an existing contact or lead?

Add Custom Entity to Activity Party list

$
0
0

We are using the following activities: Fax, Phone Call, Letter, Appointment, and Recurring Appointment. On these activities there is a "To" field. This field is a party list and has the following OOB entities in the list: account, contact, lead, and user.  Is there a way to add a custom entity to this party list. We have a custom entity for employees and we need to be able to set the "To" to an employee. I have been looking without success to see if there was a way to add out custom entity to the party list. I haven't been able to find out how the party list is set to in include the OOB entities. I am looking for a supported or unsupported way to do this.  If that is not possible I wanted to figure out how the party list works so I can effectively explain why this request is not possible.

EasyRepro – Open record using Grid.OpenRecord() in Dynamics 365 Unified Interface

$
0
0

Introduction

EasyRepro is a framework which is used to automate UI testing for dynamics customers Projects.

Problem

Grid.OpenRecord() method is used for opening the record from home page. This method opens the record by clicking on the first available anchor tag in the list of records, which makes it necessary to have the first column as primary name field of the entity.

Below code emphasize the same:

Code

internal BrowserCommandResult<bool> OpenRecord(int index, int thinkTime = Constants.DefaultThinkTime, bool checkRecord = false)

{

this.Browser.ThinkTime(thinkTime);

return this.Execute(GetOptions($”Open Grid Record”), driver =>

{

var currentindex = 0;

var rows = driver.FindElements(By.ClassName(“wj-row”));

//TODO: The grid only has a small subset of records. Need to load them all

foreach (var row in rows)

{

if (!string.IsNullOrEmpty(row.GetAttribute(“data-lp-id”)))

{

if (currentindex == index)

{

//This is the piece of code that does the opening of the record

var tag = checkrecord ? “div” : “a”;

row.findelement(by.tagname(tag)).click();

break;

}

currentindex++;

}

}

driver.WaitForTransaction();

return true;

});

}

Scenario

Suppose, we want to open the record from “All Opportunities” view by using Grid.OpenRecord() method. Then, we need to have a solution that opens the record without finding an anchor tag. The current method searches for first anchor tag(link). And with topic name blank, the first anchor tag(link) is of account due to which account record is opened instead of opportunity.

UCI Dynamics 365 CRM

Solution

We need to replace the logic of opening the record on the basis of clicking an anchor tag to look for a label and double click it.

internal BrowserCommandResult<bool> OpenRecord(int index, int thinkTime =        Constants.DefaultThinkTime, bool checkRecord = false)

{

this.Browser.ThinkTime(thinkTime);

return this.Execute(GetOptions($”Open Grid Record”), driver =>

{

var currentindex = 0;

var rows = driver.FindElements(By.ClassName(“wj-row”));

//TODO: The grid only has a small subset of records. Need to load them all

foreach (var row in rows)

{

if (!string.IsNullOrEmpty(row.GetAttribute(“data-lp-id”)))

{

if (currentindex == index)

{

//Replacing it with the below piece solves the issue.

var tag = checkRecord ? “div” : “label”;

SeleniumExtensions.DoubleClick(driver, By.TagName(tag), true);

break;

}

currentindex++;

}

}

driver.WaitForTransaction();

return true;

});

}

Conclusion

The above code will help you to open record without finding an anchor tag in Dynamics 365 Unified Interface.

click2clone

Automatically send reports to email weekly

$
0
0

Hey guys,

What I want to do is to send to user a custom report as attachment in email every friday.

Is this even possible?

I read something and I think this could be possible via plugins, but is it? Or is there a better solution?

Thank you in advance.

Viewing all 3363 articles
Browse latest View live


<script src="https://jsc.adskeeper.com/r/s/rssing.com.1596347.js" async> </script>