Quantcast
Channel: Sam's Activities
Viewing all 3363 articles
Browse latest View live

Save and refresh record entity after finishing dialog process

$
0
0

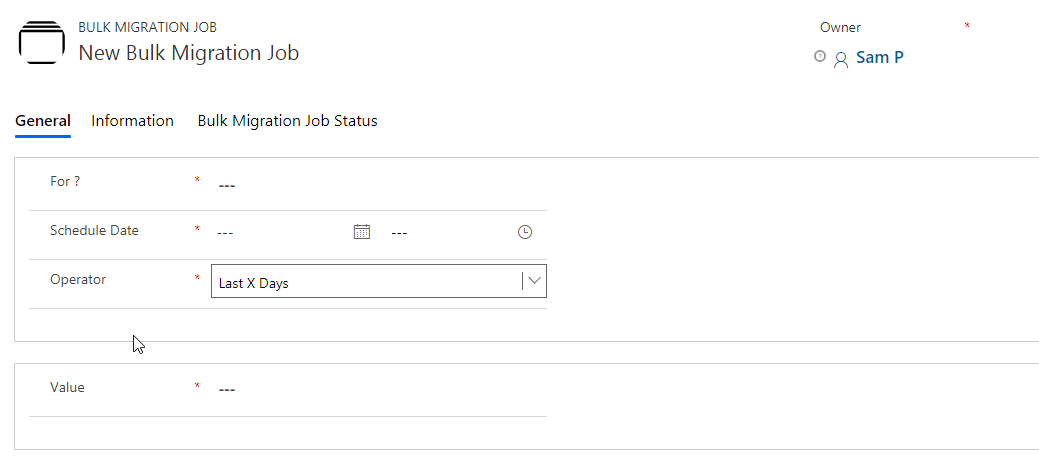
Hi All, I have created a dialog process, I call it when a button on the ribbon is clicked.
I wanna when dialog has finished its job( the dialog window closed and finished) the record entity save and reload.

Here is the code that run the dialog :

(function() {
Develop1_RibbonCommands_runDialogGrid = function(ids, objectTypeCode, dialogId) {
    if ((ids == null) || (!ids.length)) {
        alert(window.LOCID_ACTION_NOITEMSELECTED);
        return;
    }
    if (ids.length > 1) {
        alert(window.LOCID_GRID_TOO_MANY_RECORDS_IWF);
        return;
    }
    var rundialog = Mscrm.CrmUri.create('/cs/dialog/rundialog.aspx');
    rundialog.get_query()['DialogId'] = dialogId;
    rundialog.get_query()['ObjectId'] = ids[0];
    rundialog.get_query()['EntityName'] = objectTypeCode;
    openStdWin(rundialog,buildWinName(null),615,480,null);
}
Develop1_RibbonCommands_runDialogForm = function(objectTypeCode, dialogId) {
    var primaryEntityId = Xrm.Page.data.entity.getId();
    var rundialog = Mscrm.CrmUri.create('/cs/dialog/rundialog.aspx');
    rundialog.get_query()['DialogId'] = dialogId;
    rundialog.get_query()['ObjectId'] = primaryEntityId;
    rundialog.get_query()['EntityName'] = objectTypeCode;
    var hostWindow = window;
        if (typeof(openStdWin) == 'undefined') {
            hostWindow = window.parent; // Support for Turbo-forms in CRM2015 Update 1
        }
        if (typeof(hostWindow.openStdWin) != 'undefined') {
            hostWindow.openStdWin(rundialog, hostWindow.buildWinName(null), 615, 480, null);
            // window.location.reload(true);
        } 

}
})();

Depending on this source code, how can it be possible?


Retrieve Dynamics 365 CRM data in Portal by calling Odata using JavaScript

$
0
0

Introduction

When user needs to display all the record using the “account” entity on the portal page then he can perform the retrieve operation by calling OData query using JavaScript.

Working

First we will create the entity list. On the entity list there is tab “OData” where we need to fill the information like “Entity Type Name”, “Entity Set Name”, select the view and enable the Odata feed as shown in the below screenshot:

Retrieve Dynamics 365 CRM data in Portal by calling Odata using JavaScript

Based on above configuration system we will generate Odata Based URL as https://<portalurl>/_odata/entity_set_name, now we can retrieve the data on other webpages as well as show in the below screenshot

Retrieve Dynamics 365 CRM data in Portal by calling Odata using JavaScript

Retrieve the data using Javascript:

We have created a button “Get Accounts” on the html as shown below in the screenshot.

Retrieve Dynamics 365 CRM data in Portal by calling Odata using JavaScript

On clicking the button we call the function retrieveAccount() JavaScript code shown below:

function retreiveAccount () {

var oDataUrl = “/_odata/AccountSet”;

var response = getResponse(oDataUrl);

var accounts = new Array();

accounts.push([“Sr. No.”, “Name”]);

if (response != null) {

$.each(response, function (index, responseVal) {

accounts.push([(index + 1), (responseVal.name.toString())]);

});

}

//Create a HTML Table element to show the data.

var table = document.createElement(“TABLE”);

table.border = “1”;

//Get the count of columns.

var columnCount = accounts[0].length;

//Add the header row.

var row = table.insertRow(-1);

for (var i = 0; i < columnCount; i++) {

var headerCell = document.createElement(“TH”);

headerCell.innerHTML = accounts[0][i];

row.appendChild(headerCell);

}

//Add the data rows.

for (var i = 1; i < accounts.length; i++) {

row = table.insertRow(-1);

for (var j = 0; j < columnCount; j++) {

var cell = row.insertCell(-1);

cell.innerHTML = accounts[i][j];

}

}

var dvTable = document.getElementById(“dvTable”);

dvTable.innerHTML = “”;

dvTable.appendChild(table);

}

function getResponse(oDataUrl) {

var response = null;

$.ajax({

type: “GET”,

url: oDataUrl,

dataType: “json”,

async: false

}).done(function (json) {

response = json.value;

});

return response;

}

Now data can be shown on the website as shown below in the screenshot:

Retrieve Dynamics 365 CRM data in Portal by calling Odata using JavaScript

Conclusion

User can perform the retrieve operation by calling OData query using JavaScript

5 ways Click2Export makes the task of exporting your Report or Word templates easier within Dynamics 365 CRM

$
0
0

Dynamics CRM reports are detailed informative list of records. Reports may contain information such as accounting information of an organization, customer details, revenue generated during a period, etc. These reports can be converted into report templates in order to keep a common format and update the data from time to time. Similarly, we can create Word Templates for a task a simple as New Year greetings, a simple thank you note to a little more advanced scenarios as reminders to all the accounts of the orders associated with them. This may be printed or exported and a signature or personal touch can be provided to these templates.

Email Dynamics CRM Report

But are exporting these templates actually possible? Yes, with our powerful tool Click2Export they are! Click2Export supports exporting Report and Word Templates. In this blog we are going to explore some of the features of exporting templates and their benefits which make them highly efficient.

Supports multiple formats of exported templates

The exporting of template supports multiple formats viz. Reports can be exported in PDF, MS Word, MS Excel, CSV or TIFF format. These reports can be editable or non-editable depending upon what their file extension is. Word Templates can be exported in PDF and MS Word format. The default export format is PDF which can be changed as per requirement.

Automatically attach and email reports

This is a profoundly powerful feature which allows the user not only to export their Reports/Word Templates but also enables them to auto-attach these files to the mail recipient as an attachment. The email gets created based on the email template specified while selecting the layout of the email to be sent. This feature is prominent because it saves lot of time and manual effort and thus expedites the process of sending Report/Word templates. Further, it also allows to auto-send the email with the templates as attachments. This feature simplifies the task of sending email with the templates to the chosen recipient by simply exporting the files. This saves time and avoids a dedicated resource just for sending emails.

Export and upload to SharePoint

Users can also upload the exported Report/ word template file on configured SharePoint site in the requested file format. This will help the users to export and share the exported file on the common platform with the required users.

Save as Note

The exported Report/Word Templates can be stored as a note attachment in the respective Dynamics 365 CRM record and in the file extension in which it has been exported. Notes are preferable because they are quick to attach, easy to comprehend and have a time-stamp which allows easy tracking when the Note was created. While we are talking about notes, have a look at our new solution Attach2Dynamics, it allows to move notes & email attachments from Dynamics 365 CRM to SharePoint or Dropbox. User can also perform Drag & Drop, Rename, Create Folder and other actions on Dynamics 365 CRM files and folders in SharePoint and Dropbox; the Windows Explorer way!

Report Parameters Value can be configured

Report Parameter value can be configured at the time of execution. ‘CRM report parameter’ is a custom entity that comes packaged with Click2Export solution.

Thus you have seen how using Click2Export you can simplify the task of exporting report/word templates and perform actions on them. Click2Export is a utility tool that makes performance of Dynamics 365 CRM even better.

In case you haven’t downloaded the solution yet here you go! Download it for a free trial of 15 days from our Website or Microsoft AppSource.

If you have any queries or suggestions or want a demo mail at crm@inogic.com

Happy Exporting!

Events and Reminders in Resco Mobile App

$
0
0

Introduction

Resco Woodford provides many features one of which is, to be used by the technician by working on the field.

Resco provides one of the features that user/technician gets notified for any of the events from the Dynamics CRM in the latest version of the Woodford (11.3.1.0).

Consider that user needs to be notified for the Bookings that are completed today from Resco mobile app. Below are the steps for configuring the reminders:

  • Navigate to Resco Woodford for enabling the reminders for technicians/users. Enable the reminders for Resco CRM from “Configuration” tab by setting “Use Reminders” as “true”(refer below screenshot for same).

Events and Reminders in Resco Mobile App

  • Next step is to configure the appointment for reminder. Navigate to “Event & Reminders” tab >> click on “new” >> Edit the event for “Bookable Resource Booking” as shown in below screenshot.

Events and Reminders in Resco Mobile App

  • As we want only completed bookings need to be notified, so next step is to add filter to get reminder only for completed booking resource bookings. Please refer below screenshot for the same.

Events and Reminders in Resco Mobile App

  • Also ensure that in Resco mobile CRM “Use Reminders” is set as “On”.

Events and Reminders in Resco Mobile App

  • User will complete the booking from resco mobile app and sync the app.

Events and Reminders in Resco Mobile App

  • Now the user will be notified for the booking that has been completed within the Start Time and End Time of the bookable resource booking.

Events and Reminders in Resco Mobile App

Conclusion

Users can be notified whenever records are created/updated from the mobile app using Events and Reminders from the Resco.

Visualize Census Data within Dynamics 365 CRM and some more user friendly enhancements coming up in March 2019 release!

$
0
0

With every release, we brainstorm to add new features in Maplytics to enable users to increase their capabilities of geo-mapping and also incorporate the valuable feedback we receive from our customers. In our recent releases we had worked on enhancing the mapping abilities of field professionals and later we focused on empowering the managerial capabilities with our new features. In this upcoming March 2019 release, we have added an entirely new feature set to enhance the analytical aspects of mapping and worked upon the existing features to make them more productive and user friendly.

Let’s have an insight on how this release will enhance the experience of mapping visualization.

Census data visualization

To enable Maplytics to contribute more towards the analytical capability of an organization, we have added the aptitude to visualise census data on map within your Dynamics CRM. We have provided few census data for USA by default, which you can visualize on your map, and also added the option of Category Configuration for census data. You can plot the categorized census data on map for analysis and come up with effective strategic decisions. Using Maplytics you can very well save your own census data shapefile, create categories for the attributes, and plot the same on the map. The census data can be plotted with the existing Overlay feature. This feature will enable users to analyse the data of the organisation along with overlay of the territories and the census data to make the analysis even more powerful.

Geo mapping visualisation

Bring your own Pushpins

Personalization is one of the most important aspects of any tool which makes it even more user friendly. Considering this, we have added the feature which enables the user to use their own icons for the push pins to visualise data on map within Dynamics CRM. We have enhanced Maplytics configuration with a completely new section where user can upload their own icons to visualise entities with their desired push pins. As we have always wanted our users to use Maplytics in their own desired ways, this feature would help them to use their own icons to recognise their entity records on map.

Geo mapping visualisation

Resize data grid within the maps

To enhance user experience, we have added the ability to resize the view data grid which opens up on the Detail map and the Heat map. Users can now visualise their desired push pins representing the Entity records along with the respective data within the data grid into the desired ratios. User can drag the data grid to resize it as required. User can further filter the data within the view datagrid and visualise the filtered data geographically.

Geo mapping visualisation

Visualize categorized data for multiple entities within Detail map

o make the geo-mapping of the entities even more productive, we have added the ability to visualize the categorized data for more than one entities. Now, user will be able to choose the categories for more than one entities (three at max) selected in the plot card of the Detail map. To summarize the categorized data, three category cards will open up where the user can further show or hide the ranges of the categories to analyze the required data.

Geo mapping visualisation

Assign multiple territories to entity records and visualize them on map

In all our recent releases we have been enhancing Territory Management to help you analyze and plan your business in a much effective way. In this release too we have worked on one of the most important requirements for sales and field service industry, which is to have multiple territories assigned to a single entity record. If the users have entity records that lie into more than one territory they can choose to enable the feature of multiple territories for the records. Users will also be able to see the list of territories assigned to an entity record and plot the territories on the map to visualize the respective records common for multiple territories.

Geo mapping visualisation

Thus with this release we have appended new features in Maplytics that enhance the analytical and visualization capabilities of Dynamics 365 Customer Engagement users. It makes the task of mapping easier and empowers the user to perform better and detailed actions. This boosts the overall user experience and makes implementation even easier. Keep watching this space for release announcement.

Also, in case you have any suggestion, feedback or want a demo, just mail at crm@inogic.com and we will attend to you at the earliest.

Happy Mapping!


Announcing Attach2Dynamics – Drag, Drop and Manage Dynamics 365 Documents in SharePoint or DropBox – The Windows Explorer Way!

$
0
0

We have been popularily known as the clicks saving family ;-) .. after Click2Clone (One Click Solution to Clone your Dynamics 365 CRM records) and Click2Export (One Click Solution to Export your Dynamics 365 CRM reports and word templates using workflow). It was time to work on our next assignment to save clicks.

We have been often reading about users complaining on the clicks and time they spend to upload documents to CRM retrieving, managing was another challenge. We have been used to managing documents the Windows Explorer Way. Not just this, users also wanted flexibility and more cloud storage options.

Interesting, right! And that was obviously our next idea for Productivity App for Dynamics 365 CRM. We have been working on this for a while now and are happy to announce that “Attach2Dynamics” is our next new ISV solution that will help CRM users Drag, Drop single/multiple files/folders and manage their Dynamics 365 documents, the windows explorer way in systems like DropBox or SharePoint within their CRM.

Drag Drop and Manage Documents in Share Point or DropBox

Drag Drop and Manage Documents in Share Point or DropBox

Attach2Dynamics currently supports two cloud storages – Dropbox and SharePoint. We are planning to incorporate Support for Azure Blob Storage, One Drive, Box and Google Drive Storages as well in the near future. We will be glad to get your recommendations in case you are using any other cloud storages that you may like us to include in our solution. Also, it supports all types of entities, records, and documents. There is no native integration of Dropbox storage system available within Dynamics 365 CRM.

Let’s have a look at the various features and functionalities that are added to the solution.

Download

In the screen shot above you can see two tabs as SharePoint and DropBox so user has flexibility to choose cloud storage from where they would like to download documents using our solution within Dynamics CRM. Bulk download is also possible for downloading multiple documents in a single instance. This helps the user to save both clicks and time as they don’t need to navigate externally to their required cloud storage. Attach2Dynamics provides a native integration platform for users of various connectors within CRM.

Rename

User now has the option to rename documents (files and folders) by selecting the required document of Dropbox or SharePoint from within Dynamics CRM.

Email(Coming Soon)

Users can generate the Email with the selected document file as an Email Attachment and send it to the required user.

Copy a Link

Users can simply copy and paste the generated link for the selected document using this option when required to be sent outside the Dynamics CRM.

Create Folder

Users can create folder for both the storage systems using Attach2Dynamics.

Upload

User can upload single as well as multiple files and folders using our solution by choosing the required document storage system. The user gets user-friendly UI to see the list of files uploaded on Dropbox or SharePoint against the current record.

Global Search Tab (Deep Search)

User can deep search for files/folders related to the entered keyword in the search tab and obtain all the documents with the search name in the enlisted file area. Deep search allows you to search for files or folders based on your current path. If you are currently in a “/A.Datum/Sample” path and if there are more folders/files in that path and if you search for something, then it’ll go till the last file and folder and will return results.

Drag and Drop file and folder

User can drag and drop multiple files and folders at one time to Dropbox and SharePoint from Dynamics CRM.

Move Dynamics CRM notes

User can move Dynamics CRM notes attachments to Dropbox or SharePoint. This option is unavailable by default for both Dropbox and SharePoint within the CRM. For the configured entities, this feature will move the notes attached to the enabled connector and after the successful migration of the attachment, it’ll leave a path back in the notes body for the users to know the migrated path.

Document Location

With the help of this option, users can get a suitable path for the SharePoint storage system. In case of SharePoint, there are chances that a record has more than one Document Locations, in that case, it enables CRM user to select the exact location where you want to upload the file.

So its time once again to save those clicks with our Attach2Dynamics. Visit our Website for more about this clicks saving tool :-) or feel free to email us on c&#x72;m@&#x69;no&#x67;ic&#x2e;co&#x6d; for a Live Demo!

Connector and Global Workflows in Dynamics 365 Business Process Flow

$
0
0

Introduction

Business Process Flow (BPF), which was introduced in CRM 2013 is really useful for all the organizations to train their staff in an effective way.

Like, everyone knows BPF is a guided process for a user to follow.

Since, CRM 2013, BPF has undergone drastic changes iteration by iteration.

Initially, BPF didn’t support SDK methods, which was later on introduced in the next iteration.

Then in CRM version 8.2, there was a complete overhaul in how the BPF was designed. Version 8.2, is when, the creation of entity on the Business Process Flow creation was introduced.

Along, with that came a lot many features, like workflow triggering and stuff.

This blogpost is dedicated to something very simple, yet maybe ignored feature of BPF.

We’ll talk about Connector and Global Workflows in BPF.

Connector

Connector is used in BPF, when you have added conditions and you want to connect one Stage to the other.

Select the orphan stage, and then click on Connector, it gives the options which all stages are available for connection.

Connector and Global Workflows in Dynamics 365 Business Process Flow

Then, based on your requirement you can choose the correct stage.

Global Workflows

Just like, there is a provision to trigger workflows on Stage Entry and Stage Exit, we have the options to trigger workflow whenever some actions are taken in regards to Business Process Flows in its entirety.

Take an example, you want to perform some actions when a particular BPF is selected, or it’s abandoned, or it’s completed, or it’s reactivated.

Let’s understand each of the triggers in detail,

Process applied

This event is triggered when you select the BPF.

Process reactivated

This event is triggered whenever a BPF is reactivated using the button, once the BPF was completed.

Connector and Global Workflows in Dynamics 365 Business Process Flow

Process abandoned

Like most of us know, we can abandon a BPF, so whenever a BPF is abandoned using the button, this event is triggered.

Connector and Global Workflows in Dynamics 365 Business Process Flow

Process completed

Whenever a process is finished either by following the entire process or by clicking the Finish button, this event is triggered.

Conclusion

In this way connector & global workflows will help uses to manage business process in Dynamics 365.

Dynamics CRM SharePoint Integration

How to create a chart for an option set field

$
0
0

Hi,

I'm not sure if this is possible, but I want to create a chart from an option set field, to use in a dashboard.

At the moment we can select if an attendee attended the event "yes" or not "no". I want to create a chart that shows the number of attendees and then the actual number. I'm guessing a bar chart is easiest, as I want to show this over a number of events, not just one.

Is their a way to get the system to recognize the "yes" and sum count those. At the moment it only recognizes it a line level, so counts regardless of option. I need to be able to get the total number and then only the yes in a graph.

Or is my only option to export the data to excel and then try to push a chart back in? If so what is the best way to do this?

Thank you


Cloning Records in Dynamics CRM

$
0
0

 Hello,

What is the best approach to clone records in CRM (specifically quotes and orders and their respective line items)?

I know this can be done by using an ASP.NET page and many other ways.

I also want to open the cloned record to user when the cloning process finishes.

Thanks :)

Upgrade Runs Entity in Dynamics 365 CRM

$
0
0

Introduction

Dynamics 365 CRM comes with various updates and features. While exploring Dynamics 365, we came across a new feature “Upgrade Runs.” Let’s explore more on this in this blog.

Upgrade Runs helps us to check the upgrade details of installed solution.

To check upgrade details go to->Setting-> Upgrade Logs section as shown in below screenshot:

Upgrade Runs Entity in Dynamics CRM 365

After clicking on Upgrade Runs below screen will appear:

Upgrade Runs Entity in Dynamics CRM 365

In DynamicsCRM, we can check our list of installed managed solutions from admin center. In admin center we can also check for available updates for the installed solution. If update is available for the solution then click on install button as shown in below screenshot.

Upgrade Runs Entity in Dynamics CRM 365

After successful installation, in CRM Upgrade Runs records get created which will show the details about upgradation as shown in below screenshot.

Upgrade Runs Entity in Dynamics CRM 365

Upgrade Runs Entity in Dynamics CRM 365

Conclusion

Upgrade Runs gives us upgrade details of installed solution in Dynamics 365 CRM.

Clone Dynamics 365 CRM Records

Visualize Census Data within Dynamics 365 CRM and some more user friendly enhancements coming up in March 2019 release!

$
0
0

With every release, we brainstorm to add new features in Maplytics to enable users to increase their capabilities of geo-mapping and also incorporate the valuable feedback we receive from our customers. In our recent releases we had worked on enhancing the mapping abilities of field professionals and later we focused on empowering the managerial capabilities with our new features. In this upcoming March 2019 release, we have added an entirely new feature set to enhance the analytical aspects of mapping and worked upon the existing features to make them more productive and user friendly.

Let’s have an insight on how this release will enhance the experience of mapping visualization.

Census data visualization

To enable Maplytics to contribute more towards the analytical capability of an organization, we have added the aptitude to visualise census data on map within your Dynamics CRM. We have provided few census data for USA by default, which you can visualize on your map, and also added the option of Category Configuration for census data. You can plot the categorized census data on map for analysis and come up with effective strategic decisions. Using Maplytics you can very well save your own census data shapefile, create categories for the attributes, and plot the same on the map. The census data can be plotted with the existing Overlay feature. This feature will enable users to analyse the data of the organisation along with overlay of the territories and the census data to make the analysis even more powerful.

Geo mapping visualisation

Bring your own Pushpins

Personalization is one of the most important aspects of any tool which makes it even more user friendly. Considering this, we have added the feature which enables the user to use their own icons for the push pins to visualise data on map within Dynamics CRM. We have enhanced Maplytics configuration with a completely new section where user can upload their own icons to visualise entities with their desired push pins. As we have always wanted our users to use Maplytics in their own desired ways, this feature would help them to use their own icons to recognise their entity records on map.

Geo mapping visualisation

Resize data grid within the maps

To enhance user experience, we have added the ability to resize the view data grid which opens up on the Detail map and the Heat map. Users can now visualise their desired push pins representing the Entity records along with the respective data within the data grid into the desired ratios. User can drag the data grid to resize it as required. User can further filter the data within the view datagrid and visualise the filtered data geographically.

Geo mapping visualisation

Visualize categorized data for multiple entities within Detail map

o make the geo-mapping of the entities even more productive, we have added the ability to visualize the categorized data for more than one entities. Now, user will be able to choose the categories for more than one entities (three at max) selected in the plot card of the Detail map. To summarize the categorized data, three category cards will open up where the user can further show or hide the ranges of the categories to analyze the required data.

Geo mapping visualisation

Assign multiple territories to entity records and visualize them on map

In all our recent releases we have been enhancing Territory Management to help you analyze and plan your business in a much effective way. In this release too we have worked on one of the most important requirements for sales and field service industry, which is to have multiple territories assigned to a single entity record. If the users have entity records that lie into more than one territory they can choose to enable the feature of multiple territories for the records. Users will also be able to see the list of territories assigned to an entity record and plot the territories on the map to visualize the respective records common for multiple territories.

Geo mapping visualisation

Thus with this release we have appended new features in Maplytics that enhance the analytical and visualization capabilities of Dynamics 365 Customer Engagement users. It makes the task of mapping easier and empowers the user to perform better and detailed actions. This boosts the overall user experience and makes implementation even easier. Keep watching this space for release announcement.

Also, in case you have any suggestion, feedback or want a demo, just mail at crm@inogic.com and we will attend to you at the earliest.

Happy Mapping!


Announcing Attach2Dynamics – Drag, Drop and Manage Dynamics 365 Documents in SharePoint or DropBox – The Windows Explorer Way!

$
0
0

We have been popularily known as the clicks saving family ;-) .. after Click2Clone (One Click Solution to Clone your Dynamics 365 CRM records) and Click2Export (One Click Solution to Export your Dynamics 365 CRM reports and word templates using workflow). It was time to work on our next assignment to save clicks.

We have been often reading about users complaining on the clicks and time they spend to upload documents to CRM retrieving, managing was another challenge. We have been used to managing documents the Windows Explorer Way. Not just this, users also wanted flexibility and more cloud storage options.

Interesting, right! And that was obviously our next idea for Productivity App for Dynamics 365 CRM. We have been working on this for a while now and are happy to announce that “Attach2Dynamics” is our next new ISV solution that will help CRM users Drag, Drop single/multiple files/folders and manage their Dynamics 365 documents, the windows explorer way in systems like DropBox or SharePoint within their CRM.

Drag Drop and Manage Documents in Share Point or DropBox

Drag Drop and Manage Documents in Share Point or DropBox

Attach2Dynamics currently supports two cloud storages – Dropbox and SharePoint. We are planning to incorporate Support for Azure Blob Storage, One Drive, Box and Google Drive Storages as well in the near future. We will be glad to get your recommendations in case you are using any other cloud storages that you may like us to include in our solution. Also, it supports all types of entities, records, and documents. There is no native integration of Dropbox storage system available within Dynamics 365 CRM.

Let’s have a look at the various features and functionalities that are added to the solution.

Download

In the screen shot above you can see two tabs as SharePoint and DropBox so user has flexibility to choose cloud storage from where they would like to download documents using our solution within Dynamics CRM. Bulk download is also possible for downloading multiple documents in a single instance. This helps the user to save both clicks and time as they don’t need to navigate externally to their required cloud storage. Attach2Dynamics provides a native integration platform for users of various connectors within CRM.

Rename

User now has the option to rename documents (files and folders) by selecting the required document of Dropbox or SharePoint from within Dynamics CRM.

Email(Coming Soon)

Users can generate the Email with the selected document file as an Email Attachment and send it to the required user.

Copy a Link

Users can simply copy and paste the generated link for the selected document using this option when required to be sent outside the Dynamics CRM.

Create Folder

Users can create folder for both the storage systems using Attach2Dynamics.

Upload

User can upload single as well as multiple files and folders using our solution by choosing the required document storage system. The user gets user-friendly UI to see the list of files uploaded on Dropbox or SharePoint against the current record.

Global Search Tab (Deep Search)

User can deep search for files/folders related to the entered keyword in the search tab and obtain all the documents with the search name in the enlisted file area. Deep search allows you to search for files or folders based on your current path. If you are currently in a “/A.Datum/Sample” path and if there are more folders/files in that path and if you search for something, then it’ll go till the last file and folder and will return results.

Drag and Drop file and folder

User can drag and drop multiple files and folders at one time to Dropbox and SharePoint from Dynamics CRM.

Move Dynamics CRM notes

User can move Dynamics CRM notes attachments to Dropbox or SharePoint. This option is unavailable by default for both Dropbox and SharePoint within the CRM. For the configured entities, this feature will move the notes attached to the enabled connector and after the successful migration of the attachment, it’ll leave a path back in the notes body for the users to know the migrated path.

Document Location

With the help of this option, users can get a suitable path for the SharePoint storage system. In case of SharePoint, there are chances that a record has more than one Document Locations, in that case, it enables CRM user to select the exact location where you want to upload the file.

So its time once again to save those clicks with our Attach2Dynamics. Visit our Website for more about this clicks saving tool :-) or feel free to email us on c&#x72;m@&#x69;no&#x67;ic&#x2e;co&#x6d; for a Live Demo!

Connector and Global Workflows in Dynamics 365 Business Process Flow

$
0
0

Introduction

Business Process Flow (BPF), which was introduced in CRM 2013 is really useful for all the organizations to train their staff in an effective way.

Like, everyone knows BPF is a guided process for a user to follow.

Since, CRM 2013, BPF has undergone drastic changes iteration by iteration.

Initially, BPF didn’t support SDK methods, which was later on introduced in the next iteration.

Then in CRM version 8.2, there was a complete overhaul in how the BPF was designed. Version 8.2, is when, the creation of entity on the Business Process Flow creation was introduced.

Along, with that came a lot many features, like workflow triggering and stuff.

This blogpost is dedicated to something very simple, yet maybe ignored feature of BPF.

We’ll talk about Connector and Global Workflows in BPF.

Connector

Connector is used in BPF, when you have added conditions and you want to connect one Stage to the other.

Select the orphan stage, and then click on Connector, it gives the options which all stages are available for connection.

Connector and Global Workflows in Dynamics 365 Business Process Flow

Then, based on your requirement you can choose the correct stage.

Global Workflows

Just like, there is a provision to trigger workflows on Stage Entry and Stage Exit, we have the options to trigger workflow whenever some actions are taken in regards to Business Process Flows in its entirety.

Take an example, you want to perform some actions when a particular BPF is selected, or it’s abandoned, or it’s completed, or it’s reactivated.

Let’s understand each of the triggers in detail,

Process applied

This event is triggered when you select the BPF.

Process reactivated

This event is triggered whenever a BPF is reactivated using the button, once the BPF was completed.

Connector and Global Workflows in Dynamics 365 Business Process Flow

Process abandoned

Like most of us know, we can abandon a BPF, so whenever a BPF is abandoned using the button, this event is triggered.

Connector and Global Workflows in Dynamics 365 Business Process Flow

Process completed

Whenever a process is finished either by following the entire process or by clicking the Finish button, this event is triggered.

Conclusion

In this way connector & global workflows will help uses to manage business process in Dynamics 365.

Dynamics CRM SharePoint Integration

CDS Support, Census Data visualization – Maplytics March 2019 release takes Maps integration in your Dynamics 365 CRM to another new level!

$
0
0

Map Dynamics 365 CRM

We are in the first quarter of year 2019 and still reminiscing what an awesome year 2018 has been! With two major releases last year that were epitome of success, we introduced bulk of features to simplify the lives of our end users. In March 2018 Release our focus was to boost field productivity and October 2018 Release empowered the managers to take strategic decisions within Dynamics 365 CRM.

As our team of dedicated professionals enjoys every bit of the journey, it immediately sparks for a new venture the soonest we announce a release. Similarly, here we are, all grateful to the technical architects of our team, our peers, Partners and customers, to announce another, on schedule, Major Release. Yes, we are back with a set of exciting features for you! This release is even more powerful and loaded with features than our last releases. It focuses on boosting the analytical and visualization powers of its users amongst other capabilities.

Let’s delve deep and understand the features of March 2019 Release:

Support for CDS

PowerApps empower Citizen Developers and Power Users to design low code applications with control over great UX. It allows developing scalable agile applications without compromising with quality, security and usability. Now, Maplytics can be deployed on PowerApps for users who want to use Maplytics outside of Dynamics 365 CRM.

Census Data Visualization

To enhance the analytical capability of an organization through Maplytics, we have introduced Census Data for better visualization on map within Dynamics 365 CRM. By default we have added the Census Data for US with Category Configuration available for it. You can add your own census data, create further categories and plot them on the map. The census data can be plotted with the existing Overlay feature.

Resizable Data Grid

Now Maplytics users also have the option to resize the data grid. They can drag and expand the data grid to view it on the map as per requirement. The users can view their desired pushpins with desired ratio of data grid with the using resize option as required. They also have the option to filter data with view data grid and picture the filtered data on map.

Multiple Category

Users can now plot multiple categories for multiple entities. Earlier we could plot only one entity with a category. Now, for the three entities you can plot one category for each individual entity. This expands the visualization power of the Maplytics users.

Multiple Territories

Up till our last release one territory could be assigned to only one record. But, in many of the cases it is needed to assign multiple territories to a single record and to facilitate this, we came up with a solution. Now, multiple territories can be assigned to a single record using Maplytics. Users can see the list of territories assigned to a particular record within the respective record page as well as visualize the same on map.

Personalize your Pushpins

It is always user friendly to be able to use your personalized icons for a pushpin. This allows the user to be able to plot in a user friendly manner and make better and easier analysis of their data on Dynamics 365 CRM map. We have added a section to upload your own pushpins or icons in default Maplytics configuration in order to visualize entities with desired pushpins.

These are the major features we have added in our current release, apart from which there are many minor features which will make it even more functional. This release provides detailed insight to the visualization capability of the data plotted on map and empowers the users to make informed decisions.

So, what are you waiting for, download our latest solution from the Website!

Hope you have a great experience with the current release. We are awaiting your feedback! In case you have any suggestions, queries, want a demo or need assistance with installing Maplytics on PowerApps drop a mail at crm@inogic.com

Till then –

Happy Mapping, Ciao!

How to create a chart for an option set field

$
0
0

Hi,

I'm not sure if this is possible, but I want to create a chart from an option set field, to use in a dashboard.

At the moment we can select if an attendee attended the event "yes" or not "no". I want to create a chart that shows the number of attendees and then the actual number. I'm guessing a bar chart is easiest, as I want to show this over a number of events, not just one.

Is their a way to get the system to recognize the "yes" and sum count those. At the moment it only recognizes it a line level, so counts regardless of option. I need to be able to get the total number and then only the yes in a graph.

Or is my only option to export the data to excel and then try to push a chart back in? If so what is the best way to do this?

Thank you


Working with Fetch functions of JSBridge Reference file in Online and Offline Mode of Resco Mobile App

$
0
0

Introduction:

Recently, we had a business requirement where we needed to display total number of active Agreement records associated to the Account entity of Dynamics 365 CRM on “Account Entity Form” in Resco mobile app.

So, we developed a script for populating total number of active Agreements related to the Account record and deployed it on the entity form of Account entity in Resco Mobile App.

Following is the function that we were using in Javascript,

Code Snippet:

//Executing fetch

fetch.execute(“DynamicEntities”, function (result) {

if (typeof (result) != “undefined” && result.length > 0) {

//Setting “new_totalagreements” feild

entityForm.entity.properties[“new_totalagreements”] = result.length.toString();

}

}, function (error) {

MobileCRM.bridge.alert(“An Error Has occurred ” + error)

});

After deploying the script on Resco Mobile App, when the user opened an Account record on “Offline” mode it worked as expected, but when the user opened an Account record on “Online” mode it did not work and an Exception was thrown.

Please refer below screenshot,

Online Mode:  Offline Mode:

 Conclusion:

While executing fetch function in Java script in Resco Mobile App through JSBridge Reference file, we should use  “fetch.executeOffline()” instead of “fetch.execute()” to fetch data in both the Online Mode and Offline Mode of Resco mobile app.

Activate plugin is triggering on Update event after V9 upgrade

$
0
0

Hi Experts,

Here is my issue,

I have two plugins registered on quote entity:

1. Plugin 1 triggers using a Calculate button(custom button) -> javascript -> calls save function and updates a field "abc_abc" -> on this field update a plugin is registered and it is called

2. Plguin 2 triggers on Activate button(OOB) of quote -> registered on setstate dynamic entity

They are both working fine when they are on 8.2

After V9 upgrade

if I click calculate somehow for no reason activate plugin is triggering and throwing error.

Tried below:

1. update plugin 2 to setstate message instead of Setstate dynamic entity -> result plugin 1 works but activate never triggers plugin 2

2. Disable plugin 2 -> result plugin 1 works

3. put plugin 2 in setstatedynamic entity -> run into same issue  as stated

Any help appreciated. Thanks

Sync Resco Project with the latest Field Service Mobile App

$
0
0

Introduction

Recently we had a business requirement. Since the new “Field Service Mobile” app by Microsoft is available, we decided to use that app to check its advanced features in the “Resco MobileCRM” app (Example: New Themes). So we have downloaded the latest Field Service Mobile“Version 11.2.202” app on our device from App Store.

Please refer below screenshot,

Sync Resco Project with the latest Field Service Mobile App

Then we installed “Field Service 7.5.5.65” and “Woodford MobileCRM v11.3.1.0” solutions in our CRM environment.

Please refer below screenshot,

Sync Resco Project with the latest Field Service Mobile App

Then we opened the “Woodford Mobile CRM Configuration” tool and imported Resco Project (Which was previously being published for Resco MobileCRM App) and published it with “Version 11-1-9.2” in “Woodford Configuration” tool.

Please refer below screenshots,

Sync Resco Project with the latest Field Service Mobile App

Sync Resco Project with the latest Field Service Mobile App

Note: To be able sync the Resco Project with the Field Service Mobile app, we need to publish the Resco Project with “Version 11-1-9.2”.

After publishing the Resco Project, we tried to sync it with the “Field Service Mobile” app which is installed in our device. But the app did not synced and displayed error “Your organization has not configured the Field Service Mobile app with the correct project”.

Please refer below screenshot,

Sync Resco Project with the latest Field Service Mobile App

So we discussed about this issue with Microsoft and as per that, if we want to synch Resco Project in “Field Service Mobile” app then we have to add our customizations into the default project template (which was provided by them) and publish the project with “Version 11-1-9.2”. But then we could have to move all the customization to that default project template which is very time consuming process. Since there is no direct way to move customisation in latest Resco project.

So to avoid this process we compared our Resco Projects with the default template (Provided by Microsoft) and the “Telemetry.js” file was missing in our Resco Project. So we have uploaded the “Telemetry.js” file in Offline HTM section of Resco Project and published it with the “Version 11-1-9.2”.

Please refer below screenshot,

Sync Resco Project with the latest Field Service Mobile App

And after publishing the project it synced successfully in “Field Service Mobile” app as shown below.

Please refer below screenshot,

Sync Resco Project with the latest Field Service Mobile App

Conclusion

Instead of moving all the customizations in the default project template, we can just add “Telematry.js” file in Offline HTML section of Resco Project and publish it with the “Version 11-1-9.2” to make it compatible with “Field Service Mobile” app.

Map Dynamics CRM

Bulk Migrate Dynamics 365 CRM Notes or Email Attachments to SharePoint or Dropbox using Attach2Dynamics

$
0
0

Attach2Dynamics not only facilitates integration between Dynamics 365 CRM and SharePoint but also provides integration of Dynamics 365 CRM with Dropbox. This is not all, our team of solution architects have been continuously working on extending this support to other cloud storages like Google Drive, Azure Blob Storage, Azure Data Lake Storage, One Drive and Box in future. With Attach2Dynamics we appended the missing features of Drag and Drop files and folders, Upload/Download documents, Rename files/folders, Copy Anonymous Link and many others.

One of the most prominent features of Attach2Dynamics is the ability to Copy/Move Notes/Email Attachments to cloud storages of your choice SharePoint or Dropbox.

In a scenario where you want to move bulk of Notes or Email attachments to a cloud storage you can use our new feature called Bulk Migration Jobs. It allows moving of History Notes or Email attachments in batches. For instance say there are quite a number of Note attachments that are to be moved to the cloud stroage. In this case we can create a new bulk migration job. In this new job, we have to specify whether we are moving Email or Notes attachments, Scheduled date and time from when this migration starts and, the tenure of days of which the files have to be moved.

Bulk Migrate Dynamics 365 CRM Notes or Email Attachments to SharePoint or Dropbox

Bulk Migration Job Entity shows the details and status of the migrating Emails or Notes. You are advised to do the migration during off business hours for minimum interruption as there may be bulk of data to be moved. The Notes are moved to their corresponding record folder and Email attachments to a common folder.

Information tab comprises the details of processing records. It is of great significance as it tells how much space has been cleared from Dynamics 365 CRM by the user. It gives info about the number of records processed, succeeded records, ignored records, failed records and size of succeeded, ignored and failed records. This provides the user a bird eye view of their organizational data management.

Bulk Migrate Dynamics 365 CRM Notes or Email Attachments to SharePoint or Dropbox

Benefits of Bulk Migration Jobs:

Freeing Up Dynamics 365 CRM Space

As attachments are moved from Dynamics 365 CRM to cloud storages there is free space for other purposes.

Organized Data in Cloud Storages

The Dynamics 365 CRM Notes/Email attachments are saved in Cloud storages in their repsective folder. This allows the user to keep track of the data in an organized manner in the corresponding cloud storages. Notes are moved to the record’s folder while Emails go in a common folder.

Serving Business Needs

This give organizational insight into how much data has been moved from Dynamics 365 CRM.

Thus you have seen how a simple feature of Bulk Migration Job allows managing data better within Dynamics 365 CRM with Attach2Dynamics.

You can explore this feature further by downloading FREE  trial of Attach2Dynamics from our Website or AppSource.

In case you have any queries, suggestions or want a demo mail us at crm@inogic.com

Happy Document Management,Ciao!

Configuring Learning Path feature in Dynamics 365 CRM

$
0
0

Introduction

Enhancing the user experience in Dynamics 365 is the on-going activity. Everyone wants to deliver their business application to their customers with rich context, videos, walkthroughs, articles etc.

“Learning path” is a tool available in D365 which will help us to strengthen user engagement on D365. By providing them a guided instructions/hints the way in which user should explore the application and be productive enough while learning the application.

By enabling this feature in D365 you can create your own learning path content for your users which will be more informative for users while exploring your business. Also, this functionality provides contextual help which enforce a user to follow a specific process.

In this blog, we will have walkthrough of “Learning Path” configuration. Before configuring the “Learning Path” tool, let’s have a look on below pre-requisite:

Pre-requisite

  • “Learning Path Authoring” must be enabled under the system setting
  • We cannot use “Customizable help” feature and “Learning Path” feature at a time in same organization, so make sure only either of this is enable at a time in the organization.
  • User who want to use “Learning Path” must be “Opt In” for Learning Path under their user options setting
  • User must have “System Administrator” or “System Customizer” role to have access for “Learning Path” content library
  • User who want to customize the “Learning Path” must be a member of the “Office 365 Learning Path Authors Security Group”

Configuration Steps

1. Go to your System Settings by navigating to Settings-> Administration, On Administration page click on System Setting. Change ‘Enable Learning Path’ and ‘Enable Learning Path Authoring’ from No to Yes. As shown below:

Configuring Learning Path feature in Dynamics 365 CRM

2. Now, Opt In for learning path under User Setting, by default this setting is on. User is Opt In means user would like to have facility of using learning path throughout the system.

Note: As you can see “Opt Out for Learning Path” option below, user can anytime opt out and discontinue with learning path facility. User is Opt out means user will no longer receive the hints/videos throughout the system. As user have gained the enough knowledge of system and further assistance not needed.

Configuring Learning Path feature in Dynamics 365 CRM

3. Now, under Training section try to open the Content Library, you would not be able to do so as still you have not added yourself into “Office 365 Learning Path Authors Security Group”

Configuring Learning Path feature in Dynamics 365 CRM

If you click on Content Library you would be prompted with the below error message:

Configuring Learning Path feature in Dynamics 365 CRM

So for accessing the Content Library, CRM user must be a part of “Learning Path Author Security Group” first, navigate to Admin Center select Groups under groups select “Learning Path Author Security Group” and add the user as member of “Learning Path Author Security Group”.

Follow below simple steps:

1. Navigate to Admin Center, Click on Groups

Configuring Learning Path feature in Dynamics 365 CRM

2. On the Groups page, select the “Learning Path Authors” group, Click on Edit button under “Members” row as below:

Configuring Learning Path feature in Dynamics 365 CRM

3. By clicking on “Add Members” you can add the user as below:

Configuring Learning Path feature in Dynamics 365 CRM

Configuring Learning Path feature in Dynamics 365 CRM

Note: All the users who are present in “Learning Path Authors” group, would have ability to edit the Learning Path Content in the Content Library.

 4 Navigate to Training, Content Library. After a few minutes, you should see the following page, from this page you can add your own guided tasks “Guided Task” or “Sidebar” depend upon your choice.

Configuring Learning Path feature in Dynamics 365 CRM

Note: Be patient while loading the content library as it takes few minutes to load.

Conclusion

“Learning Path” helps to train our valuable users on how to use even a hugely customized system on the web and tablet application, with simple hints and videos user get throughout knowledge of “how to use the application” without relying on anyone. Eventually it helps to reduce training time and costs in any business.

Viewing all 3363 articles
Browse latest View live


<script src="https://jsc.adskeeper.com/r/s/rssing.com.1596347.js" async> </script>