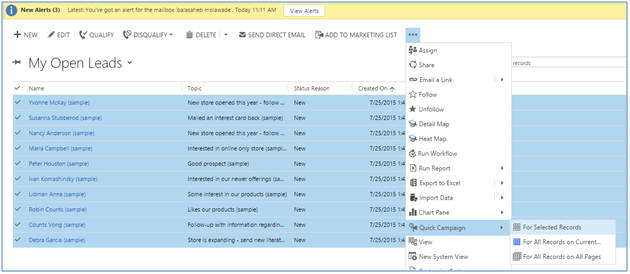
In Microsoft dynamics CRM, we have grids for each and every entity. And whenever we right-click on the grid, we get a contextual menu as shown in below screenshot.
Below is the list of menus that we get:
- Open
- Open In a new window
- Copy a Link
- Email a Link
- Refresh List
When we click on above options, we get the functionality as explained below.
Open: When we click on open in Dynamics CRM, a record gets open in same window
Open In a new window: When we click on this option, record gets open in new window
Email a Link: When we click on Email a Link option, it gets open in the default email application which contains the record URL.
Copy a Link: When we click on this option, it copies the record URL. Note: This only works in IE.
Print: On click of Print option, below page (with the all values pre-populated) will open 
Refresh List: This option refreshes the grid data.
CRM is not restricted to only OOB Grids; we have the flexibility to add customs grids as well.
We can add custom grids using Jquery, kendo, knockout grid etc.
There may be a case, where you need to mimic the right click functionality (Contextual menu) as the OOB grids have.
In this blog, we will discuss how to implement right click functionality same as in CRM on customs grids.
Consider a scenario, where you have a custom grid for a custom entity say “Project”.
Now, you need to imitate the contextual menu as we have for OOB grids.
So in order to have these menus, we have to use contextual menu (For this demo we have used kendo UI context menu).
After adding options like Open, Open in New Window etc. in the context menu, we have to add custom logic in order to make it behave the way as we have for OOB grids.
Below is the implementation of most commonly used menus, similarly you can have other custom menus as well.
Open : This option is used to open the record in the same window.
In order to open the record in the same window, we will be using OOB functionality i.e. openEntityForm as shown below.
Xrm.Utility.openEntityForm(name, id)
name: Name of the entity of the selected record in the grid.
id: GUID of the selected record in the grid that we want to open in the same window.
Open In a new window: This option is used to open the record in the new window.
In order to open the record in the new window, CRM 2015 SP1 has introduced the new parameter in the openEntityForm. For more details, you can view our previously posted blog.
var options = {
openInNewWindow : true
};
Xrm.Utility.openEntityForm(name, id, null, options)
name: Name of the entity of the selected record in the grid.
id: GUID of the selected record that we want to open in new window.
Email a Link: This option basically opens the record URL in the default mail application.
In order to achieve this, we have to follow the below mentioned steps.
Here first we will create the record URL that we need to send through email.
var recordURL = Xrm.Page.context.getClientUrl() + “/main.aspx?etc=10001&id=” + id + “&pagetype=entityrecord”
etc: Specify unique entity type code of the selected record in the grid.
id: GUID of the selected record in the grid.
The next step is to add the record URL in email body.
window.location.href = “mailto:?body=” + recordURL;
Copy a Link: This option copies the record URL on the clipboard.
We can achieve this using below piece of code.
var recordURL = Xrm.Page.context.getClientUrl() + “/main.aspx?etc=10001&id=” + id + “&pagetype=entityrecord”
etc: Specify unique entity type code of the selected record in the grid.
If(window && window.clipboardData)
{
window.clipboardData.setData(“Text”, recordURL);
}
Note: This will only work in IE.
Print: This option is intended to print the record.
For printing the record, we are using the OOB functionality. On click of this option we will open the same page that gets open in CRM when we click Print in CRM.
var url = Xrm.Page.context.getClientUrl() +”/_forms/print/print.aspx?id=” + id + “&objectType=10001&subType=10001″
window.open(url);
id: GUID of the selected record in the grid.
objectType: Specify unique entity type code of the selected record in the grid.
subType: Specify unique entity type code of the selected record in the grid.
Refresh List: This option is to refresh the data in the grid.
Call the same function that you have used to bind the data to the grid on click of this option.
Hope it helps!
There's much more, for more Dynamics CRM Tips and Tricks head on to Inogic Blog. If you have any questions on Dynamics CRM or need any help in implementation, customization, upgradation of Dynamics CRM or are looking to get more out of your CRM, feel free to reach us at crm@inogic.com today!
The post Replicate Right Click behavior of Dynamics CRM Grid on Custom Grids appeared first on Inogic Blog.