Quantcast
Channel: Sam's Activities
Viewing all 3363 articles
Browse latest View live

Converting Date/Time based on user timezone in SSRS reports for Dynamics CRM Online

$
0
0

Converting Date/Time values according to a timezone is quite easy in languages like javascript, C#, etc. but achieving this in SSRS reports is a challenging task. For CRM online we can achieve this using CRM parameter in SSRS reports.

We have covered a work around to achieve this functionality in SSRS reports for CRM online.

Scenario:

We had a request from one of our clients in which the client used to run a report on the last day of every month.

The client used to pay commisions to the users as per the goals achieved by them in the month, so he runs the report on the last day of the month. Somehow the report when ran didn’t show the proper data and the reason was the timzone difference between the user and the UTC timezone.

Since the report was made to show records of the current month so when the client ran the report on May 31 it unexpectedly showed the details of June because till that time the date has changed to June 01 in UTC.

Resolution:

After so much googling also we could not find a way to tackle this situation. So we tried to know the principles used in the OOB reports of CRM to handle this situation as they always run without any issues and show the perfect data all the time.

To know what is the logic used in the OOB reports we downloaded the Account Summary report available in system and we found two things that are used to achieve this functionality:

  1. CRM parameter: CRM_UserTimeZone
  2. Assembly reference:Crm.Reporting.RdlHelper

To incorporate these changes in our report we created a parameter CRM_UserTimeZone to store the user time zone as shown below:

report

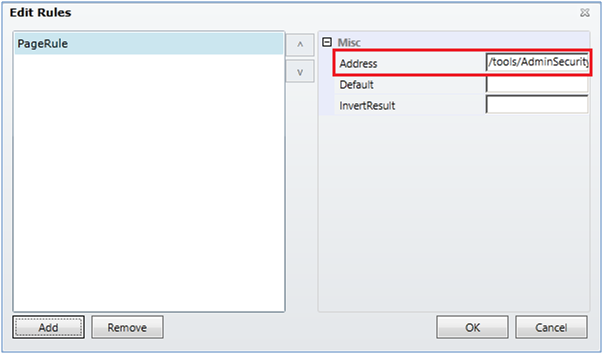
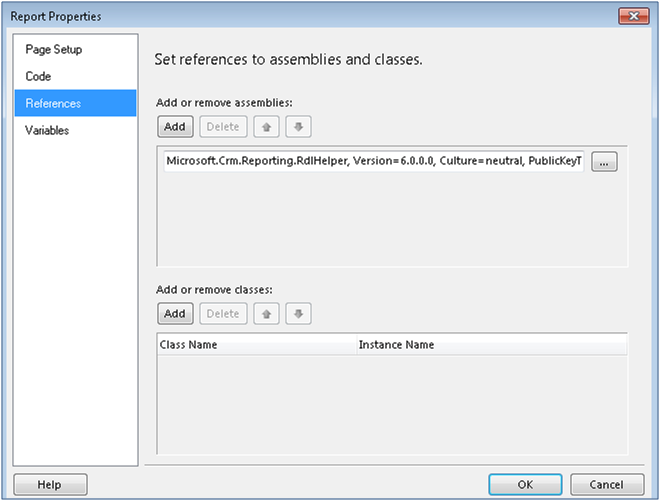
After adding the parameter in the report we need to add the assembly refrence, to add the refrence go to Report Properties and click on the References tab. Now click on the Add button, since the assembly we need to add in the report is only available on the reporting server so we cannot browse and add a URL to it.

To overcome this we need to just paste the following URL in the browse textbox as shown below:

URL: Microsoft.Crm.Reporting.RdlHelper, Version=7.0.0.0, Culture=neutral, PublicKeyToken=31bf3856ad364e35

The above URL is found in the refrences of the Account Summary report.

report1

After adding the assembly reference we need to initialize a variable which will contain the user current datetime. To do this we use the following code:

=CDate(Microsoft.Crm.Reporting.RdlHelper.DateTimeUtility.ConvertUtcToLocalTime(DateTime.UtcNow, Parameters!CRM_UserTimeZoneName.Value))

In the above code, we have converted the UTC time to user local time using theCRM_UserTimeZoneName parameter so it provides us the flexibility to run the report on the last day of each month.

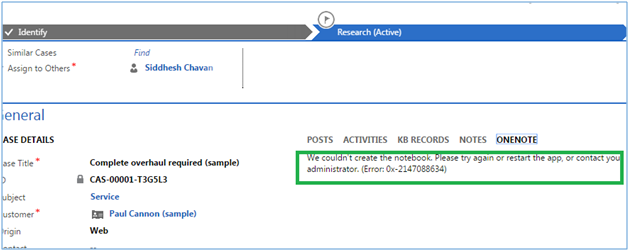
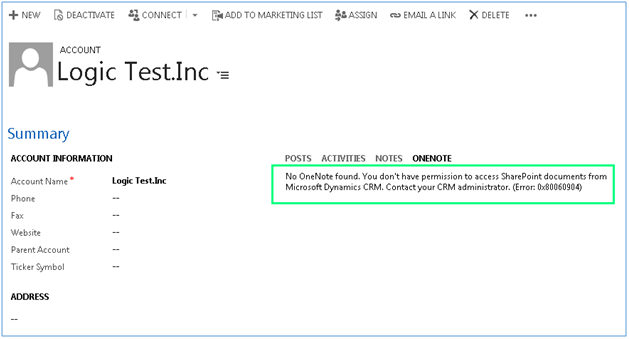
Note: If we run this report in the dev machine then it gives an error of missing references as shown below:

report2

But when this report is rendered in the online environment then it loads the referenced assembly from the CRM online environment and shows the proper data.

report3

Summary

It is clear from the above example that we can use the CRM parameters to make our reports user-friendly and to show user-specific data.

There's much more, for more Dynamics CRM Tips and Tricks head on to Inogic Blog. If you have any questions on Dynamics CRM or need any help in implementation, customization, upgradation of Dynamics CRM or are looking to get more out of your CRM, feel free to reach us at crm@inogic.com today!

The post Converting Date/Time based on user timezone in SSRS reports for Dynamics CRM Online appeared first on Inogic Blog.


Accessing related entities fields in Calculated Fields formulas in Microsoft Dynamics CRM 2015

$
0
0

Introduction:

In our recent blog post about calculated fields we have covered about calculated fields support extended for Date/Time data types in Dynamics CRM 2015 Online Update 1. You can read this blog here. In this blog we will focus on accessing related entities fields in calculated fields formulas.

In Calculated fields, you can define the formula at the time of adding the field itself. This ensures it is executed at all times, server-side. But since it is updated synchronously you can see the updates immediately upon save.

Calculated fields can only use N:1 look up fields. We cannot use N:N or 1:N relationship for Calculated fields.

Walk-through:

Let’s see how we can use related entities look up fields in calculated fields formula.

Consider an example where we need to calculate the Budget for Opportunity Entity using the formula:

Budget(Opportunity)=Budget(Account) – ( Budget(Account)*0.002)

To accomplish this,

1. We will first create Budget field as calculated field on Opportunity Entity. As we createBudget field as Calculated Field it becomes read only on the form.

calculated field         

2. To define the calculation for Budget field click on Edit button that appears only when Field type is Calculated or Rollup.

calculated field1

This opens a UI similar to Business Rules where we can define calculation.

calculated field2

3. When setting the action and formula, you get intellisense to support the common functions. Using the intellisense, we can use the related entity by using the lookup fields name of that entity.calculated field3

4. The lookup fields name allows access to all fields of the look up entity.calculated field4

5. For above requirement we have defined the conditions and actions as below:calculated field5

Now, when you create a new record, upon Save you will find the Budget automatically set.

Conclusion:

With this extended support we can perform calculations that require related entities fields using calculated fields.

Stuck with migration to Dynamics CRM? Experts at Inogic are always happy to help you, get in touch with us on crm@inogic.com.

There's much more, for more Dynamics CRM Tips and Tricks head on to Inogic Blog. If you have any questions on Dynamics CRM or need any help in implementation, customization, upgradation of Dynamics CRM or are looking to get more out of your CRM, feel free to reach us at crm@inogic.com today!

The post Accessing related entities fields in Calculated Fields formulas in Microsoft Dynamics CRM 2015 appeared first on Inogic Blog.

Calculated fields support extended for Date/Time data types in Dynamics CRM 2015 Online Update1

$
0
0

Introduction:

Calculated fields was first introduced in Dynamics CRM 2015 and it further improved upon the ability to provide codeless solutions to power users to configure. You can learn more about its features from our earlier blog here.

It provided support for most CRM data types however the calculations and formulae supported for Date/Time fields were still limited.

With the latest Online update, they have enhanced the operations supported on Date/Time fields.

  1. DIFFINDAYS(start date or time, End date or time)
  2. DIFFINHOURS(start date or time, End date or time)
  3. DIFFINMINUTES(start date or time, End date or time)
  4. DIFFINWEEKS(start date or time, End date or time)
  5. DIFFINYEARS(start date or time, End date or time)
  6. DIFFINMONTHS(start date or time, End date or time)

The Rollup field has also been enhanced to support AVG as an aggregate calculation for Date/Time fields.

How does this help?

A very real scenario where this code be used is to calculate the Avg. time it takes for resolving a complaint.

The Actual Units fields in the Case entity calculates the total time spent on the case by adding up the times on the individual activities associated with the case. But what if you wanted to know just how long a case had been open – case createdon – case modifiedon.

Next it would be good to have the Avg. case resolution time per customer, to monitor if there are particular customers for which is usually takes too long to close a case. What we are looking out for here is Avg. Case closure time.

Walkthrough

Let us see how to go about getting this set up in no time.

  1. Add the Calculated field.

calculated fields

Since we have created a Duration field, we would calculate the difference between CreatedOn and ModifiedOn in minutes. Note. Duration field always expects the values to be provided in minutes.

calculated fields1

  1. Create the Rollup field.

              We will add the rollup field on Account to get the Avg. Resolution time.

calculated fields2

                       Rollup the time for only resolved cases.

calculated fields3

  1. Place both the fields on the Case and Account forms respectively.
  2. Now when you resolve the case, you will find that the case resolution time is auto calculated.

calculated fields4

  1. We quickly closed a few cases for this account so that the avg. could be calculated

calculated fields5

  6.   Now lets check how it looks on the Account form

calculated fields6

Conclusion:

Though this takes a step further in supporting date/time data type in Calculated and Rollup fields, Rollup fields still do not support Date conditional operators like Last X months/years etc. So if I wanted to get the avg. case closure time in the last 6 months, I still cannot do that. Hoping to see this included in future version to support a full code-less power-user configuration solution.

There's much more, for more Dynamics CRM Tips and Tricks head on to Inogic Blog. If you have any questions on Dynamics CRM or need any help in implementation, customization, upgradation of Dynamics CRM or are looking to get more out of your CRM, feel free to reach us at crm@inogic.com today!

The post Calculated fields support extended for Date/Time data types in Dynamics CRM 2015 Online Update1 appeared first on Inogic Blog.

Keywords : Calculated field, Dynamics CRM 2015, Date/Time data types, Dynamics CRM 2015 Online update 1, 

Hierarchy Support in Dynamics CRM 2015 SDK

$
0
0

Introduction

Hierarchies were introduced in Dynamics CRM 2015.  Hierarchy provided a way for visualizing relation between records and identify where the records reside in parent child relationship.

As in example below shows where “Test Account02” situated in hierarchy tree.

Hierarchy_Support

SDK Support

To support the ability to retrieve records based on Hierarchy, the SDK was enhanced and new operators added that would allow you to specify the records to be selected in the hierarchy.

There are new conditional operators has been added in CRM SDK to utilize record hierarchy feature and retrieve records in hierarchy.

Listed below are the conditional operator can be used to retrieve records in hierarchy. We retrieved the records on account form load for account “Test Account02” and displayed in alert dialog to check the result. Below are the condition operator and its description.

1. above

Operator Scope: Can be used as conditional operator for the entity record.

Description: This retrieves records which are above the records in tree. In case of “Test Account02” it is “Test Account01” as below.

Hierarchy_Support1

Note : When records is retrieved with same operator for  account “Test Account05”.This will retrieve account “Test Acccount01” and “TestAccount02”.Accounts ”Test Account04” and  “Test Account03” are not part of the result.

2. eq-or-above

Operator Scope: Can be used as conditional operator for the entity record.

Description: This includes records above the specified record including record itself. In case of “Test Account 02” the result is as below.

Hierarchy_Support2

 3. under

Operator Scope: Can be used as conditional operator for the entity record.

Description: This operator used to retrieve records below the specified record in hierarchical tree. For “Test Account02” the result is as below.

Hierarchy_Support3

For the record “Test Account01” the result records are “Test Account02”,”Test Account03” ,”Test Account04” and ”Test Account05”.

 4. eq-or-under

Operator Scope: Can be used as conditional operator for the entity record.

Description: This operator is used to retrieve records below specified record in hieratical tree including the record. For “Test Account02” the result is as below.

Hierarchy_Support4

 5. not-under

Operator Scope: Can be used as conditional operator for the entity record.

Description: This operator used to retrieve records which are not below specified record. Result includes the current record too. This will be usable in combination with other operators. For “Test Account02” the result is as below. This includes all records except “Test Account05”.

Hierarchy_Support5

6. eq-owneduseroruserhierarchy

Operator Scope: Can be used as conditional operator for the owner field.

Description: This Operator used to retrieve records owned by user and also the records which are not owned by login user but part of hierarchy. We have created new account “test Account08” which is owned by another user. But its parent account is “Test Account03” as below.

Hierarchy_Support6

For “Test Account08” the result is as below.

Hierarchy_Support7

 7. eq-useroruserhierarchyandteams

Operator Scope: Can be used as conditional operator for the owner field.

Description: This Operator used to retrieve records owned by user and records owned by user in hierarchy.

Below is the screen shot shows Position “P1” and “P2” are related.

Hierarchy_Support8

Position “P1” contains first user and position “P2” contains user “John” as below.

Hierarchy_Support9

Hierarchy_Support10

Record “Test Account08” and “Test Account09” are owned By “Jon”. Since both users are related in hierarchy result for “Test Account03” will be as follows.

Hierarchy_Support11

“Test Account08” and “Test Account09” account records are included in the result.

There's much more, for more Dynamics CRM Tips and Tricks head on to Inogic Blog. If you have any questions on Dynamics CRM or need any help in implementation, customization, upgradation of Dynamics CRM or are looking to get more out of your CRM, feel free to reach us at crm@inogic.com today!

The post Hierarchy Support in Dynamics CRM 2015 SDK appeared first on Inogic Blog.

Dynamics CRM and Bing Maps integration using Maplytics – Add More Happy Customers

$
0
0

This is Part 1 of our series on some of the most common FAQ’s on our Maplytics solution which allows you to integrate your Dynamics CRM with Bing Maps for all entities.

maplytics

Why Maplytics?

First thing, Dynamics CRM does come with a Bing Map integration out of the box. Our solution takes this a step ahead, it allows you to integrate all entities including custom entities so you can explore more on customer statistics, know them better, serve them better and have more happy customers and obviously Grow your Business.

Do proximity search, color code your pushpins the way you want, have heat maps, export your results and much more.

Product Page – http://inogic.com/Product/76/Integrations/Maplytics
Video – https://www.youtube.com/watch?v=UgWslSIv5MM

Before we proceed, will it affect my existing customizations?
No, it is supplied as a managed solution that is easy to install and un-install without affecting your existing customization.

What versions does it support?
Maplytics supports all CRM deployment models namely on-premise, on-line, office 365 and partner-hosted. It supports Dynamics CRM 2011 and above.

Pricing?
Maplytics is available at 10USD per user per month. Special offers and volume discounting is also available. Don’t worry price is …..% (You can’t value how beneficial it would be for your business) of your business profit.

Can I grab a Trial?
Ofcoz, opt in for our 15 days fully functional trial. Email us on crm@inogic.com with your CRM version and deployment (on-prem or online) model.

There's much more, for more Dynamics CRM Tips and Tricks head on to Inogic Blog. If you have any questions on Dynamics CRM or need any help in implementation, customization, upgradation of Dynamics CRM or are looking to get more out of your CRM, feel free to reach us at crm@inogic.com today!

The post Dynamics CRM and Bing Maps integration using Maplytics – Add More Happy Customers appeared first on Inogic Blog.

Keywords : Dynamics CRM, Bing maps, dynamics CRM and bing maps integration, Maplytics, Mapping tool for Dynamics CRM

Immersive Excel Experience with Dynamics CRM 2015 Online Update 1

$
0
0

Introduction:

Export to Excel has been a feature that has been in Dynamics CRM since its initial release. Though it did the job, there were some annoying pop-up’s and probably a few clicks that could well be avoided. With the Online Update 1, the Export to Excel experience is set to change for the better.

Excel File Format:

In the earlier versions of Dynamics CRM, when you exported the data to Excel and tried to open the Excel file, you were prompted with this dialog

e1

We have been used to clicking on Yes and proceed further with opening the excel file.

With the latest update in place, you will not receive these innocuous messages.

Editing Excel:

Export to Excel has always had the feature to export the data for reimport.

e2


When this option was selected, the excel file exported would add the hidden GUID column to the excel sheet and you could then edit and import this sheet back into CRM. However the process was a 3 step process

  1. Export for re-import.
  2. Edit in Excel.
  3. Import the new excel file saved in CSV format using Import Tool.

Enhanced process of Editing

To avoid the 3 step process, you now can simply edit the records in-place. In a way you now have an Editable Grid in CRM. You can convert any of the CRM Views into an Editable Grid for basic field data manipulation and batch editing of records.

You can access this feature “Open in Excel Online” under the Export to Excel button available on all grids.

e3

Once you click on it you are directed to Excel Online page as you can see below:

e4

You can use any Excel Formulas you want and even edit the records if you wish to use.

Suppose we change the Account Name to “Name Updated”.

e5

We can even add any new records by adding data in the next row and saving the excel back to CRM.

e6

The record would be created in CRM when we click “Save the changes back to CRM”.

e7

You can see the record is created in CRM as below:

As soon as we click the “SAVE CHANGES TO CRM” following dialog shows up

e8

We can check the status of importing process at “Settings/ Data Management/Imports”.

e9

We can monitor the Import Job status from the Import Job. It shows the Creates and Updates performed in CRM due to the import. In our case it shows “Create” and “Update” as follows:

e10

Once the import job successfully completes, you can see the updates reflected in CRM. The Failures if any can be monitored in the job as well.

Security:

In order to use this functionality the user must have “Export to Excel” privilege.

e11

It appears you do not need to have an active Excel Online subscription for this to work. This was tested on an Org that did not have any active Office subscription.

Conclusion:

Easy to use, bulk editing tool with the power of Excel is now in your hands with this feature.

Hope it helps!

There's much more, for more Dynamics CRM Tips and Tricks head on to Inogic Blog. If you have any questions on Dynamics CRM or need any help in implementation, customization, upgradation of Dynamics CRM or are looking to get more out of your CRM, feel free to reach us at crm@inogic.com today!

The post Immersive Excel Experience with Dynamics CRM 2015 Online Update 1 appeared first on Inogic Blog.

Keywords : Dynamics CRM, CRM 2015, Dynamics CRM 2015 online Update 1

How to Open Quick Create form in Dynamics CRM 2015 Online Update 1

$
0
0

You might be aware of how to open CRM entity form using javascript function that was introduced in Dynamics CRM 2013 i.e. Xrm.Utility.openEntityForm()

If you are not then you can refer our blog about this feature here. We use openEntityForm function to open blank entity form or entity form with pre populated values.

In CRM 2013 there was new feature introduced called Quick Create Form, using quick create form user can quickly create new record by staying on the same page.

The quick create form opens as below,

form

And there was no function or an option to open such quick creates form programmatically.

Sometimes we may need to open Quick create form programmatically. Microsoft has introduced new function in Dynamics CRM 2015 Online Update 1 to open quick create form same as open entity form.

This blog will illustrate how to open Quick create form.

Now there is one function available under Xrm.Utitlity called ‘openQuickCreate’ that open entity open form as shown in above screen shot.

Syntax,

Xrm.Utility.openQuickCreate(entityLogicalName,createFromEntity,parameters).then(successCallback,errorCallback);

Here,

entityLogicalName: Accept string value. Pass logical name of entity for which we need to open quick create form,

createFromEntity: Accept a lookup object, Pass lookup object that will provide default values based on mapped attributes values.

parameters: Accept a object, pass extra querystring parameters. We can pass field values as a parameter to set field values on the quick create form.

successCallback: This is a function that will call when record is created. It returns a lookup object of created record.

errorCallback: This is a function that will be called when error occurred. It returns errorCode andmessage.

From all above parameter only entityLogicalName is required and others are optional.

Below is an example where we will open Quick Create form to create a new child account from account entity form with some pre populated values.

//lookup object of current account record

var parrentAccount = {

 entityType: “account”,

 id: Xrm.Page.data.entity.getId()

};

var parameters = { name: “Child account of ” + Xrm.Page.getAttribute(“name”).getValue(), address1_postalcode: Xrm.Page.getAttribute(“address1_postalcode”).getValue() };

Xrm.Utility.openQuickCreate(“account”, parrentAccount,parameters ).then(function (lookup) { successCallback(lookup); }, function (error) { errorCallback(error); });

function successCallback(lookup)

{

        window.console.log(“lookup: ” + lookup.savedEntityReference.id);

}

function errorCallback(e){

        window.console.log(“Error: ” + e.errorCode +” “+e.message);

}

Above code opens a quick create form with auto populating name and postal code from parent account.

form1

The successCallback() calls when you save the record.

Hope it helps!

There's much more, for more Dynamics CRM Tips and Tricks head on to Inogic Blog. If you have any questions on Dynamics CRM or need any help in implementation, customization, upgradation of Dynamics CRM or are looking to get more out of your CRM, feel free to reach us at crm@inogic.com today!

The post How to Open Quick Create form in Dynamics CRM 2015 Online Update 1 appeared first on Inogic Blog.

One Note Integration with Dynamics CRM 2015 Online Update 1

$
0
0

Introduction:

In today’s world there would be very few who perhaps still use notepad or like application for taking notes. Majority use application like OneNote or EverNote to manage their notes. These application allow recording of rich data like pictures, videos etc within the application for later consumption. Recording notes traditionally in CRM has been through the Notes tab, that allows you to record multiple notes, but it has to be text. It supports file attachments though.

In the latest CRM Online release, Dynamics CRM would now provide a seamless integration to OneNote, this means you can now from within CRM directly record notes into OneNote and easily access them from within CRM.

Enabling this feature

This feature is built upon the Sharepoint Integration framework and requires that you have Sharepoint Integration enabled for CRM. So the first step would be to enable Sharepoint Integration

Navigate to Settings >> Document Management.

In this example we will “Enable Server- Based SharePoint Integration” and enter the valid SharePoint Url to integrate CRM with SharePoint account. 

img1

Once we integrate SharePoint with CRM, the OneNote Integration option is listed in document management as shown below in the screenshot.

img2

Then enable the OneNote and it will open “OneNote Integration Settings” in which we will select the entities for which we want to turn on OneNote integration. It will only list those entities for which Sharepoint Integration had been enabled.

img3

Once the OneNote integration has been enabled, you now start seeing a new option at the entity level in the customization screen

img4

For any new entity that you want to enable OneNote integration, you need to make sure, you check the Document Management and OneNote Integration options on the entity level.

Next run the Document Management Wizard to have the libraries created in Sharepoint for these entities.

img5

Once you have the integration enabled, you would find a new option ONENOTE showing in the Social Pane on the form.

img6

Since Sharepoint Integration needs to be enabled for OneNote integration, if you click on the onenote tab you would see the following error if no sharepoint library was already created for this record.

img7

Once the library is created, clicking on the ONENOTE tab will automatically create a OneNote notebook for the record with the same name as the record name and an untitled page will show up in the notes as shown below

img8

When you navigate to the Documents pane in the CRM, you will see the following files created in Sharepoint

img9

Note: Do not delete the .onetoc2 file found in the Sharepoint library. That file is necessary for the integration to work.

You can click on the Untitledonenote file in the OneNote pane, to directly open the OneNote file in OneNote Online.

img10

Adding a new Section in the notebook will add a new listing in the ONENOTE tab of the form.

img11

img12

You can create multiple sections but they will all be stored in the same notebook. Multiple notebooks cannot be created for a single record in CRM.

Changing the OneNote page name and the file name that appears in the OneNote pane.

Untitled is not a very descriptive or friendly name to have for a file. But unfortunately, the default file/page that is created for one-note integration is called untitled. What we found that renaming the Untitled Notebook after opening it in OneNote Online did not change the file name.

Also notice in the above screenshot, the date/time in the untitled page is also not the current date/time.

To fix this

  1. Go ahead and delete the default Untitled Page and the Untitled Section that shows up
  2. Create a new Section clicking the “+” button on the section

Give the name you want to see in CRM. In our case we have considered “CRM Section using OneNote App” and saved. The new section would be created in ONENote as follows:

img13

This now also reflects the current date/time.

  1. When you come out of OneNote and navigate back to the OneNote tab in CRM you will see the updated name

img14

  1. Another way to rename the section name is to do it through the desktop version of OneNote.

Security Privileges that control OneNote Integration

No new settings or privileges have been introduced related to ONE NOTE. However since it is very closely tied to Sharepoint Integration, privileges that control Sharepoint Integration essentially control the OneNote integration as well.

Suppose a user has a role with No create , read and Write privilege for Document Location as shown below :

img15

If this user tries to create a ONENOTE clicking the Tab one note is not created or loaded and following error is displayed

img16

And finally, the user needs to have access to the Sharepoint Document Library in Sharepoint to be able to access the onenote file.

Conclusion

You can now access OneNote file from right within Dynamics CRM, without the need to manually upload or download the file to make updates.

There's much more, for more Dynamics CRM Tips and Tricks head on to Inogic Blog. If you have any questions on Dynamics CRM or need any help in implementation, customization, upgradation of Dynamics CRM or are looking to get more out of your CRM, feel free to reach us at crm@inogic.com today!

The post One Note Integration with Dynamics CRM 2015 Online Update 1 appeared first on Inogic Blog.


Dynamics CRM 2015 Online Update 1 – API support for Transaction

$
0
0

Introduction:

As a developer, you always want to perform any database operation in a Transaction so that you have the choice of rollback in case an operation fails. There are many examples where you want either all of your API instructions to succeed or all of them to rollback. If there is only a partial successful execution, it could lead the database in an unstable state. This is especially true of scenarios where you would like to create one record with multiple other related records. You want the master record created only if all other related records could be successfully created as well. If any related operation fails, do not create the master record as well.

Unfortunately, until this update, Dynamics CRM did not support transaction for actions performed through the API by the developers.

ExecuteTransactionRequest:

This is a new request that is introduced with the Dynamics CRM Online Update 1 (7.1.x).  With this request you need to provide a collection of Organization request like Create, Update, Delete, SetState, Assign, any organization request and have CRM execute them in a transaction. This means any of the request in the collection fails, all the other requests would also rollback. The response of this request would also be a collection of responses corresponding to every request that was included in the request collection.

ExecuteTransactionRequest execTrans = new ExecuteTransactionRequest()

{

ReturnResponses = true,

Requests = new OrganizationRequestCollection()

};

Below is an example of how could you add different organization requests in the request collection. Note, we are adding different messages for the sake of clarity about this message.

///// Create Account Request//////

Entity account = new Entity(“account”);

account["name"] = “Transaction request 1″;

CreateRequest createAcc = new CreateRequest();

createAcc.Target = account;

//add create request in a request collection

execTrans.Requests.Add(createAcc);

////// Update request ///////

Entity contact1 = new Entity(“contact”);

contact1["firstname"] = “Samantha”;

contact1["lastname"] = “Ray”;

contact1[“emailaddress1”] = “sammy@example.com”;

//set gender value

contact1[“gendercode”] = new OptionSetValue(3);

//Update request to update a contact

UpdateRequest upReq = new UpdateRequest();

upReq.Target = contact1;

upReq.Target.Id = new Guid(“58C7D2CB-7A0E-E511-80DC-FC15B4289E14″);

//add update request in a collection

execTrans.Requests.Add(upReq);

///// Status Change Request //////

SetStateRequest state = new SetStateRequest();

//set the reference of target entity

state.EntityMoniker = new EntityReference(“contact”, new Guid(“A925C42D-CFE4-E411-80E8-C4346BAD5414″));

//set the state of the record to inactive

state.State = new OptionSetValue(1);

state.Status = new OptionSetValue(2);

//add set state request in collection

execTrans.Requests.Add(state);

///// Delete request //////

DeleteRequest delete = new DeleteRequest();

//provide target entity reference which needs to be deleted

delete.Target = new EntityReference(“account”, new Guid(“4125C42D-CFE4-E411-80E8-C4346BAD5414″));

//add delete request in collection

execTrans.Requests.Add(delete);

Finally execute the ExcecuteTransaction Request

//Execute the request

ExecuteTransactionResponse response = (ExecuteTransactionResponse)_service.Execute(execTrans);

The response of this can be read as shown below

response.Responses would contain the collection of the responses returned for each of the request submitted to the request above.

You can read the response for each of the individual request by matching the index in the request collection with that in the response collection.

img

For the create request, the response would provide the id in the response.

OrganizationResponse resp = response.Responses[0]

Since this was a createRequest, the response would be the CreateResponse that is returned. You can find the Guid of the newly created record

id = (Guid)orgResponse.Results["id"];

If an error occurs in executing any of the message in the collection, it would throw a fault exception of the type ExecuteTransactionFault which will return the index of a request collection of the request message that caused the fault.

Here is how it looks in the debugger

img2

You can read it using the following code.

catch (FaultException<Microsoft.Xrm.Sdk.OrganizationServiceFault> ex)

{

ExecuteTransactionFault fault = (ExecuteTransactionFault)ex.Detail;

int faultedIndex = fault.FaultedRequestIndex;

}

Conclusion:

Do not confuse this with ExecuteMultiple that was introduced in one of the earlier updates to Dynamics CRM. Some points to remember

  • ExecuteMultiple allowed you to process multiple messages in a single batch to reduce the roundtrips required to process multiple messages.
  • ExecuteTransaction goes a step further to ensure that all of the messages submitted to it are executed in Transaction mode. Rollback if any message fails.
  • You can include an ExecuteMultiple request within an ExecuteTransaction request.
  • The max messages that can be executed in a batch is 1000


There's much more, for more Dynamics CRM Tips and Tricks head on to Inogic Blog. If you have any questions on Dynamics CRM or need any help in implementation, customization, upgradation of Dynamics CRM or are looking to get more out of your CRM, feel free to reach us at crm@inogic.com today!

The post Dynamics CRM 2015 Online Update 1 – API support for Transaction appeared first on Inogic Blog.

Keywords : Dynamics CRM, Microsoft Dynamics CRM, Dynamics CRM 2015, Dynamics CRM 2015 Update 1

Retrieve and Instantiate Global Email Template

$
0
0

Have you ever Retrieved or Instantiated an email template? If the answer to this question is YES, then you might be knowing the required parameters we need to have in place in order to do so.

For those of who aren`t aware of it then this blog would help you understand the tidbits involved.

We had a request in which we were supposed to use a Global Email Template for sending emails.

Well we had done the same for entity specific email template, but this was something we had never done until the request.

Let`s get started with the explanation of how we achieved it.

First, we`ll retrieve a Global Email template.

Retrieve:

Here we`ll retrieve the Global Email Template, on the basis of the Template Name. We just need the GUID for this demo, so we would just be retrieving the GUID of the template. The retrieved GUID would then be used to Instantiate the template.

Code Snippet

public void RetrieveTemplate()

        {

            string functionName = "RetrieveTemplate";

            Guid templateId = Guid.Empty;

            try

            {

                string emailTemplate = "Welcome Email";

                FilterExpression filter = new FilterExpression();

                ConditionExpression conditionTitle = new ConditionExpression();

                ConditionExpression conditionType = new ConditionExpression();

                QueryExpression query = new QueryExpression();

                //title

                conditionTitle.AttributeName = "title";

                conditionTitle.Operator = ConditionOperator.Equal;

                conditionTitle.Values.Add(emailTemplate);

                //entity type               

                conditionType.AttributeName = "templatetypecode";

                conditionType.Operator = ConditionOperator.Equal;

                conditionType.Values.Add("systemuser");

                //add conditions

                filter.FilterOperator = LogicalOperator.And;

                filter.Conditions.Add(conditionTitle);

                filter.Conditions.Add(conditionType);

                query.Criteria = filter;

                query.ColumnSet = new ColumnSet();

                query.EntityName = "template";

                query.ColumnSet.Columns.Add("templateid");

                EntityCollection templateCollection = _service.RetrieveMultiple(query);

                if (templateCollection.Entities.Count > 0)

                {

                    templateId = templateCollection[0].Id;

                    InstantiateTemplate(templateId);

                }

             }

            catch (FaultException<OrganizationServiceFault> ex)

            {

                throw new FaultException(functionName + ":" + ex.Message);

            }

            catch (Exception ex)

            {

                throw new Exception(functionName + ":" + ex.Message);

            }

        }

 Explanation

  • Entire code is similar to what it should have been for retrieving Entity Specific Email template; the difference here is the part where we specify "templatetypecode”.
  • If the template is an entity specific template, then we would have used the respective entity`s logical name, but in this case we are retrieving a Global Email Template, then what could be "templatetypecode"? Here is a trick; we need to use "systemuser" as the "templatetypecode".  And this simple it is to retrieve Global Email Template.
  • Using the above code, we`ll get the GUID of the global template and that GUID will then be used in instantiating the Global Email Template.

Instantiate:

Here on the basis of the retrieved GUID, we`ll instantiate the Global Email Template, and that would be the last step of this procedure.

Code Snippet

private void InstantiateTemplate(Guid templateId)

        {

            string functionName = "InstantiateTemplate";

            EntityCollection templateCollection = new EntityCollection();

            Entity template = new Entity();

            try

            {

                InstantiateTemplateRequest request = new InstantiateTemplateRequest();

                request.RequestName = "InstantiateTemplate";

                //Set Email template Id

                request["TemplateId"] = templateId;

                //Set Regarding

                request["ObjectId"] = userId;

                //Set regarding type

                request["ObjectType"] = "systemuser";

                //execute message

                InstantiateTemplateResponse response = (InstantiateTemplateResponse)_service.Execute(request);

                //Store response in collection

                templateCollection = (EntityCollection)response["EntityCollection"];

                if (templateCollection.Entities.Count > 0)

                {

                    template = templateCollection[0];

                }

             }

            catch (FaultException<OrganizationServiceFault> ex)

            {

                throw new FaultException(functionName + ":" + ex.Message);

            }

            catch (Exception ex)

            {

                throw new Exception(functionName + ":" + ex.Message);

            }

        }

Explanation

  • In the above snippet there are 3 key things to look at.
    • Template Id: It is the GUID of the template that we retrieved in starting.
    • Object Id: It is the GUID of the user from the organization. If this would have been an Entity Specific template then we would have used the GUID of any of the record from that entity.
    • Object Type: It is the systemuser in this case, since we are instantiating a Global Email Template. If it would have been an Entity Specific template then we would have used that respective entity`s logical name.
  • The noticing part was the above 3 points, rest is just executing the InstantiateTemplateRequest  and getting the response in InstantiateTemplateResponse which is further used to get the Entity from it.

Hope this helps!

There's much more, for more Dynamics CRM Tips and Tricks head on to Inogic Blog. If you have any questions on Dynamics CRM or need any help in implementation, customization, upgradation of Dynamics CRM or are looking to get more out of your CRM, feel free to reach us at crm@inogic.com today!

The post Retrieve and Instantiate Global Email Template appeared first on Inogic Blog.

Handling Date/Time fields in Microsoft Dynamics CRM 2015 Online Update 1

$
0
0

Introduction

Managing Date/Time fields in Dynamics CRM has not been easy especially when time zone come into picture and yet it is very critical to the application. Dynamics CRM being a global application was designed to support multiple timezones and the architecture design had a very noble thought behind it –

“No matter which timezone a user logs in and looks at a date/time value, the date/time should always be reflected in their own timezone”

To go ahead and support scenarios where on Date was required and not the time, they even created a format type to specify “Date-only” field.

To support this design architecture, the date time fields in the database are always stored in UTC format. The idea being the date/time could be then converted and shown in the time zone of the logged-in or the requesting user. You specify the timezone for each user in the User Options accessible through Options

Issues with storing in UTC

We sometimes only want CRM to store date as is, not really do the time conversion, no matter which time zone it is seen from, it should still display this static date as is. The date only field did not really achieve this. The date only is also stored as date with the time components as 12 am. Since it is UTC when viewed from another timezone, it would either go one day forward or a day back depending on the part of the world you are in.

Since it is stored in UTC any programmatic access to a date field would return a UTC value, which was not was really required and it required developers to add in date/time conversion code to use the date/time value retrieved from CRM.

New Enhancements

The product team has received well all the feedback sent around the issues with Date/time field type and with the Update 1 Online release, have brought about the following platform enhancements with the objective to resolve all issues around date/time fields.

They have now introduced a new setting called “Behavior” for date/time fields in Dynamic CRM 2015 Update 1, we are able to set DateTime field with different time behaviors.

Following are the behaviors:

  • User Local
  • Date Only
  • Time-Zone Independent

User Local:

When the DateTime behavior is set as User Local and format is Date and Time then the time displayed will be as per the user time zone. For example please find the screen shots below.

Here for “Interview date” field we have set the date and time behavior as “User Local”. So when this field will be set it will be seen as per the user time zone settings as follows –


In the above two screen shots you can find that the Interview Date field displays different time for both users as they both are from different time zones. This emulates the behaviour of all date/time fields in Dynamics CRM prior to these new enhancements. All existing date/time fields in CRM are set as User Local by default. You will need to go and manually edit the behaviour of the field if you would like it to behave as any of the following two behaviour types.

Programmatically when you retrieve this value from CRM say for example as an input parameter of a workflow, the DateTime.Kind attribute is set to UTC.

Date Only:

For date only field since only date is displayed it has no effect of the user time zone. This is a true date only field. There is no time conversion done to show this value on CRM form. It is stored just as is entered and returned when requested.

Programmatically when you retrieve this value from CRM say for example as an input parameter of a workflow, the DateTime.Kind attribute is set to none.

Time-Zone Independent:

This DateTime field will be set irrespective of the time zone of user. So in below screen shot you can find that the values for “Relieving Date” field which is of Time-Zone independent behavior shows same date time for both users although they lie in different time zones.

Programmatically when you retrieve this value from CRM say for example as an input parameter of a workflow, the DateTime.Kind attribute is set to none.

Conclusion:

With these enhancements it would be a little easier to manage the dates and avoid unnecessary conversions to get it to work.

There's much more, for more Dynamics CRM Tips and Tricks head on to Inogic Blog. If you have any questions on Dynamics CRM or need any help in implementation, customization, upgradation of Dynamics CRM or are looking to get more out of your CRM, feel free to reach us at crm@inogic.com today!

The post Handling Date/Time fields in Microsoft Dynamics CRM 2015 Online Update 1 appeared first on Inogic Blog.

Keywords: Microsoft Dynamics CRM, CRM 2015, Date/Time Field, Dynamics CRM Update 1

Custom Actions in Dynamics CRM 2015 Online Update 1

$
0
0

Recap:

Back in 2013, when Microsoft introduced the concept of “Custom Actions”, we had explained this feature in this blog. With the latest update released for CRM Online versioned 7.1, this feature has further been extended.

As a quick recap, Actions in processes are a way to create custom messages in CRM for an entity, for example escalate or approve. OOB for most entities you have Create, Update, Delete, Assign, SetState messages and you have the option of writing custom business logic in the form of Plugins or Workflows on these.

You could invoke these custom action messages through Script or through C# code.

Example:

Say to implement a business process in one of the implementation, there was a need to create a message called “Escalate” for incident. Prior to the introduction of “Actions”, these were handled by adding a custom attribute and writing plugin/workflow code that tracked the change in the attribute value to execute custom logic.

For a true XRM implementation, a need was felt to be able define custom actions instead of use workarounds like the one explained above.

Here is a custom action “Escalation” that has been created.

The actual operations that need to be performed when this action is invoked is defined through the options available similar as in workflow designer.

Until now, we needed to add a custom ribbon button and invoke this action through a script. i.e this could only be invoked through a manual process. Or if it required to be automated, then you need to write a custom workflow assembly that would programmatically invoke the action.

Workflows

With this version, now instead of creating a custom workflow assembly to invoke the action, we now have a new step available “Perform Action“.

Using the Set Properties, you can now set the input parameters that was defined for the Custom Action.

Dialogs

Similar to the workflows explained above, we now also have the “Perform Action” step available in Dialogs, so Custom Actions can now be invoked through Dialogs too.


Note: An action that is designed to accept EntityCollection will not show up in the “Perform Action” since these parameter values cannot be provided through the workflow designer.

Conclusion:

It is now possible to automate the execution of the custom actions through workflow.

Hope this Helps!

There's much more, for more Dynamics CRM Tips and Tricks head on to Inogic Blog. If you have any questions on Dynamics CRM or need any help in implementation, customization, upgradation of Dynamics CRM or are looking to get more out of your CRM, feel free to reach us at crm@inogic.com today!

The post Custom Actions in Dynamics CRM 2015 Online Update 1 appeared first on Inogic Blog.

Keywords : Microsoft Dynamics CRM, CRM Online, Custom action, CRM 2015

Updating Date Values of Existing Records after modifying the Date/Time Behaviour in Dynamics CRM Online Update 1

$
0
0

Introduction

In one of our earlier posts found here we had explained how the new date/time behaviour can be used to record date/times in the format that you require, instead of having it store the values in UTC all the time. So you can now go and modify the behaviour of an existing date/time field to “Date Only”, suppose you only wanted to store the date part and were not really interested in the time part of the field. But what we read is that the effect of this change only happens moving forward i.e only date values entered or modified after the change in the behaviour would update the field values to store only date removing the time component. The change does not happen retrospectively i.e all existing data in this date field in the database would remain as is.

Example

Suppose the user logged in has the Timezone specified as India Timezone.date-time

This user entered a value in the date/time field prior to updating the field behaviourdate-time1

Now if we retrieve the value of the field Joining Date of the contact “Jim Glynn”, then we would get the Joining Date as “6/29/2015 7:30:00 PM” as we have specified the Behaviour for this field as User Local and  User Local stores the UTC value.

Now if a different user with timezone set to US (EST) logs in they would see the same time as “6/29/2015 3.30:00 PM”. This is because the date is stored in UTC and depending on the user’s timezone, the time is converted and displayed.

Go ahead and now change the behaviour of this field to “Date Only”date-time2

Create a new Record

Retrieve the value of this record and it would return it as “6/30/2015 12:00:00 AM”. And in the database this field has been stored without the time component i.e setting the time as 12:00:00AM.

Existing Record

Again retrieve the value of the previous record and you would still see the same date/time value returned “6/29/2015 12:00:00 AM”.  When the record was originally created the date entered by 6/30/2015 and I would have expected it to show up as 6/30/2015 without the date part. However, since the change has not been made to the existing records for this field in the database, they are still stored in the original UTC format along with the time. It appears that the UTC date/time is picked and the time part is being set as 12:00:00AM.

How to fix the old data

Even though the SDK API and UI does display the date according to the behaviour provided to avoid any anomalies (as demonstrated above) at the database level where the old records still store the entire date/time in UTC and the new ones only the date with the time part set as 12:00AM, it would be good to have data corrected there to store only date part of the field and have the time reset to 12:00:00 AM for all records.

A new message has been introduced to fix the existing data after a change in the date/time behaviour. Note this message only works when the change has to be done to “Date Only” from any other behaviour.

ConvertDateAndTimeBehavior request has the following required members:

  1. Attributes: Specifies the collection of entity and attributes to which conversion should apply on.

  2. ConversionRule: This specifies the conversion rule to be applied for the attribute whose behavior has changed. This is the required parameter.

While specifying the Conversion Rule you can use one the following four members of theDateTimeBehaviorConversionRule class.

  • SpecificTimeZone: Converts UTC value to a DateOnly value as per the specified CRM time zone code. In this case, you also need to specify a value for the TimeZoneCode parameter.
  • CreatedByTimeZone: Converts UTC value to a DateOnly value that the user who created the record would see in the UI.
  • OwnerTimeZone: Converts UTC value to a DateOnly value that the user who owns the record would see in the UI.
  • LastUpdatedByTimeZone: Converts UTC value to a DateOnly value that the user who last updated the record would see in the UI.

   3.  TimezoneCode: Specifies CRM time zone code to be used for the conversion. This parameter is required only if SpecificTimeZone is specified in ConversionRule

Here is an example of how to execute this message

ConvertDateAndTimeBehaviorRequest request = new ConvertDateAndTimeBehaviorRequest()

{

Attributes = new EntityAttributeCollection()

{

//specify the collection of entity and attributes

newKeyValuePair<string, StringCollection>(“contact”, new StringCollection(){ “new_joiningdate” })

},

//specify the conversion rule

ConversionRule = DateTimeBehaviorConversionRule.SpecificTimeZone.Value, //Conversion must be performed using the specified timezone

TimeZoneCode = 190 // Time zone code for India in CRM

};

// Execute the request

ConvertDateAndTimeBehaviorResponse response = (ConvertDateAndTimeBehaviorResponse)_service.Execute(request);

This will convert existing values stored for the attribute Joining Date for the previous contact records created before we changed the Behaviour from User local to Date Only according to US Eastern Time.

Whenever we execute the ConvertDateAndTimeBehavior request, a System Job is created with the name as “Convert Date anTimeBehavior”.

This job specifies the following information,

  1. ConversionRule applied.
  2. Entity Name of which the date time attribute is converted.
  3. Names of the attributes processed(for which the conversion rule is applied).
  4. of rows converted i.e. no. of records of which the DateTime attribute value is changed.date-time5

The response that we get when we execute the request returns a JobId of the Async Job created.

//get the Guid of the System Job created

GuidjobId=response.JobId;

Exceptions

If we change the DateTime attribute’s Behaviour from User Local to TimezoneIndependent and we execute the ConvertDateAndTimeBehavior request then it does not convert datetime attribute values.

The async job created specifies the error that the DateTime attribute should have DateOnly behavior.date-time6

Result:

After the execution and successful completion of the async job, if you now check the value of the existing data you will see it updated to appropriate date values based on the timezone provided.

date-time7

No matter what is the timezone setup for the user that is viewing this record, the date would always show up as “6/30/2015”.

Conclusion:

If you have users setup for multiple timezones, it might just make sense to make sure that this request is executed for the date fields that have been set to “Date Only” to reflect the correct date that you want.

There's much more, for more Dynamics CRM Tips and Tricks head on to Inogic Blog. If you have any questions on Dynamics CRM or need any help in implementation, customization, upgradation of Dynamics CRM or are looking to get more out of your CRM, feel free to reach us at crm@inogic.com today!

The post Updating Date Values of Existing Records after modifying the Date/Time Behaviour in Dynamics CRM Online Update 1 appeared first on Inogic Blog.

Microsoft Dynamics CRM E-Training Links

$
0
0

I came across this post on Linked Group a few days back about “CRM 2015 Training” and have been thinking to compile a list of links so that new Dynamics CRM users can benefit from it.

Before you start, to familiarize yourself, it’s always better to create a Dynamics CRM Online trial:
https://www.microsoft.com/en-us/dynamics/crm-test-drive-start.aspx
http://www.microsoft.com/en-us/dynamics/crm-free-trial-overview.aspx

Microsoft Dynamics CRM Help & Training Center is a one stop source for all your Dynamics CRM E-Training needs. This is ofcoz a huge treasure of knowledgebase but if you are just stepping in Microsoft Dynamics CRM or you want to quickly refresh your knowledge, here is the list of some good training material and videos available online:

  1. Training & Adoption Kit for Microsoft Dynamics CRM versions 2015 updates 1, 2015 and 2013 : Whether you are admin or end user here you will get complete training and adoption kit for Microsoft Dynamics CRM https://www.microsoft.com/en-US/dynamics/crm-customer-center/training-adoption-kit-for-microsoft-dynamics-crm.aspx
  2. CRM eBooks & Videos: Here is a nice collection of eBooks and Videos in well organized form so that you can choose the required one easily. https://www.microsoft.com/en-us/dynamics/crm-customer-center/ebooks-and-videos.aspx#newfeatures
  3. Microsoft Dynamics CRM 2015 New Training videos: Here is a full list of the Microsoft Dynamics CRM 2015 trainings on YouTube Channel :http://blogs.msdn.com/b/emeadcrmsupport/archive/2014/12/11/dynamics-crm-2015-new-training-videos.aspx
  4. Microsoft Dynamics CRM Resource Guide 2015 : Get all the information about Microsoft Dynamics Resources for CRM 2015 https://www.slideshare.net/slideshow/embed_code/key/JdSvOiUl2pkg19
  5. Microsoft Dynamics Basics eBook: If you don’t have time to read all story…just go through this eBook. It contains a quick run-down of the basics anyone needs to know to move customers through the sales cycle or resolve a service issue successfully.http://blogs.msdn.com/b/crm/archive/2014/12/17/crm-basic-training-for-people-who-don-t-have-a-lot-of-time-to-read-new-ebook-for-sales-pros-and-service-reps.aspxtraning

If you prefer classroom training you can always google “training for dynamics crm” you will always find options for it, the above links will definitely be handy for you even while you are in classroom.

Need something more…E-Learning Platform by Microsoft:

Access this Microsoft’s website ( Keep you Windows Live ID handy)

For Customers: Go to CustomerSource. On the top navigation, choose your Microsoft Dynamics product and hover Learning then click E-Learning.

For Partners: Go to PartnerSource. After you sign in. On the home page click the tile “Click Here To Access the New Microsoft Dynamics Learning Portal”.

The direct link to access Microsoft Dynamics Learning Portal for Partners is:https://mbspartner.microsoft.com/Landing

Hope this Helps during your next learning assignment as it did to me.

There's much more, for more Dynamics CRM Tips and Tricks head on to Inogic Blog. If you have any questions on Dynamics CRM or need any help in implementation, customization, upgradation of Dynamics CRM or are looking to get more out of your CRM, feel free to reach us at crm@inogic.com today!

The post Microsoft Dynamics CRM E-Training Links appeared first on Inogic Blog.

Applying Scripts on Business Process Flow controls in Dynamics CRM 2015

$
0
0

Introduction

Anyone who would have tried using the api functions available to access the controls on the Business Process Flow to hide/lock in CRM 2013 would know that the function only worked if the control was on the current active stage on the form.

Suppose you had 2 stages Develop and Propose and you had a field added to the Propose stage. This field should be conditionally editable. Back then we could write code on the form load to access the control and lock/hide it. This is available as a blog written earlier explaining this new availabilityhttp://inogic.com/blog/2014/07/how-to-apply-script-on-header-fields-and-bpf-fields/

However, this code failed to lock/hide the field if when you open the form, the current stage was Develop and not Propose. The reason being the controls on the other stages were not created on the form, only the controls on the current stage of the BPF were available.

This really made this unusable as it is not necessary that the control that we need to hide/lock would be on the active stage always.

How to Fix this?

With CRM 2015, we now have the ability to add hooks to the stage change event. You can attach a function to the OnStageChange event that is executed whenever you move to the Previous/Next stage in the BPF. The OnStageChange event would only execute when the stage is changed, we noticed that now if you write the code to access the controls on BPF of a stage that is not the active one, it does find the control and lock/hide it as desired. This ensures that even simply switching between the process tabs, ensure that the field is locked and there is no way to edit the control on the BPF.

Here is how we do it:

Add the following code on the form load eventlocking fields

Note we are attaching the event handle to the StageChange event of the BPF

Here is the code in the lockBPFFieldslocking fields1

The fields in the BPF should be accessed as header_process_<attribute name>.

After you have this code published, you will find that fields locked through the above code, it non-editable irrespective of the active BPF stage you are in and the controls that need to be locked are in.

There's much more, for more Dynamics CRM Tips and Tricks head on to Inogic Blog. If you have any questions on Dynamics CRM or need any help in implementation, customization, upgradation of Dynamics CRM or are looking to get more out of your CRM, feel free to reach us at crm@inogic.com today!

The post Applying Scripts on Business Process Flow controls in Dynamics CRM 2015 appeared first on Inogic Blog.


Automatic record creation or update rules in Dynamics CRM 2015 SP1

$
0
0

Microsoft always believes in making life of people simpler using their product. This is what happens with every update of Dynamics CRM.

There was one feature introduced in CRM 2013 to ease the life of CRM users and that feature was Automatic case record creation through email and social monitoring.

This was indeed a very much needed feature. Prior to this update it used to be a manual/automated (through plug-in or workflow) process. As a result this feature came as a boon for a non-developer posse of users.

Albeit it was a boon, it was somewhat restricted in its functionality. We were only allowed to use Email and Social monitoring activities out of all the available activities for case creation and only case creation was possible.

Now, in CRM 2015 SP1, they have enhanced the Automatic Record Creation to another level, the feature is now named as Automatic Record Creation and Update Rules. Name itself is enough for us to understand the advancements.

Let`s understand what all things have been implemented in this update.

First and foremost, this rule is now applicable on almost all the available Activities plus Custom activities. Woahh! what a jump.

Below is the list of available activities on which automatic record creation and update rule is applicable:

  • Phone Call
  • Email
  • Appointment
  • Service Activity
  • Task
  • Social Activity
  • Custom Activities

We can select any Activity, Entity, Custom Activity and Custom Entity for creation, previously we were only allowed to Create Case.

Automatic Record Creation or Updation

How to create an Automatic Record Creation or Update rule?

  • Navigate to Settings -> Service Management and then select Automatic Record Creation and Update Rules

  • Click New, fill in the required details.
  • Click Save.
  • Once, you save the details you can specify the rules for the record creation.

 How to specify rules?

  • Click the “+” button.Automatic Record Creation or Updation2
  • Another form would pop-up, here you can specify the conditions and the record to be created.

Automatic Record Creation or Updation3

Specify Conditions:

Specify Entity for which record needs to be Created:Automatic Record Creation or Updation4

Note: Feedback is a custom activity and Action plan is a custom entity in the above screenshots. 

Once everything is set-up, you need to Activate the Automatic Record Creation or Update Rule, if not activated the rule won`t take effect.

How to Activate the rule?

  • Click the Activate button.Automatic Record Creation or Updation5

Illustration:

Now, let`s understand it with an example of how useful it can be in a real life.

Consider, a service provider company, undertaking a activity of gathering Feedback(Custom Activity) from their customers who have been with them for a year or more.

Now, depending on the sentiment of the feedback we`ll create an Action Plan(Custom Entity), i.e., an Action Plan would only be created if Negative feedback is provided by the customer.

Action Plan are the steps undertaken by the company in order to satisfy the customers complain or negative feedback.

A user from the company calls up a customer and customer gives feedback as below.

Automatic Record Creation or Updation6

Our conditions for the creation of Action Plan record is as below.

Automatic Record Creation or Updation7

Since, the subject contains Negative keyword (Negative/Positive keyword would be inserted in the subject by the user depending on the sentiments of the feedback provided by the customer) it would create a Action Plan record.

The Action Plan is created as shown below.

Automatic Record Creation or Updation8

The above screenshot is for the Action Plan entity.

In the Action Plan record, it`ll have all the details of the Feedback given by the customer, as it can be seen in the above screenshot.

Related Feedback – Lookup of the Feedback Activity

Feedback Given – Feedback from the Feedback Activity

Assigned To – Owner of the A. Datum Corporation record

Actions Taken – It would be the steps undertaken by the Assigned user in order to satisfy the customer`s feedback.

The above illustration gives a brief idea of how useful this feature can be in real life.

Note:

  • Source Type is only editable for the first time.

           Automatic Record Creation or Updation9

          Once, it is selected and saved, it gets non-editable.

             Automatic Record Creation or Updation10

  • Selecting a Queue is optional for activities other than Email. For Email, it`s mandatory to have a QueueAutomatic Record Creation or Updation11
  • For a Particular source type there can exist only two active records one with Queue and another without queue at any given time except for Email. Email can have only one Active record.
  • After a record is created of the entity through the activity it is set as a regarding on the activity record, i.e., after creation of the record the activity is updated.Automatic Record Creation or Updation12

There's much more, for more Dynamics CRM Tips and Tricks head on to Inogic Blog. If you have any questions on Dynamics CRM or need any help in implementation, customization, upgradation of Dynamics CRM or are looking to get more out of your CRM, feel free to reach us at crm@inogic.com today!

The post Automatic record creation or update rules in Dynamics CRM 2015 SP1 appeared first on Inogic Blog.

Dynamics CRM – Q1 – Inogic Blog Popular Posts

$
0
0

Lets re-visit 5 of our most popular blogs last quarter. The ones you have liked, visited, shared and re-tweeted the most. Hope these posts are helping you to explore features of Dynamics CRM in your next assignment:

most_popular

1. Custom Actions in Dynamics CRM 2015 Online Update 1: Back in 2013 Microsoft introduced the concept of “Custom Actions”, we had explained this feature in our earlier post. In this post we explore new features added to it with the latest CRM Online version 7.1.

2. Dynamics CRM 2015 Online Update 1 – API support for Transaction : In this post we exploreExecuteTransactionRequest that is introduced with the Dynamics CRM Online Update 1 (7.1.x).

3. Change Tracking Feature of CRM 2015 Online Update 1 : Change Tracking is used in Dynamics CRM to keep data synchronized in a better way by detecting what data has changed since the data was last synchronized. This blog explain about this wonderful new feature.

4. Plug-in Tracing in Dynamics CRM 2015 Update 1: This blog talks about the new Entity called “Plug-in Trace Logs” which itself creates record for any exception occurred or thrown by the developer. We walk you through how to enable this very useful feature.

5. Dynamics CRM 2015 Update 1 – Features that will change the way you work with Dynamics CRM :A quick refresh to on the new features introduced in Dynamics CRM 2015 Online Update 1

These are the post which our visitors were most interested in. There are many more blogs on various topics posted by Inogic. You can access these blogs from here. Thank you for liking and sharing our blogs. This encourages us to write more. We will continue adding more post for our Dynamics CRM friends.

There's much more, for more Dynamics CRM Tips and Tricks head on to Inogic Blog. If you have any questions on Dynamics CRM or need any help in implementation, customization, upgradation of Dynamics CRM or are looking to get more out of your CRM, feel free to reach us at crm@inogic.com today!

The post Dynamics CRM – Q1 – Inogic Blog Popular Posts appeared first on Inogic Blog.

Re-imagined Phone & Tablet Client for Dynamics CRM Online

$
0
0

Introduction

One of the USP of Microsoft Dynamics CRM that differentiates it from other CRM applications available in the market is BYOD – CRM Anywhere. Dynamics CRM as of today supports the following client

  1. Web Client ( All major browsers IE/Edge, Chrome, FireFox, Safari)
  2. Outlook Client – Seamless integration with Microsoft Outlook so that you can access Dynamics CRM from your familiar Microsoft Outlook environment. No need to move to the web.
  3. Tablet Client – Tablet apps have been available for a long time in major app stores like Window, iOS and Android.
  4. Phone Client – A phone app that allows you to access CRM right from your phone!!

All of these have been available for long now and Microsoft is continuously working hard on improving the user experience in all of these clients. In the latest update there have been enhancements that have been brought about in the Tablet and Phone app.

Tablet app

Note: The enhancements discussed here are only supported for Dynamics CRM Online Update 1

It was a long standing demand to enable support for IFRAME and WebResources in the tablet client. The tablet client already designs the forms based on the form design for the web app. The idea is only one design and different rendering depending on client type.

Earlier CRM forms could have IFRAME and Webresource control added to them but the tablet client would simply not render them.

In the current enhancement, they have now enabled these control types for rendering on the tablet client.

On IFRAME and WebResource control, you now find an additional checkbox to enable display on tablet Client.

tablet

While this is enabled for editing while adding an IFRAME control, it appears disabled on the WebResource Control. 

tablet1

As per the documentation, we should be able to enable that for webresource as well. Perhaps since this is still a preview feature, it has not been enabled, but the fact that it is on the roadmap is a very positive sign and hopefully this would be available on general release of the feature.

Availability of Dashboards

With this new release you can now enable Dashboards for tablet viewing as well. Earlier there was only one single fixed Dashboard that was available. Now, an option has been added to the Dashboard properties to enable Dashboards to be available on tablet.tablet2

With this enabled, the dashboard starts appearing both on your Phone as well as the Tablet Client.

Choose the Dashboard you desire using the Select Dashboard option. The Dashboard shown below shows the our product Maplytics Dashboard.

tablet3

Note: During my review, I could only get the IFRAME controls to show up on the Tablet Client. In the Phone Client, the IFRAME controls would also not show up.

Phone app

There was always a phone app available that was called “Mobile Express”. In the current release, they have added a new “Phone app”. So if you visit the app store, you will find 2 phone apps. The new one is called the “Mobile Express”.

The earlier phone app was a very basic app and you had a different “Mobile Express” form that was used to select the fields available on the phone. This new app, continues to use the main form designed for the entity and renders it appropriately for the Phone.

And it actually renders all of it :), you can swipe across the various tabs on your phone to access all the details made available on the form, with the exception of IFRAME and webresources that are not rendered on the phone app.

tablet4

The form design application has been modified to allow the designer to specify the controls to be displayed on the phone app. With the limited space available on the phone, you may want to restrict the fields and controls that displayed on the phone client.

tablet5

The Availability section is now available on controls that can be added on the form. You can add notes to the phone app.

tablet6

If you have integrated with OneNote, you even see the OneNote books here and can directly open them in your mobile, if you have the OneNote app installed.

tablet7

Conclusion

With the enhancements introduced in the phone and tablet client, it takes the user experience to the next level.

There's much more, for more Dynamics CRM Tips and Tricks head on to Inogic Blog. If you have any questions on Dynamics CRM or need any help in implementation, customization, upgradation of Dynamics CRM or are looking to get more out of your CRM, feel free to reach us at crm@inogic.com today!

The post Re-imagined Phone & Tablet Client for Dynamics CRM Online appeared first on Inogic Blog.

Sending Marketing Newsletter From Dynamics CRM

$
0
0

If you want to send marketing newsletter(or any content that has HTML content) to all your Leads/Accounts/Contacts by using Quick Campaign by Email using Email template then you can select the accounts/leads/contacts for which you want to send the newsletter and create quick campaign as shown below.

email template

After that select the Email as Activity Type.

email template1

After that select the Email template as shown in below screenshot.email template2

The Newsletter that you are going to send contains some company logo in the message, hyperlink that readers can click to get more information, images, different color of text, different fond size basically contains the HTML content.  Best way is to send email using E-Mail Templates.  After you create a few E-mail templates, you probably notice that the editing tools for the email message body are somewhat limited.

For example, none of the buttons allows you to add a hyperlink or image to the message. If you want to develop a more sophisticated E-mail template with multiple images, links, and so on, you can create HTML code with a development tool such as Microsoft VS 2010, 2012. However, if you try to copy and paste your HTML code into the E-mail template, it is displayed as plain text; your recipient will receive a bunch of HTML code instead of the formatted message! Fortunately, by using a little trick, you can easily copy and paste your custom HTML code into the E-mail template and still maintain the correct formatting.

The following sample shows a company newsletter created in HTML using Visual Studio 2010. Next, you can copy (Ctrl+C) the sample newsletter and paste (Ctrl+V) it into the email message body. The trick is to copy and paste the rendered HTML output, not the HTML code. You can accomplish this in a couple of ways: n Copy and paste the formatted message from the Visual Studio 2010 Design view. n Copy and paste the HTML web page from a Internet Explorer window. After you copy and paste the contents of the message into the E-mail template body, you will see the properly formatted email message, complete with an image and a hyperlink. After you paste the code into the message, you can also add a data field to dynamically display the contact’s first name in the newsletter. Please note that if you use images, you need to make sure that the image references a URL that the email recipient can access. This technique does not copy the image file into the E-mail template; it simply references the image URL from the HTML file.

Here is the Email-Template in CRMemail template3

Once you click on create button then it will create quick campaign and Newsletter will send to records that you selected.

The users will receive the email with the format specify below.

email template4

Note:

You cannot copy and paste HTML code from a text editor program such as Notepad into the E-mail template. You can also try using the copy and paste technique with other HTML editor applications. We found that the success of this technique varies depending on the format that applications use to copy data to the Clipboard.

There's much more, for more Dynamics CRM Tips and Tricks head on to Inogic Blog. If you have any questions on Dynamics CRM or need any help in implementation, customization, upgradation of Dynamics CRM or are looking to get more out of your CRM, feel free to reach us at crm@inogic.com today!

The post Sending Marketing Newsletter From Dynamics CRM appeared first on Inogic Blog.


Adding Custom Button on Security area in Dynamics CRM 2015

$
0
0

In Microsoft Dynamics CRM 2015 Security area is introduced which contains entities such as Users,Security Roles and Teams which were present in Administration area in previous versions of Microsoft Dynamics CRM.

In this blog we are going to show how we can add Custom Buttons on Application Ribbon of Securityarea through Ribbon Workbench.

Take a scenario in which we want to add a custom button “Manage Users” to the application ribbon which will be shown only on Security area.custom-button

To achieve this, first we have created a new solution and added Application Ribbon to that solution from Add Existing option.custom-button1

After adding the Application ribbon to the solution we have opened the ribbon editor and selected the solution.

Then we have added a button named “Manage Users” to the application ribbon in Home Page of Ribbon workbench.custom-button2

Once we add the button, we need to add display rule to restrict the button from being visible on any other pages except for security.

We have created a display rule which is of the type Page Rule for that button.custom-button4

We have added the URL of the Security Area Page in Address field.

The URL of Security area:  /tools/AdminSecurity/adminsecurity_area.aspxcustom-button5

The XML of  Display rule :

<DisplayRules>

<DisplayRule Id=”new.ApplicationRibbon.ManageUsers.DisplayRule”>

<PageRule Address=”/tools/AdminSecurity/adminsecurity_area.aspx” />

</DisplayRule>

</DisplayRules>

After completing all above steps publish the changes.

Now the custom button “Manage User” is visible on the application ribbon which is shown for Security area only.custom-button5

The same custom button “Manage User” is not visible on any other areas such as Administration Area.custom-button6

Note: Likewise, we can also use same approach to show custom button on the application ribbon for any other area of CRM like Administration area (URL:  /tools/Admin/admin.aspx) etc.

There's much more, for more Dynamics CRM Tips and Tricks head on to Inogic Blog. If you have any questions on Dynamics CRM or need any help in implementation, customization, upgradation of Dynamics CRM or are looking to get more out of your CRM, feel free to reach us at crm@inogic.com today!

The post Adding Custom Button on Security area in Dynamics CRM 2015 appeared first on Inogic Blog.


Viewing all 3363 articles
Browse latest View live