Hi All,
Is it possible to filter dirty fields when using D365 CE "When a record is updated?" flow trigger? I wanted to run or trigger the flow when only the Status field is updated.
Thanks!
Hi All,
Is it possible to filter dirty fields when using D365 CE "When a record is updated?" flow trigger? I wanted to run or trigger the flow when only the Status field is updated.
Thanks!
Hi All, I have created a dialog process, I call it when a button on the ribbon is clicked.
I wanna when dialog has finished its job( the dialog window closed and finished) the record entity save and reload.
Here is the code that run the dialog :
(function() {
Develop1_RibbonCommands_runDialogGrid = function(ids, objectTypeCode, dialogId) {
    if ((ids == null) || (!ids.length)) {
        alert(window.LOCID_ACTION_NOITEMSELECTED);
        return;
    }
    if (ids.length > 1) {
        alert(window.LOCID_GRID_TOO_MANY_RECORDS_IWF);
        return;
    }
    var rundialog = Mscrm.CrmUri.create('/cs/dialog/rundialog.aspx');
    rundialog.get_query()['DialogId'] = dialogId;
    rundialog.get_query()['ObjectId'] = ids[0];
    rundialog.get_query()['EntityName'] = objectTypeCode;
    openStdWin(rundialog,buildWinName(null),615,480,null);
}
Develop1_RibbonCommands_runDialogForm = function(objectTypeCode, dialogId) {
    var primaryEntityId = Xrm.Page.data.entity.getId();
    var rundialog = Mscrm.CrmUri.create('/cs/dialog/rundialog.aspx');
    rundialog.get_query()['DialogId'] = dialogId;
    rundialog.get_query()['ObjectId'] = primaryEntityId;
    rundialog.get_query()['EntityName'] = objectTypeCode;
    var hostWindow = window;
        if (typeof(openStdWin) == 'undefined') {
            hostWindow = window.parent; // Support for Turbo-forms in CRM2015 Update 1
        }
        if (typeof(hostWindow.openStdWin) != 'undefined') {
            hostWindow.openStdWin(rundialog, hostWindow.buildWinName(null), 615, 480, null);
            // window.location.reload(true);
        }

}
})();
Depending on this source code, how can it be possible?
Introduction:
In our last post about Azure functions, we saw how to register the workflow assembly and execute the workflow using Microsoft Flow in Dynamics 365. Continuing with our series to call webhooks from CRM, let us register the Azure function created as a Webhook. We register this using the Plugin Registration Tool (PRT)
From the PRT choose Register → Register New Webhook

In the Endpoint URL provide the function URL.
Choose Authentication method as WebhookKey and provide the key. This key is what you passed as the code querystring earlier.
Note: Webhook is registered as Service End Point in CRM

You can now register a step for this webhook just like we do for a plugin assembly.

When you create an Account the PluginExecutionContext is received in the message body of the httprequest in your Azure function. You then need to parse that to get context related details.
Once registered as webhook, you can also invoke this through a workflow by executing the endpoint using the following code:
string serviceEndPoint = WebhookURL.Get(executionContext);
                IWorkflowContext context = executionContext.GetExtension<IWorkflowContext>();

                string fetch = @"<fetch><entity name='serviceendpoint' ><attribute name='serviceendpointid' /><attribute name='name' /><attribute name='authtype' /><attribute name='url' /><filter type='and'><condition attribute='contract' operator='eq' value='8' /><condition attribute='url' operator='eq' value='" + serviceEndPoint + @"' /></filter></entity></fetch>";
                EntityCollection coll = crmWorkflowContext.OrganizationService.RetrieveMultiple(new FetchExpression(fetch));

                if (coll != null && coll.Entities.Count > 0)
                {
                    IServiceEndpointNotificationService endpointService =
                             executionContext.GetExtension<IServiceEndpointNotificationService>();

                    crmWorkflowContext.Trace("serviceEndPoint found: " + coll.Entities[0].Id.ToString());
                    endpointService.Execute(coll.Entities[0].ToEntityReference(), context);
                }
Once again you receive the Workflow context in the message body that you can parse to read the information passed.
Conclusion:
There are other ways to invoke Azure functions from D365. Azure functions can be called through Logic Apps and you could register Logic Apps on D365 entities and actions. That’s content for another post. So Keep visiting this space ![]()

Hi,
I have an requirement where user can select security role and need to exports all the related privileges to Xl sheet . Any suggestions.
Thanks in advance
Many times it happens that due to some reason i.e. long vacation/absence user unable to create/submit time entry or expense records. So user might want for that particular time slot, let the other authorize user make the time/expense entries on behalf of him. And hence get rid of the headache of missing any of time/expense entries during leave period. In Dynamics 365, you can create “Delegate” record to achieve this.
1. Navigate to Project Service→Delegations

2. Let say there are two resource managers (Mike and Sam), and in absence of one manager other has liability to create/submit the time or expense entries.
Under this “Delegations” entity create the new Delegation record as shown below, you can create the record with Type=Time Entry or Expense as below:

Note: Before creating Delegate record make sure that “Mike Roy” and “Sam Developer” should be present as bookable resource record with “Resource Type=User” in D365. And user atleast has Resource Manager role.

3. Lets continue creating the Delegation record with “Type=Time Entry” as below, Let say Mike is on leave for the period 25 May to 30 May 2018 and Mike want Sam to be his delegate for the mentioned period.

Upon creation of above record, the record will appear in “Active Delegations” view as below:

4. Now, whenever Sam logged in, and willing to submit the Time entries by navigating to Project Service→Time Entries, Sam could see the delegation options, defaulted to his name i.e. Sam Developer.

5. Sam now willing to make time entries on behalf of Mike then, select the user, so timesheet will be appear as below:

Note: As shown above only those time entries will appear of Mike which falls in between 25 May to 30 May 2018. As we have created the Delegate for this period only.
Please note that while logging the time entries as Mike through, Sam might get below error:

So, make sure that Sam has assigned with the “Delegate” role as well as shown below:

6.Now, Sam can go on creating “Time entries” on behalf of Mike for only assigned period for which above delegate record created for.

7. The above created time entries would be logged actually against the Mike, and Mike can easily have access of this time entries as if he has created this.
You can follow above steps as it is for creating the Delegation records with Type=Expense, and can submit the Expenses by navigating to Project Service→Expenses.
Simply by using the delegate concept in Dynamics 365 user can submit the time and expense entries in Project Service Automation even in their abscense without delaying the work.
I have created a email signature in my personal options, however, whenever I click on "insert signature" I get a generic error - "An error has occurred. Please return to homepage and try again". I have system Admin security role. I have tried on internet explorer 11, chrome v52.0.2743.116. Does anyone else get the same issue ? See below screens for series of steps.
1. Created an email signature under personal options and set it as default.

2. Clicked on quick create to create an email activity but the email signature did not automatically get populated in the body of the email. See below screen. Even if I go to a case and create an email activity from there it does not populate the email signature automatically.

3. Now if I click on "insert Signature" button to manually insert the signature I get an error.

Hello!
When i create record of an entity on dynamics portal then following error display which is not understandable for me so kindly help me about this!
An unknown failure has occurred. Error ID # [4e5d8146-3f62-42fe-b368-56731bd180ce]

Hi Guys,
How to get the records for each active contact which has a field called job title. And display that using C#
I tried this:
RetrieveMultipleRequest RM = new RetrieveMultipleRequest()
{
Query = new FetchExpression(linkFetch.ToString())
};
EntityCollection entityResults = ((RetrieveMultipleResponse)_service.Execute(RM)).EntityCollection;
foreach (var entity in entityResults.Entities)
{
String output = String.Empty;
if (entity.Attributes.Contains("job title"))
MessageBox.Show("" + entity.Attributes["job title"]);
}
I wanted to display job title for each active contact .. please help me
Hi All, I have created a dialog process, I call it when a button on the ribbon is clicked.
I wanna when dialog has finished its job( the dialog window closed and finished) the record entity save and reload.
Here is the code that run the dialog :
(function() {
Develop1_RibbonCommands_runDialogGrid = function(ids, objectTypeCode, dialogId) {
    if ((ids == null) || (!ids.length)) {
        alert(window.LOCID_ACTION_NOITEMSELECTED);
        return;
    }
    if (ids.length > 1) {
        alert(window.LOCID_GRID_TOO_MANY_RECORDS_IWF);
        return;
    }
    var rundialog = Mscrm.CrmUri.create('/cs/dialog/rundialog.aspx');
    rundialog.get_query()['DialogId'] = dialogId;
    rundialog.get_query()['ObjectId'] = ids[0];
    rundialog.get_query()['EntityName'] = objectTypeCode;
    openStdWin(rundialog,buildWinName(null),615,480,null);
}
Develop1_RibbonCommands_runDialogForm = function(objectTypeCode, dialogId) {
    var primaryEntityId = Xrm.Page.data.entity.getId();
    var rundialog = Mscrm.CrmUri.create('/cs/dialog/rundialog.aspx');
    rundialog.get_query()['DialogId'] = dialogId;
    rundialog.get_query()['ObjectId'] = primaryEntityId;
    rundialog.get_query()['EntityName'] = objectTypeCode;
    var hostWindow = window;
        if (typeof(openStdWin) == 'undefined') {
            hostWindow = window.parent; // Support for Turbo-forms in CRM2015 Update 1
        }
        if (typeof(hostWindow.openStdWin) != 'undefined') {
            hostWindow.openStdWin(rundialog, hostWindow.buildWinName(null), 615, 480, null);
            // window.location.reload(true);
        }

}
})();
Depending on this source code, how can it be possible?
Automation has become a necessity in every type of business and Dynamics 365 CRM is one of the most preferred automation system implemented by various organizations around the globe. But its success totally depends upon its users, which leads us to the question, how to evaluate if it’s being adopted by its users. As an answer to this, we have a solution User Adoption Monitor. User Adoption Monitor helps managers to track various operations performed by the users in Dynamics CRM, thus increasing user adoption and also providing an overview of the organization’s productivity to the managers. This results in speeding up of the business process and thereby helps in generating more profits and ROI.
Now, what if we tell you that you can also track the entity records being opened by the Dynamics CRM users using the User Adoption Monitor? Amazing right? Yes, it’s very much possible. You can now even track the mere opening of the records along with all the other everyday actions such as Create/Update of Lead/Contact/Account, Won/Los of Opportunity, Email-Send, Appointment-Closed, etc. in Dynamics CRM.
However, to start tracking opening of the records in Dynamics CRM one needs to create the Entity Configuration for the entity to track. For this, you need to navigate to User Adoption Monitor group ->Entity Configuration. As you can see below Entity configuration is created for Case – Open entity action.

After creating the entity configuration, you will be able to start tracking the records that are opened by the CRM users as shown below. All the details of open records will be generated in the Tracking section.

User Adoption Monitor is a productive tool that will help in increasing the user adoption of your Dynamics CRM and also provide a glimpse of the user’s operation and business’s productivity to its managers thus helping them in taking quicker yet proper decisions further promoting the growth and productivity of an organization.
So, to increase the user adoption, to be an informed manager and to evaluate the feature track opening of the records download the 15 days free trial from our Website or Microsoft AppSource. It works on both Dynamics 365 CRM online as well as on-premises.
In our previous blogs of this Integrating Dynamics 365 with Azure Functions series, we have gone through a walkthrough with an example of creating an Azure Function and call the same through the following,
In this blog, we will illustrate how to parse the JSON data that we received in the Azure Function. Let’s consider that we have registered a plugin step on an update of Account record which invoke a WebHook (here in our case Azure Function).
When plugin triggers and invokes a WebHook, three types of data received in the request i.e. Query String, Header Data and Request Body. The Request body contains a string that represents the JSON value of the RemoteExecutionContext class. This class defines the contextual information sent to a remote service endpoint at run-time. Below code snippet reads the content from the HttpRequestMessage and converts the received JSON string to proper deserializable JSON string.
using System.Text;
using System.Net;

public static async Task<HttpResponseMessage> Run(HttpRequestMessage req, TraceWriter log)
{
log.Info("C# HTTP trigger function processed a request");

    string jsonContext = await req.Content.ReadAsStringAsync();
    log.Info("Read context: " + jsonContext);

    jsonContext = FormatJson(jsonContext);
    log.Info("Formatted JSON Context string: " + jsonContext);

    return req.CreateResponse(HttpStatusCode.OK, "Success");
}

/// <summary>
/// Function to convert the unformatted Json string to formatted Json string
/// </summary>
/// <param name="unformattedJson"></param>
/// <returns>string formattedJsonString</returns>
public static string FormatJson(string unformattedJson)
{
    string formattedJson = string.Empty;
    try
    {
        formattedJson = unformattedJson.Trim('"');
        formattedJson = System.Text.RegularExpressions.Regex.Unescape(formattedJson);
    }
    catch (Exception ex)
    {

        throw new Exception(ex.Message);
    }
    return formattedJson;
}
Remark: Add reference of System.Text so that we can use Regex expression.
Below is the sample JSON string.
{"BusinessUnitId": "f0bf3c9a-8150-e811-a953-000d3af29fc0","CorrelationId": "39499111-e689-42a1-ae8a-5b14a84514ce","Depth": 1,"InitiatingUserId": "df010dad-f103-4589-ba66-76a5a04c2a11","InputParameters": [

    {
      "key": "Target","value": {"__type": "Entity:http:\/\/schemas.microsoft.com\/xrm\/2011\/Contracts","Attributes": [
          {"key": "telephone1","value": "1111"
          },
          {"key": "accountid","value": "ec4e2f7d-9d60-e811-a95a-000d3af24950"
          },
          {"key": "modifiedon","value": "\/Date(1527757524000)\/"
          },
          {"key": "modifiedby","value": {"__type": "EntityReference:http:\/\/schemas.microsoft.com\/xrm\/2011\/Contracts","Id": "df010dad-f103-4589-ba66-76a5a04c2a11","KeyAttributes": [],"LogicalName": "systemuser","Name": null,"RowVersion": null
            }
          },
          {"key": "modifiedonbehalfby","value": null
          }
        ],"EntityState": null,"FormattedValues": [],"Id": "ec4e2f7d-9d60-e811-a95a-000d3af24950","KeyAttributes": [],"LogicalName": "account","RelatedEntities": [],"RowVersion": null
      }
    }
  ],"IsExecutingOffline": false,"IsInTransaction": true,"IsOfflinePlayback": false,"IsolationMode": 1,"MessageName": "Update","Mode": 0,"OperationCreatedOn": "\/Date(1527757530151)\/","OperationId": "08fec203-ec78-4f7a-a024-c96e329a64fe","OrganizationId": "b0714265-8e72-4d3b-8239-ecf0970a3da6","OrganizationName": "org94971a24","OutputParameters": [],"OwningExtension": {"Id": "3db800fe-0963-e811-a95a-000d3af24324","KeyAttributes": [],"LogicalName": "sdkmessageprocessingstep","Name": "D365WebHookHttpTrigger: Update of account","RowVersion": null
  },"ParentContext": {"BusinessUnitId": "f0bf3c9a-8150-e811-a953-000d3af29fc0","CorrelationId": "39499111-e689-42a1-ae8a-5b14a84514ce","Depth": 1,"InitiatingUserId": "df010dad-f103-4589-ba66-76a5a04c2a11","InputParameters": [
      {"key": "Target","value": {"__type": "Entity:http:\/\/schemas.microsoft.com\/xrm\/2011\/Contracts","Attributes": [
            {"key": "telephone1","value": "1111"
            },
            {"key": "accountid","value": "ec4e2f7d-9d60-e811-a95a-000d3af24950"
            }
          ],"EntityState": null,"FormattedValues": [],"Id": "ec4e2f7d-9d60-e811-a95a-000d3af24950","KeyAttributes": [],"LogicalName": "account","RelatedEntities": [],"RowVersion": null
        }
      },
      {"key": "SuppressDuplicateDetection","value": false
      }
    ],"IsExecutingOffline": false,"IsInTransaction": true,"IsOfflinePlayback": false,"IsolationMode": 1,"MessageName": "Update","Mode": 0,"OperationCreatedOn": "\/Date(1527757524631)\/","OperationId": "08fec203-ec78-4f7a-a024-c96e329a64fe","OrganizationId": "b0714265-8e72-4d3b-8239-ecf0970a3da6","OrganizationName": "org94971a24","OutputParameters": [],"OwningExtension": {"Id": "63cdbb1b-ea3e-db11-86a7-000a3a5473e8","KeyAttributes": [],"LogicalName": "sdkmessageprocessingstep","Name": "ObjectModel Implementation","RowVersion": null
    },"ParentContext": null,"PostEntityImages": [],"PreEntityImages": [],"PrimaryEntityId": "ec4e2f7d-9d60-e811-a95a-000d3af24950","PrimaryEntityName": "account","RequestId": "08fec203-ec78-4f7a-a024-c96e329a64fe","SecondaryEntityName": "none","SharedVariables": [
      {"key": "ChangedEntityTypes","value": [
          {"__type": "KeyValuePairOfstringstring:#System.Collections.Generic","key": "account","value": "Update"
          }
        ]
      }
    ],"Stage": 30,"UserId": "df010dad-f103-4589-ba66-76a5a04c2a11"
  },"PostEntityImages": [],"PreEntityImages": [],"PrimaryEntityId": "ec4e2f7d-9d60-e811-a95a-000d3af24950","PrimaryEntityName": "account","RequestId": "08fec203-ec78-4f7a-a024-c96e329a64fe","SecondaryEntityName": "none","SharedVariables": [],"Stage": 40,"UserId": "df010dad-f103-4589-ba66-76a5a04c2a11"

}Below code snippet deserialize the JSON string to dynamic ExpandoObject.
dynamic dynObj = Newtonsoft.Json.JsonConvert.DeserializeObject(jsonContext);
Simple string type,
log.Info(“BusinessUnitId: ” + dynObj["BusinessUnitId"]);
or
log.Info(“BusinessUnitId: ” + dynObj.BusinessUnitId);
Complex ParameterCollection type,
log.Info(“InputParameters->Target->LogicalName: ” + dynObj["InputParameters"][0]["value"]["LogicalName"].ToString());
Below code snippet deserialize the JSON string to RemoteExecutionContext object
#r "bin/Newtonsoft.Json.dll"
#r "bin/Microsoft.Xrm.Sdk.dll"
#r "bin/System.Runtime.Serialization.dll"

using System.Net;
using System.Dynamic;
using System.Text;
public static async Task<HttpResponseMessage> Run(HttpRequestMessage req, TraceWriter log)
{
   string jsonContext = await req.Content.ReadAsStringAsync();
   log.Info("Read context: " + jsonContext);

   jsonContext = FormatJson(jsonContext);
   log.Info("Formatted JSON Context string: " + jsonContext);

   Microsoft.Xrm.Sdk.RemoteExecutionContext remoteExecutionContext = DeserializeJsonString<Microsoft.Xrm.Sdk.RemoteExecutionContext>(jsonContext);
}

/// <summary>
/// Function to deserialize JSON string using DataContractJsonSerializer
/// </summary>
/// <typeparam name="RemoteContextType">RemoteContextType Generic Type</typeparam>
/// <param name="jsonString">string jsonString</param>
/// <returns>Generic RemoteContextType object</returns>
public static RemoteContextType DeserializeJsonString<RemoteContextType>(string jsonString)
{
    //create an instance of generic type object
    RemoteContextType obj = Activator.CreateInstance<RemoteContextType>();
    MemoryStream ms = new MemoryStream(Encoding.Unicode.GetBytes(jsonString));
    System.Runtime.Serialization.Json.DataContractJsonSerializer serializer = new System.Runtime.Serialization.Json.DataContractJsonSerializer(obj.GetType());
    obj = (RemoteContextType)serializer.ReadObject(ms);
    ms.Close();
    return obj;
}
Remarks: Add reference of following dlls,
Below code snippet shows how to read values,
//read Plugin Message Name
    string messageName = remoteExecutionContext.MessageName;
    //read execution depth of plugin
    Int32 depth = remoteExecutionContext.Depth;
    //read BusinessUnitId
    Guid businessUnitid = remoteExecutionContext.BusinessUnitId;
    //read Target Entity
    Microsoft.Xrm.Sdk.Entity targetEntity = (Microsoft.Xrm.Sdk.Entity)remoteExecutionContext.InputParameters["Target"];

    //read attribute from Target Entity
    string phoneNumber = targetEntity.Attributes["telephone1"].ToString();
    log.Info("Message Name: " + messageName);
    log.Info("BusinessUnitId: " + businessUnitid);
    log.Info("Plugin Depth: " + depth);

    log.Info("TargetEntity Logical Name: " + targetEntity.LogicalName);
    log.Info("Phone Number: " + phoneNumber);
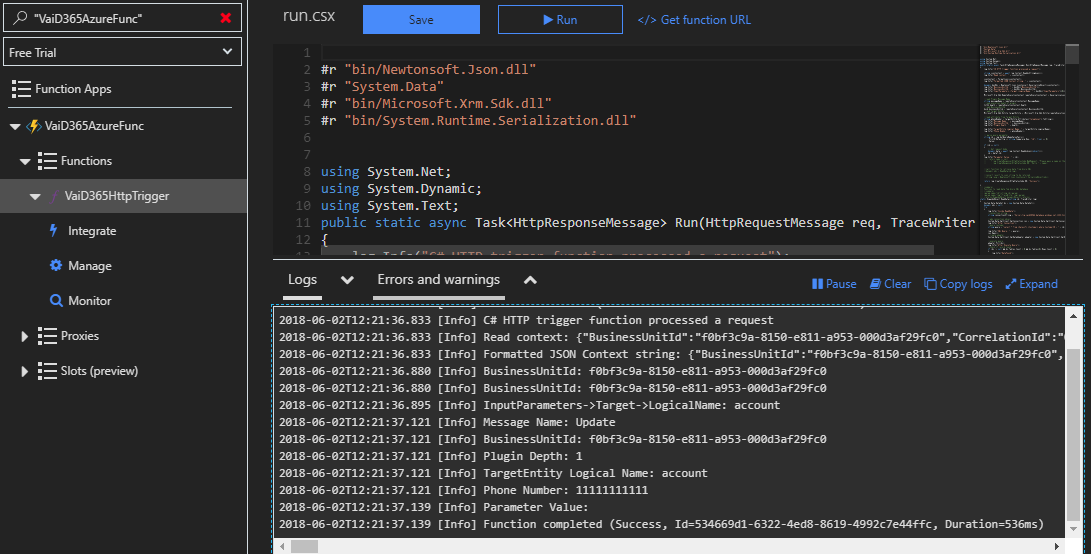
The steps given above describes how to Parse JSON string that represents the Dynamics 365 plugin execution context received in Azure Function. To read all blogs about Azure Functions visit: http://bit.ly/inogic-azurefunctions
We have several custom business process flows applied to the Opportunity entity.
We can have two concurrent business process flows running at the same time on a single record.
The issue I face is the following:
A user is opening up an opportunity and it is not showing the business process flow to which he has access.
He can switch to the proper process but the next time he opens the record, it goes back to the other process.
How does one control which active business process flow is in place when a user opens the record?
He has no access to the other process flow so why does it keep opening that one?
Thank you,
Will
In Dynamics 365 v9.0 Microsoft introduces new development feature in Dynamics 365 to show lookup dialog using Xrm.Utility.lookupObjects method.
Xrm.Internal.Opendialog is most commonly used method to open dialog where we need to provide URL. But this method is not supported in UCI or mobile app.
So, open a lookup window using JavaScript can be achieved using Xrm.Utility.lookupObjects method.
Parameters for Xrm.Utility.lookupObjects method is as follows:
Consider, an example where we need to open html webresource, on html page there will be a textbox and button to select the contact. When user click on “Select Contact” button, the lookup dialog of contact will gets open which allows user to select contact.
Steps need to follow:
1. We need to create html page with textbox and “Select Contact” button.
<!DOCTYPE html><html xmlns="http://www.w3.org/1999/xhtml"><head><title></title><meta http-equiv="X-UA-Compatible" content="IE=11" /><style>
        .bottomsection {
            position: absolute;
            float: right;
            margin-top: 5%;
            right: 10px;
            bottom: 5px;
            display: inline-block;
            background-color: #F8F8F8;
            border-top-color: #FFFFFF;
        }</style></head><body onload="load();"><div style="text-align:center"><h2>Contact Details</h2></div><div style="height:50px"></div><div>
        Please select Contact : <input type="text" id="TxtContact" /> <input type="button" id="btnContact" value="Select Contact" /></div><div><input type="button" class="bottomsection"  name="Ok" value="OK" /></div><script src="new_Jquery.js" type="text/javascript"></script><script src="ClientGlobalContext.js.aspx"></script><script src="../../../../_static/_controls/lookup/lookup.js"></script><script src="new_ShowContactLookup.js"></script><script type="text/javascript">
        function load() {
            this.OnContactSelectClicked();
        }</script></body></html>
2. Next write a script for showing lookup dialog using Xrm.Utility.lookupObjects method.function openWeb()
{
try {
var height = 360;
var width = 600;
//open the generate Work Order dialog
// var webResourceName = FirePro.ApiLib.getClientUrl() + "/WebResources/xcrm_/firepro/CreateWorkOrder.html?data=" + strAgincidentId + ",agreementId=" + agreementid;
// var webResourceName = encodeURI(webResourceName);
//Open the Dialog
// FirePro.CommonLib.openDialog(500, 240, webResourceName, null);
height = height != "undefined" ? height : null;
width = width != "undefined" ? width : null;
if (typeof Xrm != "undefined" && typeof Xrm.Navigation != "undefined" && Xrm.Navigation.openWebResource != "undefined") {
var windowsOption = { height: height, width: width, openInNewWindow: true };
Xrm.Navigation.openWebResource("new_ContactDetails.html", windowsOption, null);
} else if (typeof Xrm != "undefined" && typeof Xrm.Utility != "undefined" && typeof Xrm.Utility.openWebResource != "undefined") {
Xrm.Utility.openWebResource("new_ContactDetails.html", null, width, height);
} else {
return;
}
} catch (e) {
Xrm.Utility.alertDialog(e.message);
}
}
function OnContactSelectClicked()
{
try {
//bind click event of select contact lookup
$("#btnContact").click(function (e)
{
showContactLookupDialog();
});
} catch (e) {
Xrm.Utility.alertDialog(e.message);
}
}
function showContactLookupDialog() {
try {
var fetch = "<filter type='and'><condition attribute='lastname' operator='like' value='%a%' /></filter>";
var encodedURL = encodeURIComponent(fetch).replace(/'/g, "%22");
var lookupParameters = {};
//specify the list of entity types to be displayed in lookup dialog
lookupParameters.entityTypes = ["contact"];
//Sepecify the default entityType need to be displayed
lookupParameters.defaultEntityType = "contact";
//Default view need to be displayed
lookupParameters.defaultViewId = "{00000000-0000-0000-00AA-000010001004}";
//allow multiple selection or not
lookupParameters.allowMultiSelect = false;
//list multiple views available on lookup dialog
// lookupParameters.viewIds = ["{0D5D377B-5E7C-47B5-BAB1-A5CB8B4AC105}", "{A2D479C5-53E3-4C69-ADDD-802327E67A0D}"];
lookupParameters.customFilters = [encodedURL];
lookupParameters.customFilterTypes = ["contact"];
Xrm.Utility.lookupObjects(lookupParameters).then(DisplaySelectedContact, null);
} catch (e) {
Xrm.Utility.alertDialog(e.message);
}
}
function DisplaySelectedContact(selectedContact) {
try {
if (selectedContact != undefined && selectedContact != null && selectedContact != "")
$("#TxtContact").val(selectedContact[0].name);
} catch (e) {
Xrm.Utility.alertDialog(e.message);
}
}
3. Add ribbon button “Contact Details” on Account form. Add “openWeb” function onclick of the ribbon button.

4. Now when we click on the contact lookup button it will open the “Contact Details” html page.

5. This html page consist of a textbox and “Select Contact” button. When user click on the button, lookup dialog with default entity and default view provided in parameters of lookupObjects method gets open.

6. In UCI or Mobile app it opens the lookup dialog as shown in below screenshot.

Using the new feature introduced in Microsoft Dynamics 365 user can show lookup dialog using Xrm.Utility.lookupObjects method.

Automation has become a necessity in every type of business and Dynamics 365 CRM is one of the most preferred automation system implemented by various organizations around the globe. But its success totally depends upon its users, which leads us to the question, how to evaluate if it’s being adopted by its users. As an answer to this, we have a solution User Adoption Monitor. User Adoption Monitor helps managers to track various operations performed by the users in Dynamics CRM, thus increasing user adoption and also providing an overview of the organization’s productivity to the managers. This results in speeding up of the business process and thereby helps in generating more profits and ROI.
Now, what if we tell you that you can also track the entity records being opened by the Dynamics CRM users using the User Adoption Monitor? Amazing right? Yes, it’s very much possible. You can now even track the mere opening of the records along with all the other everyday actions such as Create/Update of Lead/Contact/Account, Won/Los of Opportunity, Email-Send, Appointment-Closed, etc. in Dynamics CRM.
However, to start tracking opening of the records in Dynamics CRM one needs to create the Entity Configuration for the entity to track. For this, you need to navigate to User Adoption Monitor group ->Entity Configuration. As you can see below Entity configuration is created for Case – Open entity action.
After creating the entity configuration, you will be able to start tracking the records that are opened by the CRM users as shown below. All the details of open records will be generated in the Tracking section.
User Adoption Monitor is a productive tool that will help in increasing the user adoption of your Dynamics CRM and also provide a glimpse of the user’s operation and business’s productivity to its managers thus helping them in taking quicker yet proper decisions further promoting the growth and productivity of an organization.
So, to increase the user adoption, to be an informed manager and to evaluate the feature track opening of the records download the 15 days free trial from our Website or Microsoft AppSource. It works on both Dynamics 365 CRM online as well as on-premises.
Hello, I am playing around with the new Document Template feature for in CRM 2016. I am easily able to include fields in my documents by inserting the content controls as plain text from xml parts. One thing that I cannot figure out however is how to add dynamic content using "IF" statements from the values populated from the content control fields.
For example:
If country = USA "This field displays USA" "This field does not display USA".
Has anyone able to do this with Document Templates in CRM 2016?
Thanks in advance!
Recently we got a business requirement where we need to merge two assemblies into single exe i.e. one .net assembly and another assembly which would serialize and deserialize, so we used Newtonsoft.Json.dll for it. To merge Newtonsoft.Json.dll with .net dll in single exe it is recommended to use ILMerge.
ILMerge is a tool that can combine multiple DLLs into a single exe. For this every time, we need to manually merge the assembly using ILMerge UI as shown below.

This blog explains the basics of using ILMerge to create a single Workflow/Plugin DLL without using ILMerge tool externally every time.
Step 1: Add ILMerge.MSBuild.Task using Nuget to your Visual Studio project:
Navigate to Visual Studio Project → Tools → Library Package Manager → Package Manager Console

Step 2: Use command “Install-Package ILMerge.MSBuild.Task” and paste in package manager console.

Step 3: Also need to install the ILMerge Package using command “Install-Package ilmerge” in the package manager console

Step 4: Build your project. After successful build one new folder is created with the name ILMerge. The merged assembly will be stored in an ILMerge folder under the project output. (Need to merge Crm.Workflow.dll and Newtonsoft.Json.dll)

Step 5: Merge Output is present in the ILMerge folder (Under ILMerge Folder Crm.Workflow.dll is merged output).The merged dll contains the component of both the dlls (i.e. Newtonsoft.Json.dll, Crm.Workflow.dll). Now you have to use this dll (i.e. Crm.Workflow.dll) for further processes to reflect the changes in your CRM.

Step 6: By default, all references with Copy Local equals true are merged with your project output. To avoid merging of CRM SDK DLLs and Microsoft.IdentityModel.DLL into our DLL we need to select the three files and set the property “Copy Local” to false.

Merging of multiple dlls using external tool is time-consuming and somewhat annoying. So simply type the commands Install-Package ILMerge.MSBuild.Task, Install-Package ilmerge in package manager console of your project and after successful installation, rebuild your project and you will get newly merged dll for further processing to reflect changes in your CRM.
Hello!
When i create record of an entity on dynamics portal then following error display which is not understandable for me so kindly help me about this!
An unknown failure has occurred. Error ID # [4e5d8146-3f62-42fe-b368-56731bd180ce]
Sales enabled organizations are always looking for ways to improve their sales pipeline. While new organizations struggle with efficiently utilizing their sales force, more seasoned organizations apply tactics that allow them to make the whole sales process efficient!
So, what are the most used sales tactic that every successful sales enable organizations vouch for? Sales Territories!
Sales territories are one of the most critical factors for the success of sales initiatives of an organization.
For an organization that has just started out and has a sales force of just a few professionals, explaining the benefits of sales territories would be difficult.
However, imagine an organization with hundreds of sales professionals, and now the concept of sales territories suddenly looks promising.
So, if you don’t already know what sales territories are, it’s merely dividing the area that the organizations actively serves into more manageable regions called territories.
By creating smaller territories for their market, the organization can;
Most successful organizations realize the potential of having efficient sales territories and are always on a lookout for tools that help them achieve this goal.
One of the way to better manage the sales territories is to use a CRM system like Dynamics 365 Customer Engagement, which allows an organization to organize and analyze their business data.
However, organizations need something more, something that adds more benefit to their Dynamics CRM system.
The search for that tool that allows organizations to better manage their sales territories within Dynamics 365 ends with powerful geo-analytical map visualization tools like Maplytics!
Having features that are specifically designed for sales territory management can add value to the sales process of an organization. Let’s understand the role of geo-analytics in sales territory management and how it can help an organization to transform the way they manage their sales territories.
Having the ability to define the geographical boundaries for the sales territories within Dynamics CRM allows an organization to understand the locational aspect of their sales territories. Unlocking the locational element augments the way an organization creates and manage the sales territories in Dynamics 365. Moreover, having the relevant sales territories assigned for the Dynamics CRM records based on their location and visualize the territories on a map further enables an organization to evaluate the sales territories geographically.
The assignment of Dynamics CRM records to relevant territories also allows an organization to measure the sales territories based on the KPI that they prefer. This further enhances the geographical evaluation of the sales territories. Also, having the ability to get summarized information about the KPI for each of the sales territories improves the way an organization analyzes their territories on a map within Dynamics 365.
With the summarized information of KPI for individual sales territories further allows an organization to optimize each sales territories within Dynamics 365. The sales territory optimizations can result in efficient sales force distribution, balanced workload and better ROI for their sales initiatives. Also, by optimizing the territories, an organization can improve the customer service experience and satisfaction which is essential to retain the customers in the long term.
Having the ability to easily add, remove or change the geographical boundaries for sales territories makes it easier for an organization to have fast turnaround times and experience impactful changes to the sales performance in their territories. Also, this facilitates easy realignment of territories thus resulting in balanced territories that have proportional and efficient sales force distribution.
Geo-analytical map visualization tools like Maplytics™ allows organizations to define the geographical boundaries for their sales territories. Maplytics also helps the organization to assign the Dynamics CRM records to relevant sales territories based on the geo-coordinates (latitude and longitude data), visualize the territories on the map, get summarized information for each sales territory, easily reassign Dynamics CRM records to some other territory and more!
To learn more about how Maplytics can help you manage your Sales Territories within Dynamics CRM, refer to this video.
Get your free TRIAL today from our Website or Microsoft AppSource!
Happy Mapping!
Hello Team,
I have create a report in reporting section and now i want to create a custome work flow through that i can convert this report into pdf with the download option.
Thanks
Hi Everyone,
Have a requirement!
On Create of Record, I have to generate it as PDF, send that PDF as an attachment in Email and send Email and store that PDF in Notes section.
But, problem is all should happen on record create.
How to achieve it. ? Help would be appreciated.