Quantcast
Channel: Sam's Activities
Viewing all 3363 articles
Browse latest View live

Working on Lookup Field of Dynamics 365 in PowerApps

$
0
0

Introduction:

PowerApps is a quick service that helps you to easily build business apps that runs on browsers and in phone or tablet without any coding experience needed. It allows anyone in an organization unlock new business agility.

Recently we had a business requirement, where we need to work on lookup field of Dynamics 365 using PowerApps, but currently, we cannot directly fetch the lookup values in PowerApps. So after some research and play around we found a solution on this.

This blog explains about steps to read and set Lookup fields of Dynamics 365 in Power Apps.

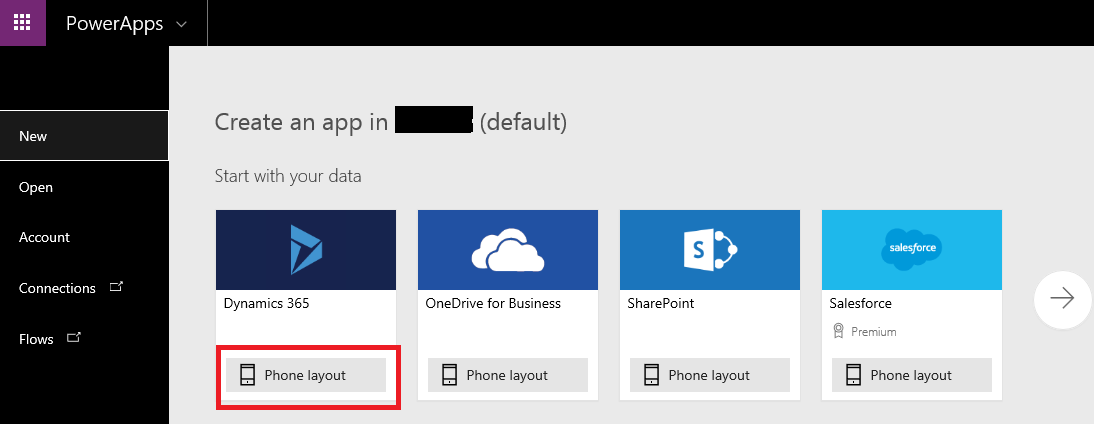
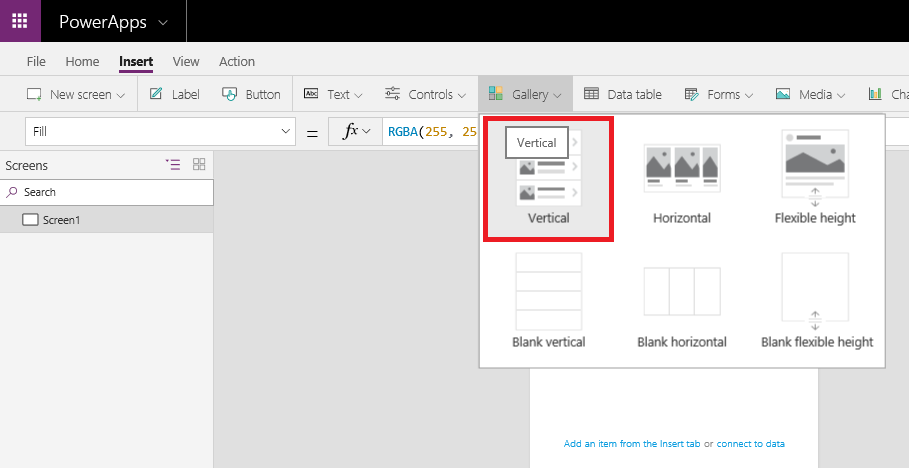
1. Create a new power Apps by selecting the Phone Layout as shown in the below screenshot.

Working on Lookup Field of Dynamics 365 in PowerApps

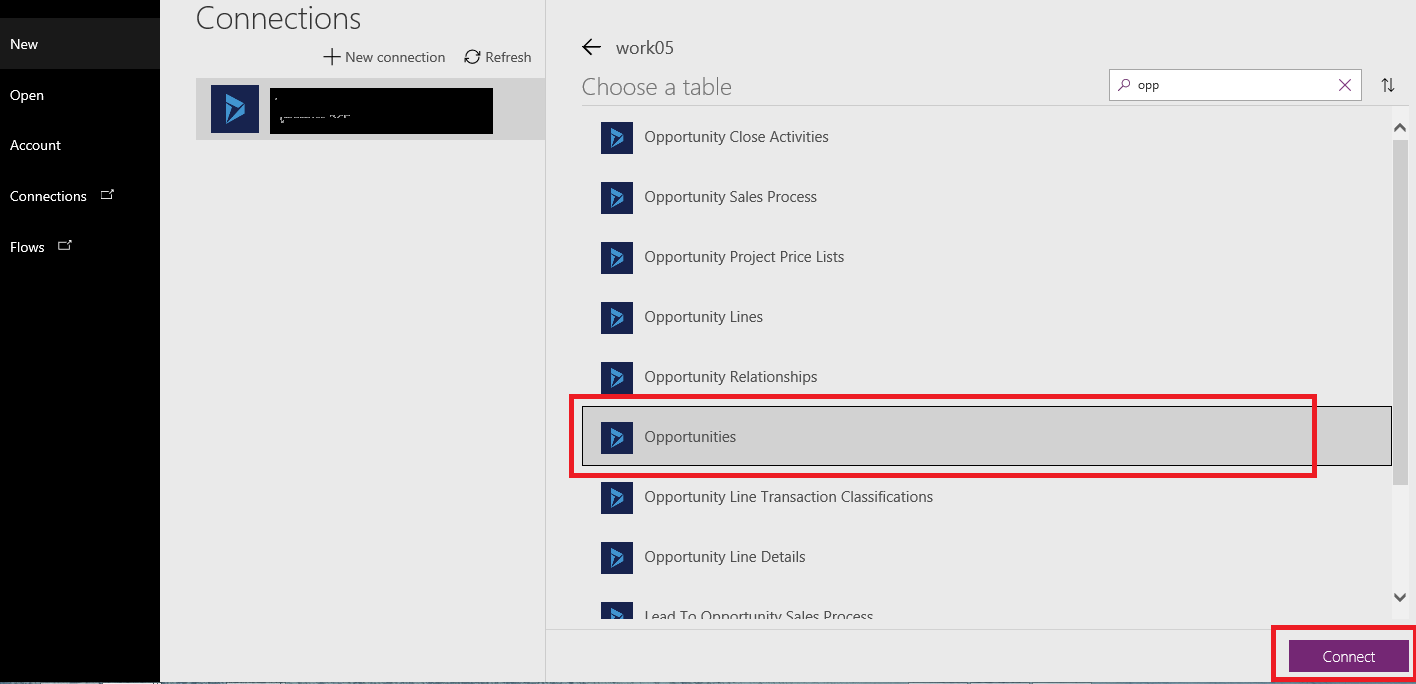
2. Select the database i.e. Entity and then click on Connect as shown in the below screenshot.

Working on Lookup Field of Dynamics 365 in PowerApps

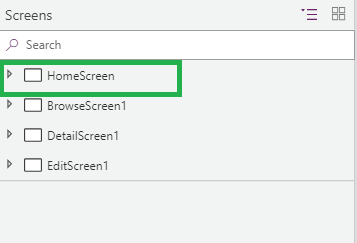
3. We get the following three screen on the left side

  • Browse Screen
  • Detail Screen
  • Edit Screen

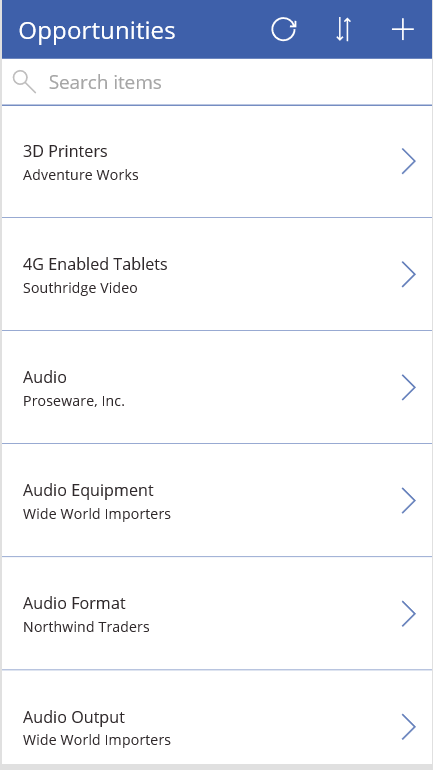
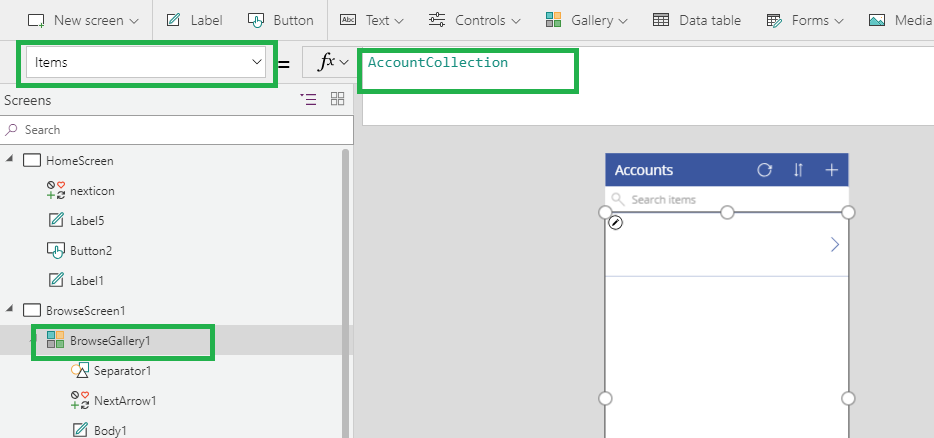
4. Click on Browse Screen and user can see the List of Opportunities in the CRM.

5. Now as seen in the below screenshot user can see GUID of parent account.

Working on Lookup Field of Dynamics 365 in PowerApps

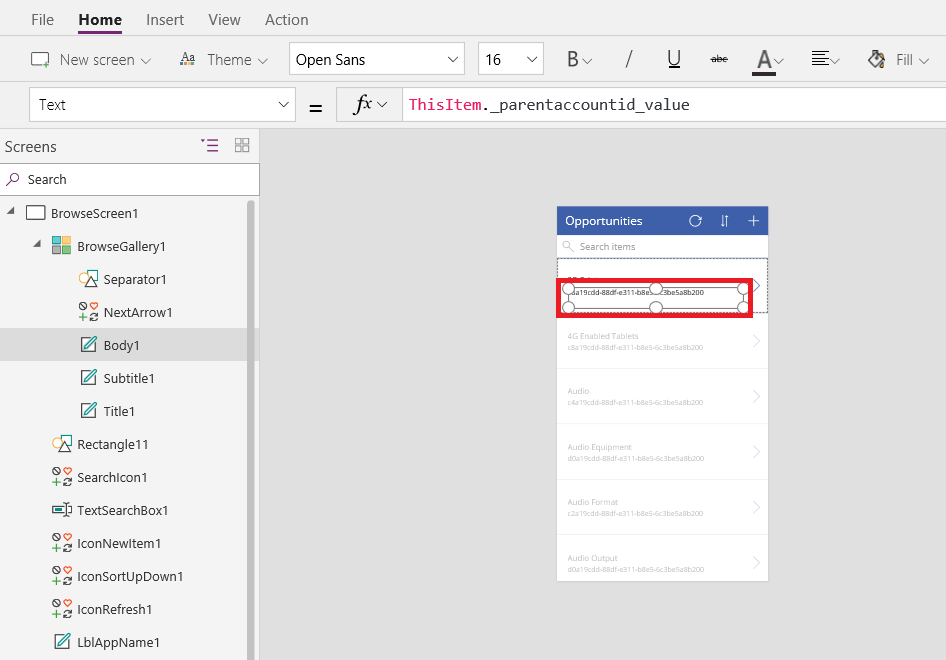
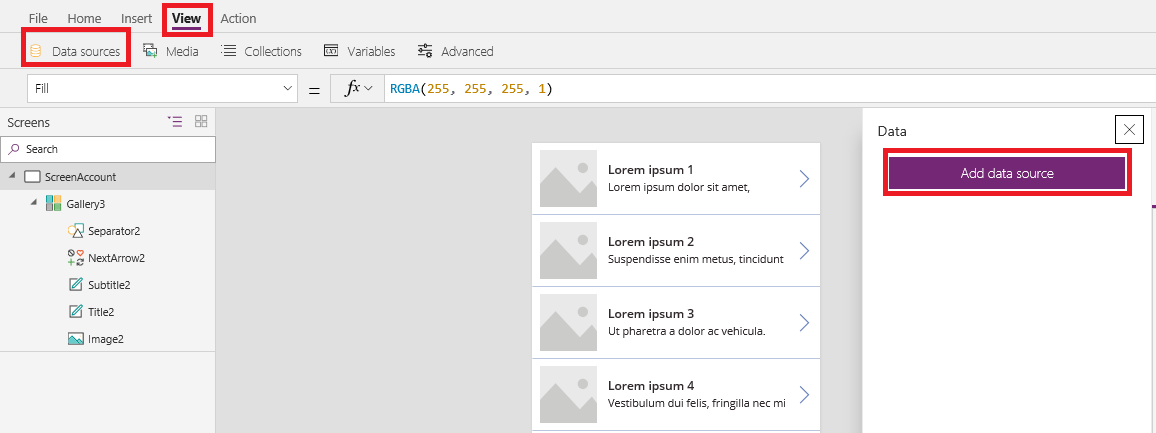
To display the name of the parent account follow the steps as given below:

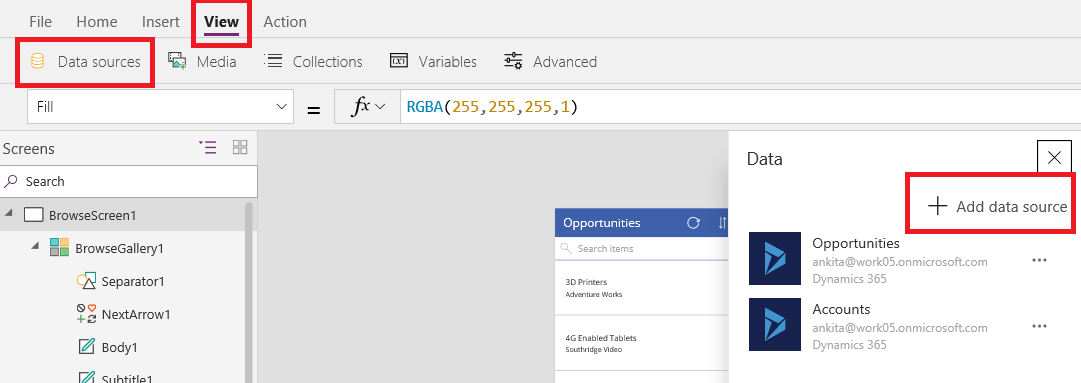
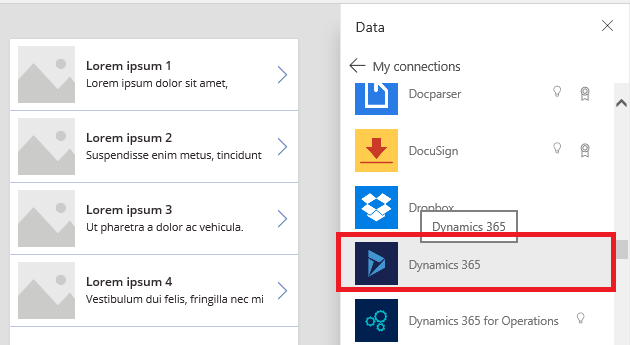
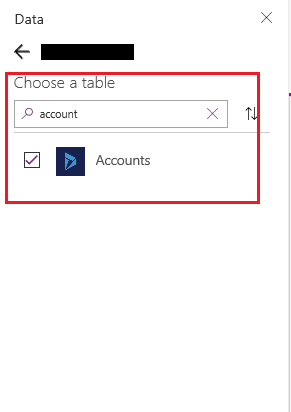
  • Add a data source of Account i.e. Account Entity by selecting on View, Data source and then select “Add Data Source” as shown in the below screenshot.

Working on Lookup Field of Dynamics 365 in PowerApps

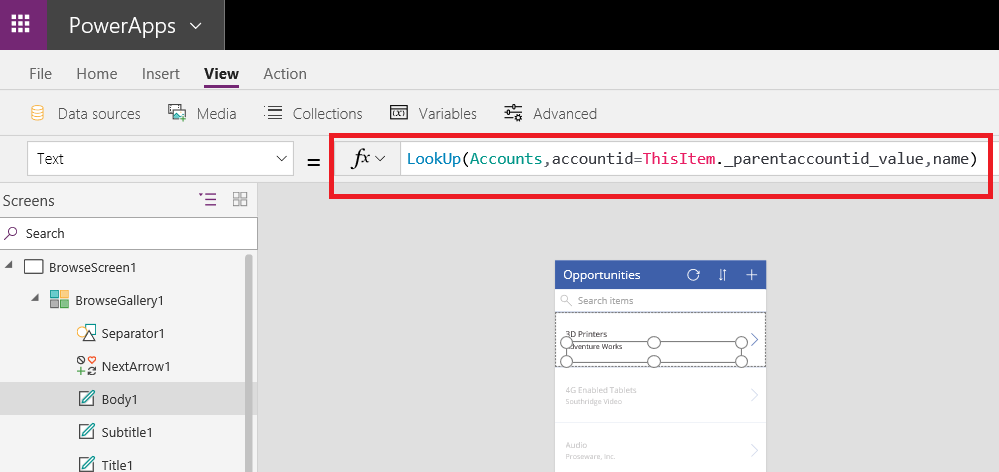
To display the name of the parent account set the text property of the Body1 which contains parentaccountid as below:

LookUp(Accounts,accountid=ThisItem._parentaccountid_value,name)

The Lookup Property search the accountid in Accounts which equals to GUID shown in textbox and returns the name of the Account.

Working on Lookup Field of Dynamics 365 in PowerApps

Now you can see the name of the parent Account which is selected on Opportunity as shown below.

Working on Lookup Field of Dynamics 365 in PowerApps

Following are the steps to assign Lookup value in PowerApps:

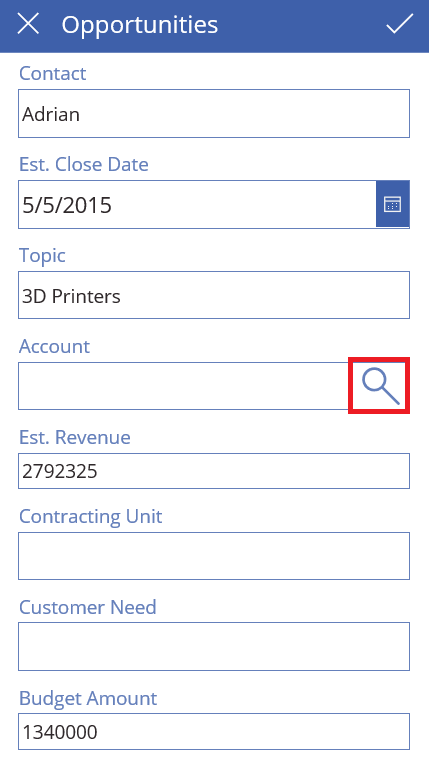
1. Click on Edit Screen and insert the “Search” Icon inside a Data Card as shown in the below screenshot.

Working on Lookup Field of Dynamics 365 in PowerApps

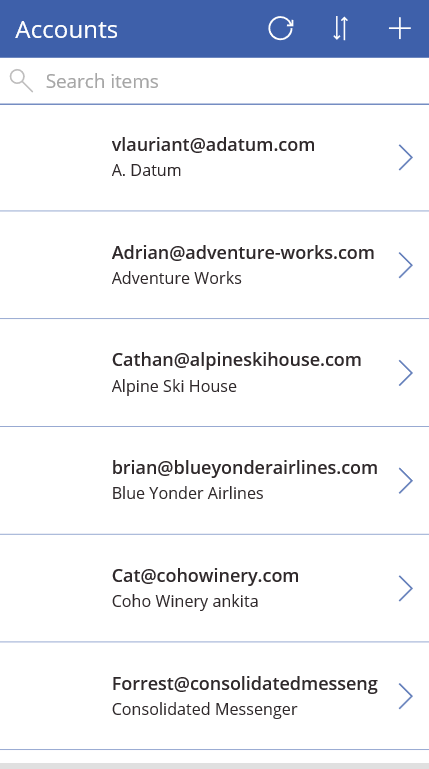
2. Insert another List screen and add data source as Accounts. This screen will show list of Accounts present in CRM.

Working on Lookup Field of Dynamics 365 in PowerApps


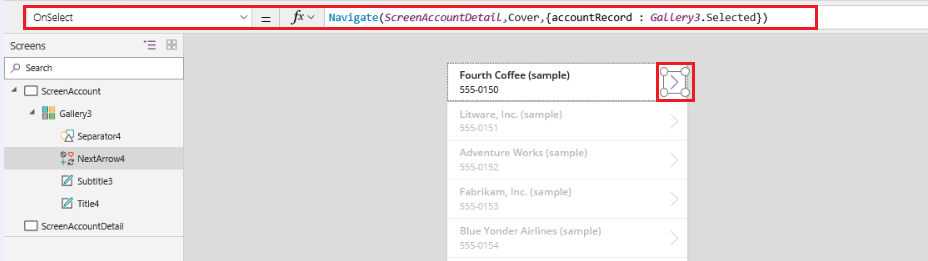
3. On “OnSelect” property of Search Icon set the formula as:

Navigate(AccountScreen,ScreenTransition.Fade,{searchAccountName : DataCardValue12 .Text});Clear(accountToBeAdded)

Working on Lookup Field of Dynamics 365 in PowerApps

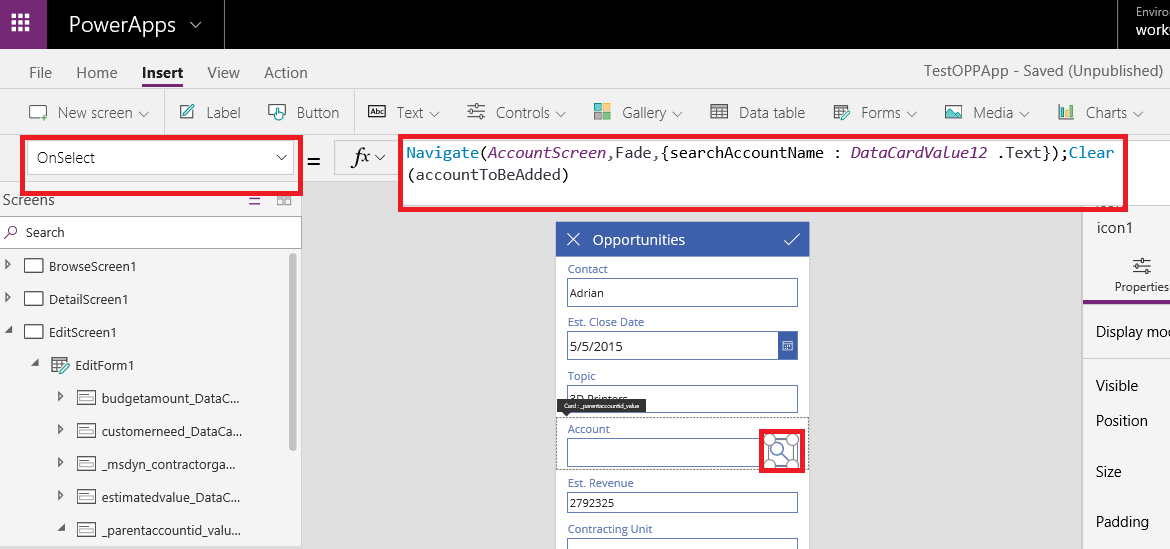
The above formula will navigate the Account Screen which shows list of Accounts and update the value of searchAccountName by value in DataCardValue12

4. Now on Account Screen, on “OnSelect” property of  icon write the formula as

ClearCollect(accountTobeAdded , {account :BrowseGallery2.Selected});Back()

Working on Lookup Field of Dynamics 365 in PowerApps

This formula create a collection name as “accountToBeAdded” and add the selected account in Collection and navigate back to the Edit Screen.

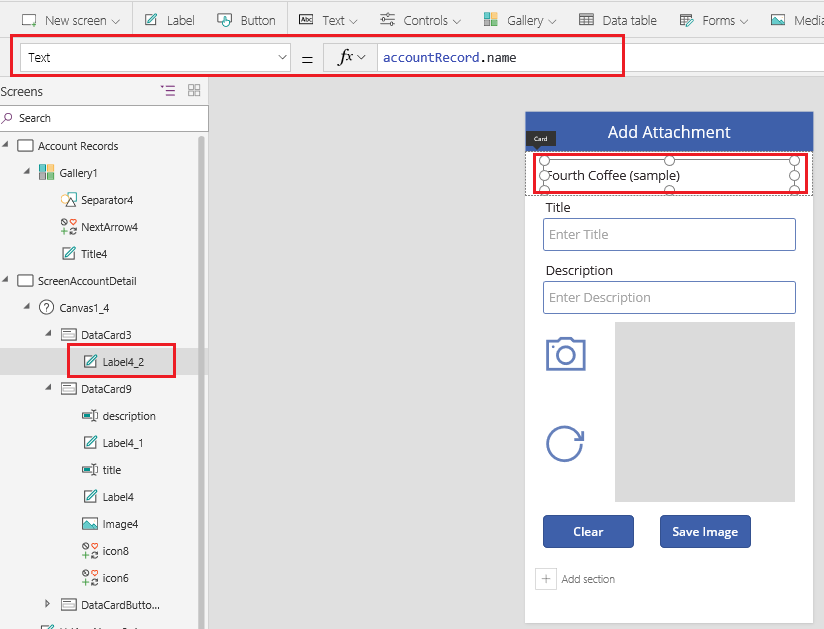
5. Now go back to the edit form, on text box of the Account  set the Default property  as following:

If(IsBlank(First(accountToBeAdded).account.accountid),Blank(),First(accountToBeAdded).account.name)

Working on Lookup Field of Dynamics 365 in PowerApps

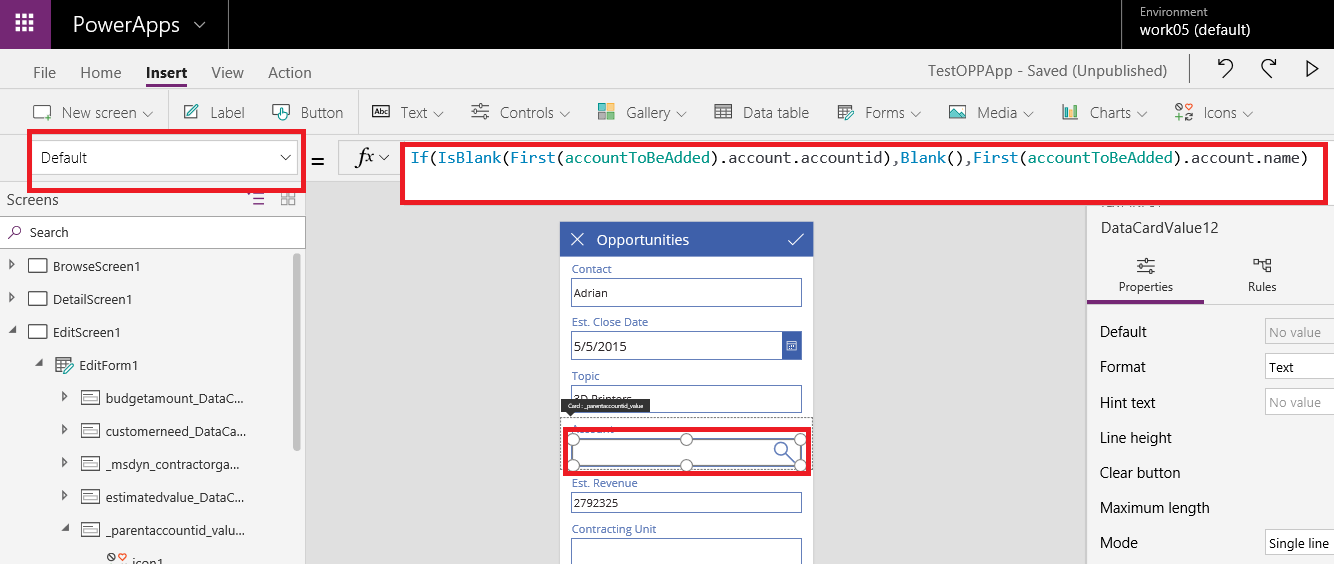
This formula check whether the “accountToBeAdded” collection contain accountid. If true set the name else set it as “Blank”.

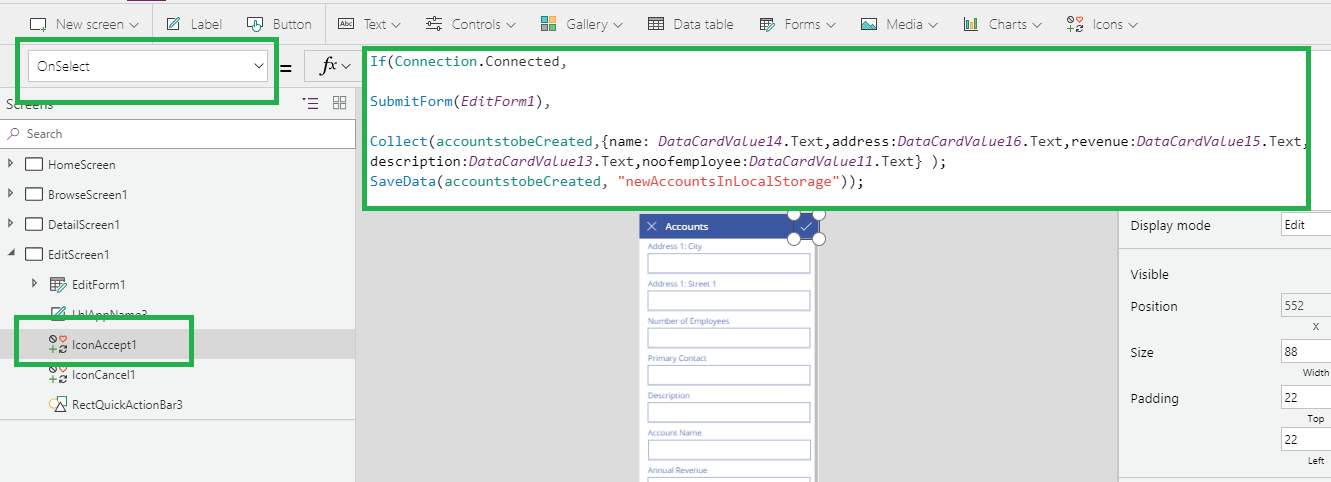
6. On Update property of Data Card set the formula as:

First(accountToBeAdded).account.accountid

Working on Lookup Field of Dynamics 365 in PowerApps

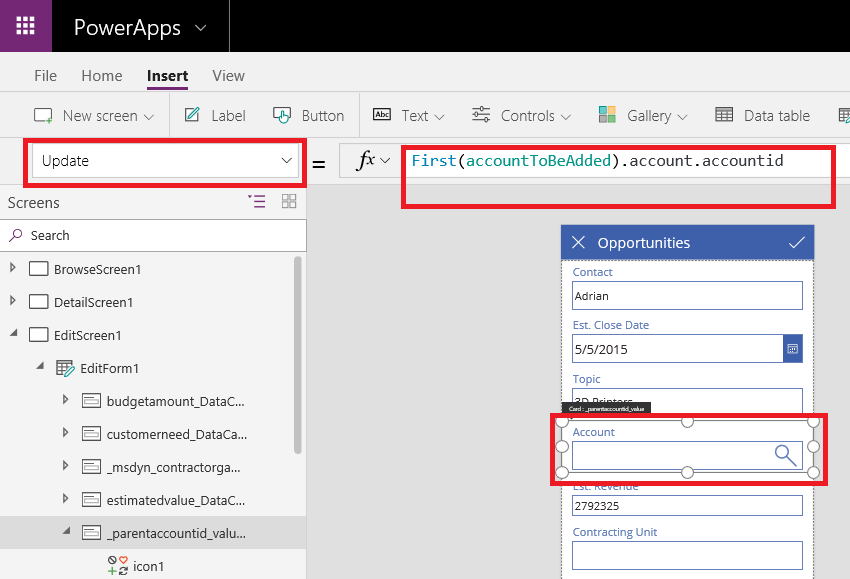
The above formula will update the Data card value to the selected account.

Conclusion:

Using the simple steps explained in this blog user can read and set Lookup fields of Dynamics 365 in Power Apps.

Export Dynamics CRM Reports


Update Smart Sheet at the time of Entity records creation in Dynamics 365

$
0
0

Introduction:

In our Microsoft Flow blog series, we have explored various topics related to Microsoft Flow and will keep on exploring more.

Microsoft flow helps us to create a backup of our data in smart sheet. So user don’t need to download excel from CRM for further analysis. Recently while working in Microsoft Flow we found something amazing where we can create records in Smart Sheet at the time of creating a Lead entity record of Dynamic CRM.

In this blog will walk through the steps to create records in a smart sheet at the same time of creating Entity records.

Let’s see the steps to create flow in Dynamics CRM:

1. Click here to open Flow template.

2. Click on Use This Template button.

Update Smart Sheet at the time of Entity records creation in Dynamics 365

3. You will see below window. Click on Sign in and complete the sing in process.

Update Smart Sheet at the time of Entity records creation in Dynamics 365

4. After successfully login, you will see below window.

Update Smart Sheet at the time of Entity records creation in Dynamics 365

5. Now you need to create one smart sheet

Click Here refer this link to Log in or Sign up into a smart sheet

Note: you can create a smart sheet by creating a new account or use existing Gmail account.

Update Smart Sheet at the time of Entity records creation in Dynamics 365

Update Smart Sheet at the time of Entity records creation in Dynamics 365

Once user successfully login in to smart sheet you will see below window. Now, we need to create smart sheet

Update Smart Sheet at the time of Entity records creation in Dynamics 365

In this example, we created record for Lead entity so we will create columns related to lead entity such as Last Name, Topic, Mobile Number, Company Name, First Name and Job Title.

Note: Here column name is used for mapping CRM Entity Record.

Update Smart Sheet at the time of Entity records creation in Dynamics 365

6. Now we finish the first part of the process that is Create Smart Sheet. Next, we need to create flow.

After creating smart sheet you will see in below window both connections has been done successfully. Now for creating flow click on continue button.

Update Smart Sheet at the time of Entity records creation in Dynamics 365

Once we click on continue flow steps are visible for us and we will be able to create actual flow as shown in the screenshot below.

Update Smart Sheet at the time of Entity records creation in Dynamics 365

Now to create records in smart sheet from the records created in Lead entity Dynamic CRM we need follow the below steps.

1. Select the sheet from list.

Update Smart Sheet at the time of Entity records creation in Dynamics 365

Organization Name list will pop up from Dynamic CRM that we provided in Step 3.

2. Select the Entity Name

Update Smart Sheet at the time of Entity records creation in Dynamics 365

Entity List contains CRM OOB entity and Custom entity both.

3. Now Select sheet from list.

Update Smart Sheet at the time of Entity records creation in Dynamics 365

Sheet directory will pop up from the smart sheet portal that we created in Step 5 and 6. Once we select the sheet all the columns in sheet are visible which we created at the time of smart sheet creation.

Update Smart Sheet at the time of Entity records creation in Dynamics 365

4. Now we need to map Smart Sheet columns to Dynamic CRM entity attributes as shown in the screenshot below.

Update Smart Sheet at the time of Entity records creation in Dynamics 365

At the time of filling smart sheet columns the Dynamics CRM entity column list will auto populate in right side panel where we need to match the respective columns.

And finally, click on save button to save the flow details.

7. Now let’s go into Dynamic CRM for creating Lead entity Record. Here we have created two lead entity records as shown in below screenshot

Update Smart Sheet at the time of Entity records creation in Dynamics 365

8. Now let’s check smart sheet in smart sheet online portal. Two smart sheet record is created for lead entity.

Update Smart Sheet at the time of Entity records creation in Dynamics 365

Conclusion:

This will help users to direct analysis of your CRM data on excel where user don’t need to download excel from Dynamics CRM every time and it also helps us to get back up of Dynamic CRM entity Records.

Map Dynamics CRM

Is it possible to Create/Update Application User in Dynamics 365 Programmatically?

$
0
0

You may have heard about the Application user in Dynamics 365. The Application user is a non-licensed and non-interactive user in the Dynamics 365 that we can use to connect to Dynamics 365 services to perform operations.

Have you come across a requirement where you need to create/update Application User programmatically and do you think it is possible?

Recently, we had a requirement where we had to create an Application User in Dynamics 365 programmatically. And, after researching it, we came to know that it is possible!

In this blog, we will illustrate how we can create/update the Application user programmatically.

Programmatically Creating or Updating Application User in Dynamics 365

While creating an Application User from Application Form manually, we have to pass the below mandatory fields.

  1. First Name
  2. Last Name
  3. Primary Email
  4. Application ID (that we get from Azure AD)

After you click on save button, the Application ID URI, Azure AD Object ID fields get auto-populated.

If you try to do the same thing using either JavaScript (Web API) or C# code (bypassing above mentioned four fields to entity object to create), you will get the following error,

“An unexpected error occurred”

While creating an Application User, we must pass the Business Unit ID field along with the fields mentioned above.

So to create an Application User, we must pass following fields to an entity object,

  1. First Name
  2. Last Name
  3. Primary Email
  4. Application ID (that we get from Azure AD)
  5. Business Unit ID

Below is the sample code that shows how to create Application User using Web API at the client side.

function createApplicationUser() {
    try {

var apiconfig = { APIUrl: Xrm.Utility.getGlobalContext().getClientUrl() + '/api/data/v9.0/' };
        var crmAPI = new CRMWebAPI(apiconfig);

        //retrieve business unit
        var buQueryOpions = {
            Select: ["businessunitid", "name"],
            Filter: "_parentbusinessunitid_value eq null"
        };

        //retrive Business Units
        crmAPI.GetList("businessunits", buQueryOpions).then(function (response) {
            if (response != null && response != undefined && response.List != null && response.List != undefined && response.List.length > 0) {

                //set Business Unit ID
                var businessUnitId = response.List[0].businessunitid;

                //create Application User
                createApplicationuser(businessUnitId, crmAPI);
            }
            else {
                alert("Root Business Unit not found");
            }
        }, function (error) {
            alert(err.responseText);
        });
    } catch (e) {
        throwError(e, functionName);
    }
}


// This function create or update the Application User
function createApplicationuser(businessUnitId, crmAPI) {
    try {
        //check if application user is already exist
        var queryOptions = {
            Select: ['systemuserid', 'applicationid'],
            Filter: 'applicationid eq XXXXXXXX-XXXX-XXXX-XXXX-XXXXXXXXXXXX'
        };
        var applicationUser = null;

        //retrive Applicationuser with Application ID
        crmAPI.GetList("systemusers", queryOptions).then(function (response) {

            //if Application User record is present then Update
            if (response != null && response != undefined && response.List != null && response.List != undefined && response.List.length > 0) {

                //set the Application User
                applicationUser = response.List[0];

                //crete user data object
                var user = {
                    "applicationid": "XXXXXXXX-XXXX-XXXX-XXXX-XXXXXXXXXXXX","firstname": "MultiTenant","lastname": "Portal3","internalemailaddress": "multitenantportal@test.com"
                };

                //update application user
                crmAPI.Update("systemusers", applicationUser.systemuserid, user, true).then(function (result) {
                    alert("Application user updated with new details.");
                }, function (err) { alert(err.responseText);});
            }
                //check if Application User record is not present then Crete 
            else {
                //create user data object 
                var user = {"applicationid": "XXXXXXXX-XXXX-XXXX-XXXX-XXXXXXXXXXXX","firstname": "MultiTenant","lastname": "Portal3","internalemailaddress": "multitenantportal@test.com","businessunitid@odata.bind": "/businessunits(" + businessUnitId + ")"
                };
                //create application user
                crmAPI.Create("systemusers", user).then(function (result) {
                    alert("Application user created.");
                }, function (err) { alert(err.responseText);});
            }

        }, function (error) {
            alert(error);
        });
    } catch (error) {
        alert(error.message || error.description);
    }
}
 

Here, we first retrieved the Business Unit ID and then we passed this Business Unit ID to create the Application User along with other fields.

You can see that we are checking whether an Application User already exists with matching Application ID in the System. If matching Application User is found, then we are updating existing Application User, else we create a new Application user.

Conclusion:

It is possible to create Application user either at client side (using JavaScript) or server side (using plugin, workflow assembly or external tools). We need to make sure that we are passing all the required fields, i.e. First name, Last Name, Email Address, Application ID and Business Unit ID.


How to import data into new Multi Select Option Set field

$
0
0

We are trying to work out how to import data from an excel file into the new multi select option set field.  We have tried using a ; separated string, but this adds unique values for each of the lines  (example: value1; value2  results in a new options set value of "value1; value2").

How can we import data into this new field type?

Thanks

Simon

On record create generate it as PDF, send that PDF as Email attachment and attach PDF to notes as well.

$
0
0

Hi Everyone,

Have a requirement!

On Create of Record, I have to generate it as PDF, send that PDF as an attachment in Email and send Email and store that PDF in Notes section.

But, problem is all should happen on record create.

How to achieve it. ? Help would be appreciated.

The Power of Automation within Dynamics 365 CRM

$
0
0

Businesses generate terabytes of data every year, and that volume of data keeps on climbing exponentially as the companies grow. Business data is the driving force for the success of CRM systems like Dynamics CRM that helps businesses organize and analyze their business data. However, business data entry is usually done by people, and we as humans are prone to errors, and it is a time-consuming process.

The most common automation a business does can be seen in the form of lead generations from their websites. This kind of automation eliminates manual data entry, reduces errors and saves a lot of time.

Businesses still need to ensure that the throughput delivered by their employees are high and one way to ensure it is by eliminating mundane tasks like creating similar records in Dynamics CRM.

The time-consuming process of creating similar Dynamics CRM records

Most businesses prepare a standard template for how the records in Dynamics CRM should be created to maintain consistency throughout the organization.

For example, a business could have a standard format for how the leads should be created in Dynamics CRM but most of the time users might make manual errors while doing so!

Now the time wasted by 1 or 2 employees in mundane tasks like creating similar records repetitive might not sound much.

For example, if an employee takes 5 minutes every day for a repetitive task like similar record creation in Dynamics CRM, that employee would have wasted 100 minutes or 1.6 hours in a month, considering a month has on an average 20 working days. In a year, that employee would have wasted 1200 minutes or 20 hours. In five years that number would be 100 hours!

If your company has 100 employees, your business would have lost 10000 man-hours in five years!

Imagine what your business could have achieved if you could reduce that number! This is the compound effect that works in all areas of life, and employee throughput or productivity is no different!

Completely or partially automating the process of cloning Dynamics CRM records

A successful business is defined by the efficiency of their employees. Companies go to great lengths to ensure that their employees are efficient. This is where productivity apps come into the picture.

Productivity apps are designed to improve the efficiency of users, and there are a plethora of business productivity apps available, both standalone ones and for a robust platform like Dynamics CRM.

Business process automation using an app like Click2Clone within Dynamics CRM empowers an organization to reduce the time spent on manual tasks drastically and enables a tighter business control and agility.

Click2Clone is a productivity app for Dynamics 365 that allows the users to copy or clone Dynamics CRM records in few clicks. Click2Clone significantly reduces the time spent on manual data entry and enable an organization to maintain data sanctity with automation.

Click2Clone can be used to clone Dynamics CRM records on-demand with a click of a button or automate the creation of cloned records using a workflow! Click2Clone enables users to clone/copy Dynamics CRM records from any OOB as well as custom entities of Dynamics CRM to another including its related child records.

Click2Clone supports Dynamics CRM (2013 & above) On-Premises, Online, and Partner-hosted.

Get a free trial of Click2Clone from the Website or Microsoft AppSource today and experience the power of automation within Dynamics 365!

Create Records in Dynamics 365 with Canvas PowerApp

$
0
0

Introduction:

Now, it is possible to build the business apps without having coding experience. Microsoft provide service named PowerApps using which users can build the apps as per the requirement and can run on the Browser, phone and tablets.

With the help of Microsoft PowerApps, we can build the apps that run on browser, tablets and on Phone. PowerApps has three major components:

  1. Canvas Apps
  2. Model-Driven
  3. Common Data Service

In this blog we are focussing on Canvas Apps of Microsoft PowerApps. Canvas apps allow to work with the 200 data sources.

So, let’s create small Canvas app with few controls to create records in Dynamics CRM. Below are the steps to create the records in Dynamics CRM.

1. Sign in to the PowerApps site https://powerapps.microsoft.com/en-us/ with the Microsoft work email id. After signing you will see the below screen:

Create records in Dynamics 365 with Canvas PowerApp

a. Click on Create an app and it will navigate to another screen. Then select Phone Layout under the blank Canvas blank.

Create records in Dynamics 365 with Canvas PowerApp

2. A blank screen will appeared as below. You can rename it if you want.

Note: Here we have used scrollable screen and all control placed inside sections. You can use blank screen.

Create records in Dynamics 365 with Canvas PowerApp

Add controls from the Insert Tab to the blank screen so that we can take input to save the record in CRM.

Here we are going to create the custom entity (survey) record in CRM. You can use other entity as well.

Create records in Dynamics 365 with Canvas PowerApp


Create records in Dynamics 365 with Canvas PowerApp

Set the Min, Max, Default property of slider control.

3. configure the Account Lookup

To set the Account lookup on Survey entity we added another screen to select the Account record

To add blank screen: Go to Insert -> New Screen  -> select Blank Screen.

Add Gallery control to display the list of existing Account records in Gallery control.

To add Gallery control; Go to Insert -> select Gallery -> Select Vertical Gallery control.

4. Now set the property for Account Lookup on textbox control.

a. Set On Select property of search icon to

Navigate(AccountLookup,ScreenTransition.Fade,{searchAccName : TextInputSelectAccount_3.Text }) ;Clear(SelectedAccountRecord )

Create records in Dynamics 365 with Canvas PowerApp

Here we are navigating the screen to select the Account record and also passing the value as SearchAccName of Select Account Textbox.

b. Set the Default property of Select Account textbox to

If(IsBlank(First(SelectedAccountRecord ).account.accountid),Blank(),First(SelectedAccountRecord ).account.name)

Create records in Dynamics 365 with Canvas PowerApp

Here we are displaying the selected account name from the Account Gallery in the textbox. Initially it will display blank.

5. To select CRM Account Record we added the another blank screen.

Insert – > New Screen

Create records in Dynamics 365 with Canvas PowerApp

a. Now add Account data source:

Select view -> Data Source – > Select the connection and then add the Account Data Source

Create records in Dynamics 365 with Canvas PowerApp

b. Now set the Gallery Item Property to

Create records in Dynamics 365 with Canvas PowerApp

If(IsBlank(searchAccName), Accounts,Search(Accounts,searchAccName,”name”))

Here the Gallery will display the list of the accounts with matching name in searchAccName variable from previous screen. If searchAccName is empty then it will show all accounts.

c. Set On select property of Arrow on BrowsGallery to

ClearCollect(SelectedAccountRecord , {account : BrowseGallery3.Selected});Reset(TextSearchBox3); Back()

Create records in Dynamics 365 with Canvas PowerApp

Here we are storing the selected account record in the separate collection i.e. SelectedAccountRecord.

6. Set the On select property of Submit button

Here we need to add the Data source for the Custom entity (Survey)

Set the On select property of Submit button to

Patch(‘Survey”s’,Defaults(‘Survey”s’),{new_name:TextInput2Name_2.Text,new_issurveydone : ToggleIsSurveyDone_4.Value , new_noofemployee :Value(Slider1_1.Value),new_email :TextInputEmail_3.Text,new_surveydate : DatePicker1_3.SelectedDate ,new_signature : Signature_1.Image,_new_selectaccount_value:If(IsBlank(First(SelectedAccountRecord).account),Blank(),First(SelectedAccountRecord).account.accountid)});

In Patch function we will set the values of controls to the Survey data source columns.

Create records in Dynamics 365 with Canvas PowerApp


Create records in Dynamics 365 with Canvas PowerApp


Create records in Dynamics 365 with Canvas PowerApp

Note: The pen input control will give BLOB data string and this signature will not be displayed on the Dynamics 365 for Phone app.

Conclusion:

In this way we can create the records in Dynamics CRM with the blank canvas app using Patch function.

Export Dynamics CRM Reports

Create Attachment in CRM with Camera Control using Canvas App in PowerApps

$
0
0

Introduction:

Designing and building business apps using the Canvas app in Microsoft PowerApps is an intuitive experience with the ability to drag and drop elements onto the canvas. This gives the users the freedom to utilize and integrate business data from Common Data Service along with the choice of 200 data sources. Using the blank canvas, users can design tailored user interface for their business applications.

In the previous blog, we have seen how to create a record in CRM using the Canvas app in PowerApps.

In this blog, we will explore how you can attach a photo to CRM record using the Camera control in Microsoft PowerApps.

Using the PowerApps Camera control to attach photos to Dynamics 365 records

1. First, you need to sign in to the PowerApps https://powerapps.microsoft.com/en-us/ with your Microsoft work email id. It will open thePowerApps Web Studio.

Create Attachment in CRM with Camera Control using Canvas App in PowerApps

2. Now, you need to click on ‘Create an app’ and then select the ‘Phone Layout’ under ‘Start with a blank canvas or a template’. This should open a blank canvas.

Create Attachment in CRM with Camera Control using Canvas App in PowerApps

3. Then, insert a ‘Gallery’ control on the canvas.

Create Attachment in CRM with Camera Control using Canvas App in PowerApps

4. Now, go to View > Data sources > Add data source. Here, add Dynamics 365 as a data source and add corresponding entities (in this example, we are adding Account and Notes entities).

Create Attachment in CRM with Camera Control using Canvas App in PowerApps


Create Attachment in CRM with Camera Control using Canvas App in PowerApps


Create Attachment in CRM with Camera Control using Canvas App in PowerApps

5. Next, set the Gallery Item property to Accounts.

Create Attachment in CRM with Camera Control using Canvas App in PowerApps

6. Now, set the OnSelect property of Next Arrow to; Navigate(ScreenAccountDetail,ScreenTransition.Cover,{accountRecord : Gallery3.Selected})

Create Attachment in CRM with Camera Control using Canvas App in PowerApps

Now, OnSelect or click of the Next Arrow, it will navigate to “ScreenAccountDetail” screen.

Here we are sending the selected row as accountRecord into the next screen which means the whole data row will be available on screen ScreenAccountDetal”.

7. Next, add another screen for capturing the image from the Camera Control. Add Camera control on the screen and set the position and size to see the image while capturing.

Create Attachment in CRM with Camera Control using Canvas App in PowerApps

Note: Here we have added a Label and set its Text property to“Click anywhere on camera to capture image” below the camera control to let the user know how to capture the image from control.

Set OnSelect property of Camera Control to;

ClearCollect(CameraImages,Camera1_1.Photo);

Clear(Image);

ForAll(CameraImages,Collect(Image,{Filename:”img.jpg”,fileBody:Url}));Back()

Create Attachment in CRM with Camera Control using Canvas App in PowerApps

CameraImages: In this collection, captured images will be stored as URL which will be in the base64 string format with prefix “data:image/jpeg;base64,”.

Image: this is the collection in which we store the image name and image captured by the camera control.

Note: Here we are storing one image at a time to CRM.

8. Insert Blank Screen and add the control to save the captured image as Attachments in Dynamics CRM.

Create Attachment in CRM with Camera Control using Canvas App in PowerApps

Note: We have added a scrollable screen and all the controls added in the section. You can use the blank screen as well.

Set the Text property of the Label to; accountRecord.name

Create Attachment in CRM with Camera Control using Canvas App in PowerApps

Set OnSelect property of Camera Icon to; Navigate(CameraAccount,ScreenTransition.Fade)

On click of the Camera Icon, it will navigate to Camera Screen (added in step 7) where you can capture the image.

Set OnSelect property of Reset Icon to; Clear(Image)

On click of the Reset Icon, it will clear the Image collection.

Set OnSelect property of Clear button to; Reset(title);Reset(description);Clear(Image)

This button will clear the Title, Description and Image collection.

Set OnSelect property of Save Image button to;

Patch(Notes,Defaults(Notes),{subject:title.Text ,notetext :description.Text,_objectid_value : accountRecord.accountid, _objectid_type : “accounts”,filename: “img.jpg”,documentbody :

If(StartsWith(First(Image).fileBody,”data:image/jpeg;base64,”),Replace(First(Image).fileBody,1,23,””),First(Image).fileBody)});

Here we are creating the records in the Annotation entity regarding the account. So, to set the regarding field we have to pass the objectidvalue and objectidtype.

In our case, we are creating the Annotation record against the Account entity, so we pass the objectidvalue as selected account id and objectidtype as accounts. Also, we are setting the default file name as “img.jpg”, you can use a different name with .jpg extension.

Note: To create attachments in CRM we have to pass the document body in base64 string. In the canvas app, the camera control gives the URL as base64 string of captured image with the prefix “data:image/jpeg;base64,”. So while creating the annotation record in CRM we have to remove “data:image/jpeg;base64,” from the URL and if you want to display the attachment image of CRM in Image control of canvas app then you have to append “data:image/jpeg;base64,” in the prefix of document body.

Conclusion:

By following the above steps, we can create the Annotation record in CRM with the help of the Camera Control from the Canvas app in Microsoft PowerApps.

Effectively Manage Sales Territories on a map within Microsoft Dynamics CRM


How to output file in custom workflow.

$
0
0

I have an custom workflow, This workflow has below codes Like:

InstantiateTemplateRequest itr = new InstantiateTemplateRequest();
itr.ObjectId = customer.Id;
itr.ObjectType = customer.LogicalName;
itr.TemplateId = email.Id;
InstantiateTemplateResponse instTemplateResp = (InstantiateTemplateResponse)service.Execute(itr);

//Serialize the email message to XML, and save to a file.
XmlSerializer serializer = new XmlSerializer(typeof(InstantiateTemplateResponse));
string filename = "email-message.xml";
using (StreamWriter writer = new StreamWriter(filename))
{
serializer.Serialize(writer, instTemplateResp);
}

Now, I create an button in ribbon, When use clicked the button, It will invoke my custom workflow, 

expected: workflow output an email-message.xml to user.

actual: 

Unexpected exception from plug-in (Execute): {My workflow assembly fullname}: System.Security.SecurityException: Request for the permission of type 'System.Security.Permissions.FileIOPermission, mscorlib, Version=4.0.0.0, Culture=neutral, PublicKeyToken=b77a5c561934e089' failed. If you contact support, please provide the technical details.

Activity ID: 84f47315-d8b3-4618-ae8a-993309b632d7

Update I/O parameters of a custom assembly without unregistering it in Dynamics 365

$
0
0

Introduction:

As CRM developers we often come across some requirements to accomplish which, we need to write custom assemblies. The unique feature of a custom assembly is the Input and Output parameters saving some of the retrieves thus decreasing the processing time and complexity and eventually increasing the efficiency.

Recently we came across a scenario where changes made in the Input/output parameters won’t get reflected when we try to update the custom assembly.

So as can be seen from the screenshot below we have a custom assembly with only one input parameter of type string

Update IO parameters of a custom assembly without unregistering it

Now a few minutes later in the course of our development, we felt the need of another Input Parameter of type entity reference as below:

Update IO parameters of a custom assembly without unregistering it

And so, we did add the parameter then build and updated the assembly but still when we try to access the assembly in the workflow and access the new parameter we couldn’t see it.

Update IO parameters of a custom assembly without unregistering it

So, to reflect the changes in the I/O parameters of the custom assembly in the workflow kindly follow the below steps:

  1. Add or Remove the I/O parameters in your assembly as required.
  2. Then just before you build the assembly change the Major number of the version of your assembly. To do so follow the steps below.
  • In your visual studio from your project select the assembly, right click on it and select the Properties to navigate to the window as shown below.

Update IO parameters of a custom assembly without unregistering it

  • Then click on the “Assembly Information” button as highlighted in the above screenshot to access the assembly version.
  • Change the Major version of this assembly i.e. change the version from 1.0.0.0 to 2.0.0.0.

Update IO parameters of a custom assembly without unregistering it

3. Now just re-build & register this in your CRM as a new assembly. The CRM will identify this as the newer version of the already existing assembly and in your workflow steps you just need to change the version of your assembly to see the new set of I/O parameters.

Even in the Plugin registration tool one can find the version difference of both the assemblies in the properties tab as below.

Update IO parameters of a custom assembly without unregistering it

4. And in the workflow, you will start to see a dropdown besides your assemblies from where you can change the version.

Update IO parameters of a custom assembly without unregistering it

5. And when you choose the version 2.0 you can see the newly added parameter as below.

Update IO parameters of a custom assembly without unregistering it

Please Note in case you have an action in which you are using a custom assembly then all the above scenarios and solutions are very much applicable in this scenario as well.

Conclusion:

Thus changing the version number saves a lot of work which one would have to rather go through if they try to un-register and then re-register the assembly leading them to recreate the entire workflows or actions with all the steps.

Generate Your Own New Leads Now Within Dynamics 365 CRM with Maplytics

The evolution of business productivity with Dynamics 365 CRM

$
0
0

The evolution of business productivity with Dynamics 365 CRM

CRM systems like Microsoft Dynamics 365 are known to help businesses streamline their business data and further analyze it to gain insights into their business performance to improve sales, service and marketing.

Businesses around the world have utilized the power of Dynamics 365 to transform and grow their business all while maintaining customer relationships and satisfaction.

However, this was not the case a few decades back.

Business productivity in the pre-internet era

Before the introduction of the internet, a business heavily relied on standalone mainframe systems to store their customer data. This was an expensive affair and due to the technological limitations at the time, was very limited and only available to major corporations.

Also, it was highly inefficient as the employees were dependent on others to provide any needed information about the customer or prospect and that had a dramatic effect on the productivity of the organization and the overall customer satisfaction.

Businesses relied on standalone systems to gather and manage their business data, and these systems were not reliable enough and not accessible widely by the employees, further widening the communication gap and increasing the dependency on employees.

All of this translated into poor customer experience and businesses lost a considerable amount of opportunities further limiting their growth in the long term.

The internet-fueled productivity and growth boost 

As the internet boomed, it paved the way for the development of allied technologies, and eventually, it all led to the creation of CRM systems that was easy to use and accessible by large and mid-sized businesses.

The internet fueled the productivity of organizations and provided a boost to their growth.

As the internet developed further, it allowed these CRM systems to move to the cloud and that eventually made it more accessible to a broader employee base and small organizations.

The move to cloud allowed small and mid-sized businesses to compete with the larger corporations and made the overall customer experience better.

Customers now had a choice to choose from a plethora of products and services from all size of organizations and this competition further improved the overall quality of the products and services.

The need for productivity apps for Dynamics CRM

Growth-oriented organizations started looking out for ways to further boost their productivity, and that led to the creation of productivity add-ons from hundreds of companies around the world.

These apps catered to different needs and focused on improving different business processes. The overall effect that Dynamics CRM in combination with productivity apps created further allowed for a more productive workplace and more profitable business.

We, at Inogic, have been exclusively focused on Dynamics CRM for more than a decade and predicted the need for enhanced productivity as Dynamics CRM evolved over the years. This understanding led us to develop a range of productivity apps that not just enhances the productivity within Dynamics CRM but takes it to a whole new level.

Our productivity app offerings include;

  • Maplytics™, which is a leading Certified for Microsoft Dynamics 365 (CfMD) geo-analytical map visualization business intelligence tool. Maplytics allow users to plot and perform drill-down analysis of their Dynamics CRM records on interactive map interfaces. With features like Appointment Planner, Route Optimization and Management, Proximity/Radius Search, Sales Territory Management and Heat Map visualizations, Maplytics is a go-to solution for organizations looking to get the maximum value out of their business data.
  • InoLink: Quickbooks is a bi-directional integration solution for Microsoft Dynamics CRM and Intuit QuickBooks and helps business to enhance the efficiency of processing financial information and streamlines the information flow between the systems to empower Dynamics 365 users with a 360 degrees view of the customer by synchronizing transaction history and Aging details of the customers from QuickBooks.
  • User Adoption Monitor is a must-have productivity app for every Dynamics CRM implementation. It allows an organization to monitor and analyze the user actions in CRM, further enabling the organization to understand the usage of their CRM system and take actions to train users and improve the user adoption of their Dynamics CRM implementation.
  • Click2Clone is a one-click productivity app that helps the users to clone/copy Dynamics CRM records from any OOB as well as custom entities of Dynamics CRM to another including its related child records. Click2Clone also provides the ability to automate the mundane task of copying or cloning Dynamics CRM records, further improving per employee productivity.
  • Click2Export is also a part of one-click productivity app and provides the ability to export and email Dynamics CRM reports in PDF, Word or Excel file formats. The exported reports can also be attached to a note or downloaded for later use.

Apart from the productivity app offerings, we also provide cost-effective offshore Dynamics CRM development services to help Dynamics 365 Partners and Customers get the most out of their Dynamics CRM implementation. With a wide range of services from development, configuration, and data migration across Dynamics Customer Engagement, Field Service, and Project Service modules, Inogic is the go-to choice for Dynamics CRM Partner and Customers looking for an offshore development company to further compliment and streamline their CRM implementation.

We are also technically equipped and have a team of techno-functional developers and consultants with in-depth knowledge of the new technologies like Microsoft Dynamics 365 Portals, Power BI, Common Data Service, Microsoft PowerApps, Microsoft Flow and Logic Apps.

To learn more about how we can help you enhance the productivity within Dynamics CRM and make your Dynamics CRM implementation a success, write to us at crm@inogic.com.

Create Dynamics 365 Records from an Excel using Microsoft Flow

$
0
0

Introduction:

Dynamics 365 Records can be created from Excel using Microsoft flow “Create Dynamics 365 Leads from an Excel table”.  This is useful if user wants to create Records for each row from the Excel that is uploaded on Google Drive.

In this blog, we will explore this topic, to

Below are the steps for creating Dynamics 365 Records from Excel using Microsoft flow:

1. Navigate to “Apps” section of Dynamics CRM, and click on “Flow”.

Create Dynamics 365 Records from an Excel using Microsoft Flow

2. Click on “Create Dynamics 365 Leads from an Excel table” as shown in the below screenshot.

Create Dynamics 365 Records from an Excel using Microsoft Flow

3. Microsoft flow “Create Dynamics 365 Leads from an Excel table” includes recurrence for creating Record in Dynamics 365. Recurrence setting in this flow determines after how many intervals the records will be created in CRM from Excel.

Create Dynamics 365 Records from an Excel using Microsoft Flow

4. Next Step is to specify the file name and table name from which records will be retrieved in order to create in CRM.

Create Dynamics 365 Records from an Excel using Microsoft Flow

5. After creating a record in CRM, flow allows us to delete that row from Excel. For this, we need to specify excel file name and table name in “Delete rowScope” Section of the flow.

Create Dynamics 365 Records from an Excel using Microsoft Flow

6. In “Create a new recordScope” section in flow, we need to specify “Organization Name” in which we need to create the Dynamics 365 Records.

7. Select “Entity Name” and map other fields of record with the columns mentioned in the excel sheet.

Create Dynamics 365 Records from an Excel using Microsoft Flow

8. Click on Save. We can also test the flow by clicking on the “Test” button.

Create Dynamics 365 Records from an Excel using Microsoft Flow

Conclusion:

Using “Create Dynamics 365 Leads from an Excel table” in Microsoft Flow user can create records in Dynamics CRM from an Excel uploaded on google drive.

Export Dynamics CRM Reports

How to output file in custom workflow.

$
0
0

I have an custom workflow, This workflow has below codes Like:

InstantiateTemplateRequest itr = new InstantiateTemplateRequest();
itr.ObjectId = customer.Id;
itr.ObjectType = customer.LogicalName;
itr.TemplateId = email.Id;
InstantiateTemplateResponse instTemplateResp = (InstantiateTemplateResponse)service.Execute(itr);

//Serialize the email message to XML, and save to a file.
XmlSerializer serializer = new XmlSerializer(typeof(InstantiateTemplateResponse));
string filename = "email-message.xml";
using (StreamWriter writer = new StreamWriter(filename))
{
serializer.Serialize(writer, instTemplateResp);
}

Now, I create an button in ribbon, When use clicked the button, It will invoke my custom workflow, 

expected: workflow output an email-message.xml to user.

actual: 

Unexpected exception from plug-in (Execute): {My workflow assembly fullname}: System.Security.SecurityException: Request for the permission of type 'System.Security.Permissions.FileIOPermission, mscorlib, Version=4.0.0.0, Culture=neutral, PublicKeyToken=b77a5c561934e089' failed. If you contact support, please provide the technical details.

Activity ID: 84f47315-d8b3-4618-ae8a-993309b632d7

Implement offline support for Canvas App in Dynamics 365 CRM

$
0
0

Introduction:

Recently, we had a requirement where customer wants use Dynamics365 CE using PowerApp in Offline mode.

Following are the steps to implement offline support for Power App to Dynamics365:

1. Create a default Canvas app by using Dynamics 365. You can refer to our previous blog here.

2. Insert a new Screen in the power app and design the page accordingly. This screen we have consider as Home Screen so move this screen to the top as shown in below screenshot:

Implement offline support for Canvas App in Dynamics365 CRM

We have designed the home screen as shown in below screenshot:

Implement offline support for Canvas App in Dynamics365 CRM

3. In Edit screen1, on “onselect property” of “IconAccept1” write the formula as:

If(Connection.Connected,

SubmitForm(EditForm1),

Collect(accountstobeCreated,{name: DataCardValue14.Text,address:DataCardValue16.Text,revenue:DataCardValue15.Text,description:DataCardValue13.Text,noofemployee:DataCardValue11.Text} );

SaveData(accountstobeCreated, “newAccountsInLocalStorage”));

Implement offline support for Canvas App in Dynamics365 CRM

The above formula will first check if connection is connected (i.e. if application is connected to internet), if true application will submit the form else create a collection name as “accountstobeCreated” and will store the value of fields.

SaveData function stores the collection in local database under name.

4. Now back to the home screen, on “onselect” property of “nexticon” write the formula as:

If(Connection.Connected,

ClearCollect(AccountCollection, Accounts);

SaveData(AccountCollection,”AccountInLocalStorage”),

LoadData(AccountCollection,”AccountInLocalStorage”, true));

LoadData(accountstobeCreated,”newAccountsInLocalStorage”, true);

Navigate(BrowseScreen1,ScreenTransition.Cover)

Implement offline support for Canvas App in Dynamics365 CRM

The above formula will first check if connection is connected (i.e. if application is connected to internet), if true application will clear and collect “AccountCollection” which will stores all the records from account entity and later will save the records in “AccountCollection” under the name “AccountInLocalStorage”.

If connection is not available, the application will LoadData from accountCollection and accountstobecreated.

LoadData function re-loads a collection by name that was previously saved with SaveData

5. On Item property of BrowseGallery1 write formula as:

AccountCollection

Implement offline support for Canvas App in Dynamics365 CRM

6. Now Add a Timer Control on BrowseGallery1 and set the following property of Timer:

Auto Start: true

Repeat: true

Duration: 30000

7. On “OnTimerEnd” property of Timer Control write the formula as:

If(Connection.Connected &&CountRows(accountstobeCreated)>0,

ForAll(accountstobeCreated,Patch(Accounts, Defaults(Accounts),{name:name,description:description}));

Clear(accountstobeCreated);

Refresh(Accounts);

ClearCollect(AccountCollection,Accounts);

SaveData(AccountCollection,”accountInLocalStorage”))

Implement offline support for Canvas App in Dynamics365 CRM

Whenever the timer ends the application will check if internet connection is available and records are present in “accountstobecreated” collection. If true,

Records will be created in CRM using patch function.

“accountstobecreated” collection will be cleared and created records will be saved in “AccountCollection”.

Conclusion:

Using simple steps above user can implement offline support for Canvas App in Dynamics365 CRM

Generate Your Own New Leads Now Within Dynamics 365 CRM with Maplytics

Update default country field based on Option Set value

$
0
0

Hi, 

With data consistency in mind, I would like to automatically update the value of the country field (in Account Addresses) update automatically once the value of another field (which is a custom option-set) changes.

A simple figure below about what I am trying to achieve. 

What are the possible ways to achieve this?

I wonder why the country field is not dynamic in Dynamics already...


Filter lookup based on business Unit

$
0
0

Hi,

Let me brief first current scenario. We have customize lead entity by using Ribbon Workbench. When user click on new lead, a HTML window will come and ask to select Business Unit. Once user selected Business Unit . This below formula added on form properties.

*********************************************************************************************************************

function SetBUField() {
var BUName = window.parent.Xrm.Page.getAttribute("new_bu").getValue();
if (BUName != null) {
var req = new XMLHttpRequest();
req.open("GET",
Xrm.Page.context.getClientUrl() + "/api/data/v8.0/businessunits?$select=businessunitid,name",
false);
req.setRequestHeader("OData-MaxVersion", "4.0");
req.setRequestHeader("OData-Version", "4.0");
req.setRequestHeader("Accept", "application/json");
req.setRequestHeader("Content-Type", "application/json; charset=utf-8");
req.setRequestHeader("Prefer", "odata.include-annotations=\"*\"");
req.onreadystatechange = function () {
if (this.readyState === 4) {
req.onreadystatechange = null;
if (this.status === 200) {
var results = JSON.parse(this.response);
for (var i = 0; i < results.value.length; i++) {
var businessunitid = results.value[i]["businessunitid"];
var name = results.value[i]["name"];

if (name == BUName) {
var lookUpValue = new Array();
lookUpValue[0] = new Object();
lookUpValue[0].id = businessunitid.replace('{', "").replace('}', "").toString();
lookUpValue[0].name = name.toString();
lookUpValue[0].entityType = "businessunit";
Xrm.Page.getAttribute("new_businessunitid").setValue(lookUpValue);
}
}
} else {
Xrm.Utility.alertDialog(this.statusText);
}
}
};
req.send();
}
}

//Function to Filter Market Segment
MarketSegmentFilterSearch = function () {

Xrm.Page.getControl("new_marketsegmentid").addPreSearch(function () {
AddPreSearch();
});


}

//Function to Filter Market Segment
AddPreSearch = function () {
var businessUnitId = Xrm.Page.getAttribute("new_businessunitid").getValue()[0].id;
if(businessUnitId != null){
var Filter = "<filter type='and'><condition attribute='new_businessunitid' operator='eq' uitype='businessunit' value='"+businessUnitId+"'/></filter>";
Xrm.Page.getControl("new_marketsegmentid").addCustomFilter(Filter, "new_marketsegment");

}
}

****************************************************************************************************************************

Above formula works fine.

We have created 3 custom entity (Market Segment, Product, Region) Each entity has 2 field (Name & Business Unit)

Issue happening here when we running multiple lookup filters, sometime it works properly some it doesn't.

Requirement : Once business unit selected, all the 3 custom entity should show only name related to business unit.

Please help !

Regards

Faisal

unified interface options

$
0
0

I am struggling with the new unified interface. 

How the heck do you modify forms now?

If I make a change to the main form, some of it is moved to the unified interface, but many things work differently.

Eg, we have the contacts filtered on the account, this does not work anymore but I do not know where to go to reset it.

Also we have a bunch of system dashboards.

They are not visible under the unified interface.

Where do I go to set the dashboards to show under any of the hubs.

So confused.

There must be a for dummies (me) document but I cannot seem to find it.

Help

Create Customer Lookup in PowerApps using Data Context

$
0
0

Introduction:

Recently, we had a business requirement to show customer lookup in PowerApps similar to the customer lookup in Dynamic 365.

For example – In Dynamic 365, we have customer lookup of contact and account, using this we can select contact and account.

To achieve the same thing in PowerApps, we have to use “Context” parameter of navigation methods.

For more details about navigation, methods refer below link.

https://docs.microsoft.com/en-us/powerapps/maker/canvas-apps/functions/function-navigate

Solution:

Step 1: Select a Blank application as shown in below screenshot.

Create Customer Lookup in PowerApps using Data Context

Step 2: Add two Blank Screen one is Home Screen and Customer Screen which will display account and contact list.

Create Customer Lookup in PowerApps using Data Context

Step 3: Add Dropdown Control, Textbox, search icon on Home Screen as below.

Create Customer Lookup in PowerApps using Data Context

Step 4: Add data source of account and contact in PowerApps as shown in the below screenshot.

To add Source Go to View-> Data Source -> +Add data source

Create Customer Lookup in PowerApps using Data Context

After that Click on Add data Source, the below screen will appear,

Create Customer Lookup in PowerApps using Data Context

If u have different data source then select that one. Here we have selected a Dynamic 365.

Click on Dynamic 365 then select required entity. I have selected Account. After selecting entity click on Connect, data source will get added to PowerApps. Similarly we can add Contacts data source as shown in below screenshot.

Create Customer Lookup in PowerApps using Data Context

After successful setup it looks like below.

Create Customer Lookup in PowerApps using Data Context

Step 5: Add gallery two controls to “CustomerScreen” as shown in below screenshot.

Create Customer Lookup in PowerApps using Data Context

Step 6: Go to HomeScreen select dropdown, to set dropdown value, I have define entityList collection which consist of entityName as property. These will display data on dropdownlist.

Create Customer Lookup in PowerApps using Data Context

Step 7: Now set Items property of dropdown to entityList Collection as shown below.

Create Customer Lookup in PowerApps using Data Context

Step 8: Now add below lines of code in onSelect property of dropdown.

Create Customer Lookup in PowerApps using Data Context

Step 9: Select Search Icon of Textbox then add navigate function as shown below.

Create Customer Lookup in PowerApps using Data Context

Step 10: Go to CustomerScreen and set Items property Contact and Account Gallery to Source collection that define in navigate function.

Create Customer Lookup in PowerApps using Data Context

Step 11: To display only one gallery at a time set visible property of account and contact gallery as shown below

Contact Gallery

Create Customer Lookup in PowerApps using Data Context

Account Gallery

Create Customer Lookup in PowerApps using Data Context

Step 12: To display selected data on HomeScreen Textbox, use Set function on OnSelect property of nextArrow Icon as shown in screenshot.

Contact Gallery

Create Customer Lookup in PowerApps using Data Context

Account Gallery

Create Customer Lookup in PowerApps using Data Context

Step 13: Go to HomeScreen and set default property of textbox as shown in below screenshot.

Create Customer Lookup in PowerApps using Data Context

Note: Instead of Dropdown control, we can use radio Button. Now simply run the application.

Conclusion:

Using the simple steps above user can create customer lookup in PowerApps using data context in Dynamics 365

Microsoft Dynamics CRM and QuickBooks Integration

Control with Workflow how you want records Cloned in Dynamics CRM

$
0
0

Click2Clone your favorite app to clone Dynamics CRM records in 1 click new release has much more. In our last posts we read about the new feature to Clone Dynamics 365 CRM record with over 100 line items in a single click and in another post we read how we can now Clone Dynamics CRM data from any OOB or Custom Entity to another including its related child records!

Today, lets expore one more of additional feature in this article. This feature will help the users to update the cloned record along with the two features mentioned above through the workflow i.e. The users now have the ability to add a workflow step to do the needful updates in the cloned record. The advantage of this feature is that the user gets the power to set the standard values for certain fields of the cloned record.

Let’s take an example of cloning the Opportunity data on the Project with the help of workflow and to do needful updates along with the ability to identify the reference of cloned project on opportunity and vice versa.

Selected Opportunity:

Dynamics CRM Copy Records

Cloned Project:

Dynamics CRM Copy Records

We have created the Opportunity to Project template to use in the workflow.

In the Click2Clone template target entity is set as Project to copy the data of Opportunity on the newly created project and set the references of cloned Project on Opportunity and vice versa.

Dynamics CRM Copy Records

In fields mapping section user needs to select the attributes of Project that they want to map across the required attributes of Opportuniy.(E.g. Name of an Opportunity across the name of the Project).

Dynamics CRM Copy Records

We have then created the workflow for cloning the Opportunity data on Project with the help of Click2Clone workflow where the Record fields change is selected from the Options for automatic process. The workflow is shipped with the two Click2Clone assemblies i.e. Inogic.Click2Clone.GetRecordId (to get newly created record id) and Inogic.Click2Clone.ClonedRecords (set the Entity Name, Record ID, Click2Clone Template and Target Entity and call workflow to clone the records) as shown below.

Dynamics CRM Copy Records

Dynamics CRM Copy Records

Users can now do needful updates in the cloned record. For this user needs to add the update record steps where new data is defined in set properties to get cloned record updated with that new data. Here in Update Project step for doing the needful changes we have set the standard values for the various fields as shown below.

Dynamics CRM Copy Records

Thus, it is very easy now for the Dynamics CRM users to access the record through workflow and make the updates in the cloned record along with the source references set on the cloned record and vice versa.

Try and evaluate the new feature now by activating the 15 days trial from our website or Microsoft Appsource. If you need any assistance in your trial period then kindly mail us at c&#x72;m&#x40;in&#x6f;g&#x69;c&#x2e;co&#x6d;.

Booking Alert activity on Schedule Board in Dynamics 365

$
0
0

Introduction:

Microsoft Dynamics CRM 365 always surprises us with the new features that are being introduced.

One such feature is “Booking Alert” on Schedule board. Booking Alerts in Field services is an activity type which has ability to show in the schedule board. Booking Alert is actually an effective alert for the Dispatcher who is working with the schedule board and work orders. It helps the dispatcher to get an alert on the urgent work that needs to be finished and can schedule the work orders accordingly.

Now there are ways to create “Booking Alert”.

You can create new Booking Alert directly from the schedule board. Navigate to Field Service -> Schedule Board.

Booking Alert activity on Schedule Board in Dynamics 365

Other way to create “Booking Alert” is from the work order.

Follow below steps for the same:

1) Create work order either from a Case or an Opportunity.

For example, navigate to Opportunity -> Create a record -> click on “Convert to Work Order”.

Booking Alert activity on Schedule Board in Dynamics 365

2) Navigate to the generated work order and click Other Activities -> Booking Alert.

Booking Alert activity on Schedule Board in Dynamics 3653) Following screen opens up where you need to fill in the details of the Booking Alert.

Booking Alert activity on Schedule Board in Dynamics 365

Regarding: Work order is prepopulated because we have open the booking alert from the work order. Basically Regarding is set to indicate what record the alert is related to.

Assignees: This is set as the user who needs to be logged in to see the above alert. In our scenario, these would be the dispatchers those people who works in office and not on field. Dispatchers have access to the work orders and schedule board.

Due Date: This is a Date/Time field which should be the future date. Due date is the date/time this Alert will be popped up in the schedule board.

Once you save the Booking Alert record, Activity record would appear against the “Regarding” that has been set on the booking alert as shown in below screen.

Booking Alert activity on Schedule Board in Dynamics 365

Also if you navigate to “Statuses” which is available in the related entities of the Booking Alert record. You would see the below record created.

Booking Alert activity on Schedule Board in Dynamics 365

Booking Alert activity on Schedule Board in Dynamics 365

The same booking alert would appear on the Schedule board as well shown in below screen.

Note: Booking Alert to appear on the schedule board might some time.

Booking Alert activity on Schedule Board in Dynamics 365

Dispatcher can perform two actions on Schedule Board:

  • Dismiss

Once user clicks on “Dismiss”, the alert will be disappeared and status of the “Booking Alert Status” record would be inactive.

  • Snooze

Snooze will allow user to set alert later. For example, the alert time snoozed to 30 minutes, then the “Next Time to Show” on the Booking Alert Status updates to the snooze time.

In the above example, the “Next Time to Show” = 6/30/2018 5.00 PM on Booking Alert Statuses record. User snoozed the alert for 30 minutes. So now the “Next Time to Show” would be updated to “6/30/2018 5.30 PM”. Also the Alert disappears from the schedule board.

Booking Alert activity on Schedule Board in Dynamics 365

If you double click on the “Alert” shown on schedule board, then it will open the Booking alert record. From Booking Alert record, you will get the work order as we had set work order in the above example, then Dispatcher will go and schedule this work order.

Conclusion:

Booking Alert is the only activity that could be shown on the Schedule board. It helps the dispatcher to get an alert on the urgent work that needs to be finished and can schedule the work orders accordingly.

Generate Your Own New Leads Now Within Dynamics 365 CRM with Maplytics

Viewing all 3363 articles
Browse latest View live


<script src="https://jsc.adskeeper.com/r/s/rssing.com.1596347.js" async> </script>