Quantcast
Channel: Sam's Activities
Viewing all 3363 articles
Browse latest View live

Controls in Dynamics 365 for Mobile App: Bullet Graph

$
0
0

Introduction:

Microsoft Dynamics CRM 365 introduced additional controls for mobile and tablet to increase user interaction, user convenience and for user-friendliness. These controls are available for Mobile, Tablet application depending on the field type.

Today in this blog we will discuss about Bullet Graph Control.

Bullet Graph Control:

This control is used to represent field values graphically. We can add this control to the fields of type Whole number, Floating Point Number, Currency and Decimal Number. For this, we need to enter a value in the textbox of this control and then it will show that value in graph of control. To configure this control we need to provide Maximum, Minimum and Target, We can also provide Good and Bad value. These values gets differentiated by different shades.

Maximum Value– Maximum value to display on graph of control.

Minimum Value– Minimum value to display on graph of control.

Good Value– Good value to display on graph of control.

Bad Value– Bad value to display on graph of control.

Target– This is nothing but the value which we want to compare with actual control value.

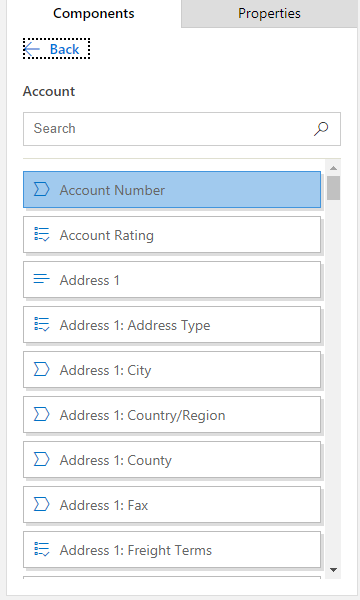
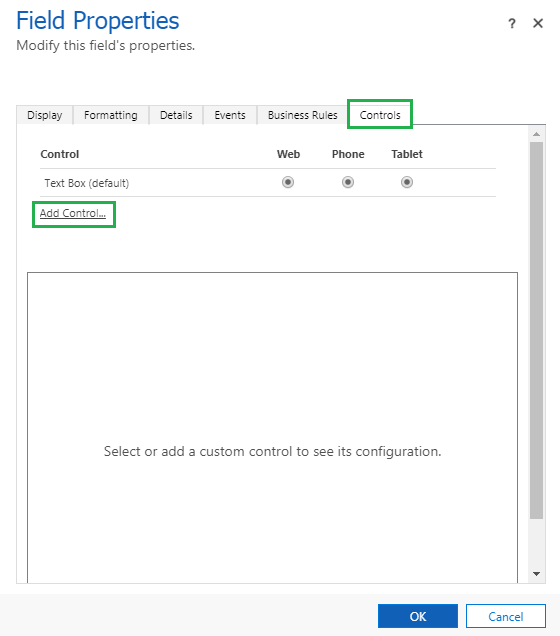
We can add this control through customizations, go to customizations -> open the form -> click on field which we want to add this control -> click on Change Properties button.

For Example: Here we are adding bullet graph control on “Number of Employees” field.

After clicking on “Change Property” button go to “Control” tab and then click on “Add Control” button as shown in below screenshot.

Controls in Dynamics 365 for Mobile App Bullet Graph

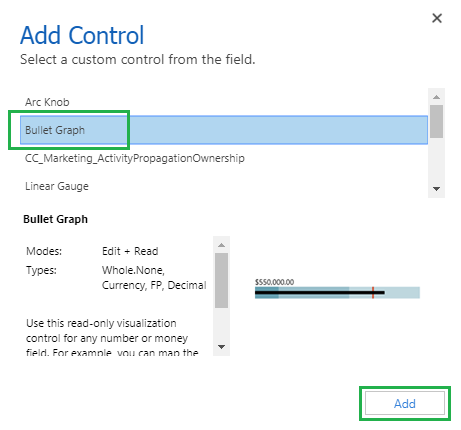
After clicking “Add Control” button the following window will get open and it will shows list of all controls, Select “Bullet Graph” control from the list and then click on “Add” button.

Controls in Dynamics 365 for Mobile App Bullet Graph

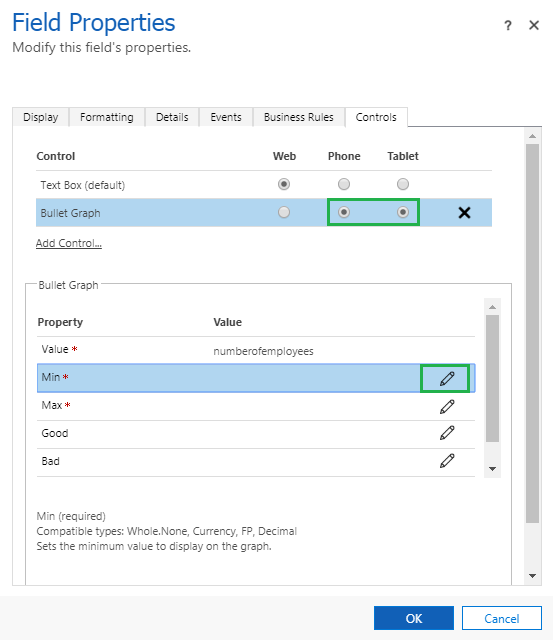
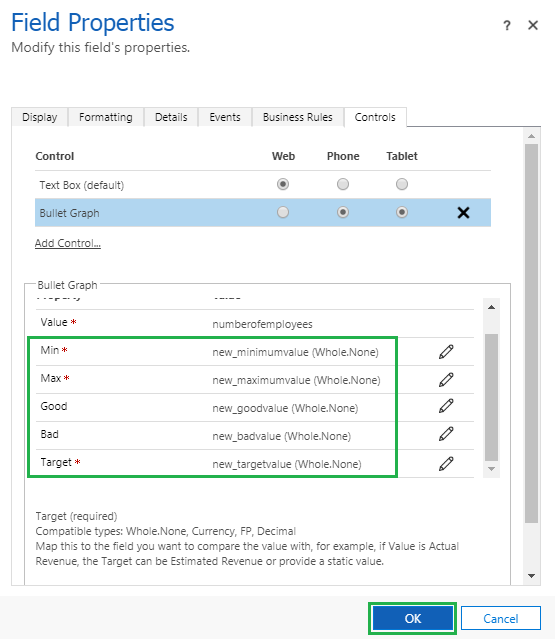
Then select Phone and Tablet radio buttons to show this control on Phone and Tablet, and then click on “Configure Property” button to set Minimum, Maximum, Good, Bad and Target values.

Controls in Dynamics 365 for Mobile App Bullet Graph

After clicking on “Configure Property” button the following window will get open which will display two options to set values

Controls in Dynamics 365 for Mobile App Bullet Graph

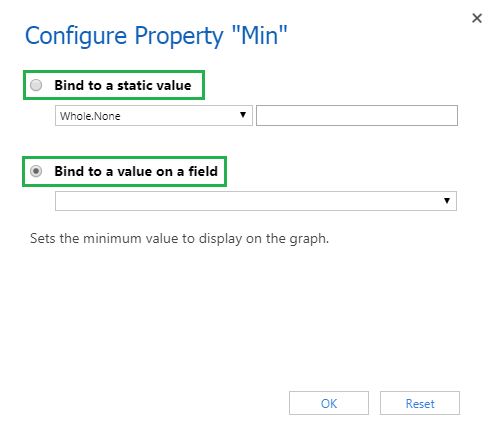
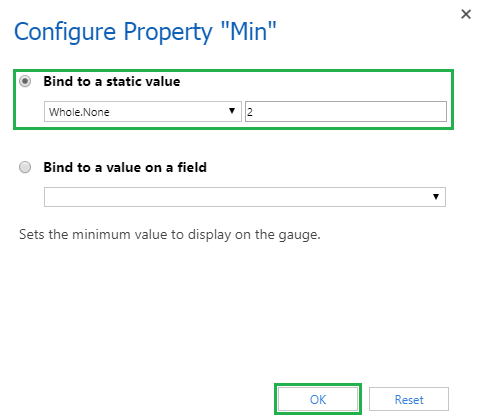
To set values using “Bind to a static value” we need to select “Bind to a static value” radio button, then select data type and then add static value in textbox and click on “OK” button.

Controls in Dynamics 365 for Mobile App Bullet Graph

To set values using “Bind to a value of a field” we need to select “Bind to a value of a field” radio button, select the field of whose value we want to use as Minimum Value, Maximum Value, Good Value, Bad Value or Target Value and then click on “OK” button.

Controls in Dynamics 365 for Mobile App Bullet Graph

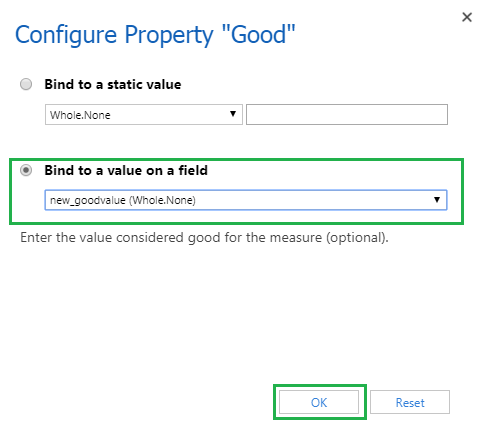
Here we are setting values using “Bind to a value of a field” option, as mentioned in below screen clip for Min value we are using “Minimum Value” field value, for Max value we are using “Maximum Value” field value, for Good value we are using “Good Value” field value, for Bad value we are using “Bad Value” field value and for Target we are using “Target Value” field value.

Controls in Dynamics 365 for Mobile App Bullet Graph

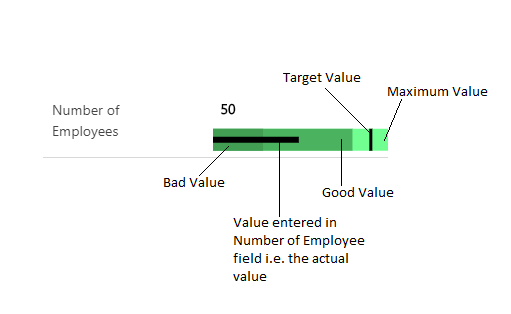
The Bullet Graph control will displays values graphically as per below screenshot, the value entered in control’s textbox getting appears on control’s graph in black colour.

Controls in Dynamics 365 for Mobile App Bullet Graph

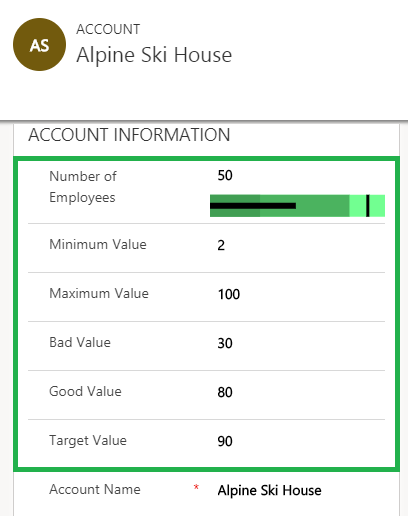
Here is the graphical representation of Bullet Graph control values.

Controls in Dynamics 365 for Mobile App Bullet Graph

Conclusion:

In this way, we can add Bullet Graph control which allows you to enter data in and represent that data in graphical manner in user convenient way.

Get-started-with-QuickBooks-and-Dynamics-365-Integration


CRM V9.x : Export to excel button is disabled for selected record on Advanced Find and Views on home screen

$
0
0

Hi,

User is system administrator and not able to export the selected record in excel  from the advanced find.

Export to excel button is disabled for selected record on Advanced Find  and Views on home screen with CRM/D365 V9.x. Is it a new feature in D365 V9.0 or is it bug?

Kind Regards,

Neeti Rajgor

Create multiple territories quickly within map itself in Dynamics 365 CRM

$
0
0

Territory Management Dynamics 365

We have always been keen on making it easier for Sales Managers to manage territories for their salesperson. Previously, we introduced the concept of creating Geographies, which helps users to define created territories geographically. With the help of Territory assignment workflow, users are able to assign territories to records within the Microsoft Dynamics CRM based on their existence in respective geographical regions as per their geocoding. Sales managers can assign these created territories to their field sales team in order to distribute the responsibilities of sales opportunities.

With the latest release of October 2018, we have added a whole new section of Territory management into Detail map. We have enhanced Territory management to make the Territory mapping process much easier and precise. We have added a few more enhancements, where user can now view required regions on map and create territories out of those regions right through the map. With geographical view, managers can easily analyse the regions and create multiple territories within a short timeframe through single screen on the Detail map.

Let’s understand this with an example. Let’s say, we have Anna as the Sales manager of her organization. Anna is responsible for handling her Sales Team so as to meet sales target for financial year. She now needs to create territories and assign them to the respective Sales persons as per their efficiency to develop sales opportunities available and increase the sales conversion. She can follow the steps mentioned below to access Territory management section and start creating territories.

Go to Detail map > More Options > Territory Management

Dynamics CRM Territory Management

In order to create territories, Anna should be able to view all regions, analyse them and decide which regions to create the territories for. To plot the required regions, she has 4 options available:

  • By File
  • By Region
  • By Drawing
  • By Territory

By File

With the help of this option, Anna can plot Shape files and Excel files that store geographical information and attributes of geographic features. Plotting files will help Anna to view all the required geographic regions together on map, which makes it easier to understand, analyze and create territories. Based on regions with potential customers, Anna can select some of the regions and create new territories out of them. To proceed, we introduce the ‘Territory Alignment Tool’.

Dynamics CRM Territory Management

Using Territory alignment tool user can select regions, deselect all, select multiple regions or delete regions respectively.

Now Anna can easily use the Territory alignment tool to select some region(s) and create a new territory for the same.

Dynamics CRM Territory Management

She can either create a new territory for the selected region or add it to an existing territory.

Dynamics CRM Territory Management

The data of the files plotted on map will also be visible in view grid in the map. Anna can also deselect some records from view grid to remove the respective regions which are not required and directly click on ‘Create territory’ button to create a territory with plotted regions as its geographies.

Dynamics CRM Territory Management

By Region

The second option Anna has, is ‘By region.’ Just like plot functions in Detail map, Anna can search for regions on map by City, State, County, Country, PostalCode, PostCode Sector, PostCode (Outward Code), PostalCode Area. This option is really useful as Anna also needs to use regional boundaries like postal codes, counties etc. to create territories for her field sales team. Using this option, Anna can easily plot required regions and select some of them with the help of Alignment tool to create a territory for the same.

Dynamics CRM Territory Management

By Drawing

Let’s say Anna had created a Territory for Madison County in New York which is shown by Green color in the screenshot below. Now she needs to add some region that can’t be defined by a specific boundary, to this Madison County territory. To achieve this, she can easily use the redesigned Drawing toolbar to create shapes on map for required regions and add these regions to Madison County.

Dynamics CRM Territory Management

Dynamics CRM Territory Management

With the three options mentioned above, Anna has ease to choose any of the options to plot required regions/shapes on map, analyze them and create territories out of them right through the map. Without switching to any other screen, she has options to create multiple territories and even make changes in the same, right from Detail map.

Now that Anna has created territories, she can now align them in order to get a balanced territory distribution. To achieve this she has a fourth option ‘By territory.’

By Territory

This option will help Anna to plot existing territories on map. With existing territories plotted on map, Anna can compare and analyze territories. This will help her to understand areas covered by existing territories and which of them to align, in order to achieve the right territory distribution. With the help of Territory Alignment Tool, she has options to Move or Copy some of the geography(ies) of one or more territories to another territory. This way she can align territories so as to create appropriate territories that could be assigned to the sales team based on efficiency of the field personnel.

This was our latest enhancement in regards to creating territories right through the Detail map. User can further align these created territories with our Alignment tool. They can update the territories by removing some part of it or add some regions to increase the area of the territory. Look out for our next post where we will discuss on the alignment capabilities of Territory management in Maplytics, stay tuned!

Enhance your Territory management process with the Advanced Territory Management within Maplytics. Start your free trial on your Dynamics 365 CRM today. Click here to download Maplytics solution for your Dynamics CRM version. Don’t forget to leave your comments and feedback in the comment box below, we are eagerly waiting!

Happy Mapping!

Create a system views by using App Designer in Dynamics 365 CRM

$
0
0

In Dynamics 365, Microsoft has introduced App Designer where we can create different apps based on security roles where we can controls which entities, dashboards different people in an organization can see. As we all know, Dynamics 365 v9.0 came with Unified Interface, which provides the same user interface in all devices.

In this blog, we will see how we can create system views while creating the Apps by using App Designer.

To create a view follow the steps mentioned below:

1. Go to Settings > Customizations > Customize the System > Click on the Model-driven apps from the components and the required Hub in which we want to create views.

2. Click on the view of required entity in the Entity view section in app designer as shown in the below screenshot.

Create a system views by using App Designer in Dynamics 365 CRM

3. Click on the create new and it will open the window as below:

Create a system views by using App Designer in Dynamics 365 CRM

4. To define columns we can select it from the primary entity and also from a related entity.

Create a system views by using App Designer in Dynamics 365 CRM

5. Click on the Column Attributes to select fields of primary entity i.e Account to view in column. It will open the list of columns as shown below:

Create a system views by using App Designer in Dynamics 365 CRM

Here, we can search for the particular field and double click on that field or can drag and drop the field to the column section. If we want to change the order of the columns, we can simply drag the column in order which we want to be.

Create a system views by using App Designer in Dynamics 365 CRM

6. We can set the primary or secondary sort order to the column as below:

Create a system views by using App Designer in Dynamics 365 CRM

If you remove the column you selected for the primary sort order, then the column you selected for the secondary sort order becomes the primary.

7. We can also set the width of the particular column. For the same, select the required column and it will open the properties section where we can set the width for the column, can add the web resources and it also shows the data type of the field for the details as shown in the below screenshot.

Create a system views by using App Designer in Dynamics 365 CRM

8. To add the filters into view click on the filter criteria section, it will allow us to add the criteria as below:

Create a system views by using App Designer in Dynamics 365 CRM

9. As we are creating the view to shows Account records which are created by logged in user and created in this current month, we are adding criteria as below:

Create a system views by using App Designer in Dynamics 365 CRM

10. Then select the rows which are added and choose the condition as below:

Create a system views by using App Designer in Dynamics 365 CRM

11. Once we have completed with view creation then click on save button on the top right corner and your view is ready.

Conclusion:

Using the simple steps above user can easily create a system views by using App Designer in Dynamics 365

Resource Reconciliation in Project Service Automation

$
0
0

Introduction:

With the release of Dynamics 365 v9.0 Project Service Automation has become more powerful in terms of project management capabilities, PSA version 3 has a new feature added called “Reconciliation View” which is available on Unified Interface.

In this blog, we will explore the new feature of reconciliation view of PSA and its resource scheduling capabilities in brief. Before moving ahead, let’s understand the use of Reconciliation view.

For any project, it is very important to manage the project team members efficiently, means resource booking and their dedicated task assignments should be perfectly aligned.

Ideally, the project manager should be able to align the resource booking as per the task assignments they have for them, which will help the resource to complete the task in time. But if you see the reality, it is very difficult to do so, as in entire project life cycle resource booking changes many times based on the resource availability and also, project task assignment fluctuates based on the project priority/deadlines.

In PSA, there is a tab on the project entity called Resource Reconciliation view to help project manager to be able to reconcile the team member bookings and their task assignments for their project team.

You can navigate to Reconciliation view for a project by clicking on the Resource Reconciliation tab on the project entity as shown below:

Resource reconciliation in Project Service Automation

The Resource Reconciliation view shows team member, their bookings and task assignments. Each cell represents the hours which shows time phases for months, weeks or days.

Resource reconciliation in Project Service Automation

As shown in the above screenshot, there are multiple timescale controls are available. Like Month, Week or Day.

Note: The Resource Reconciliation view uses “Week” timescale control as the default.

Resource reconciliation in Project Service Automation

You can use the calendar control to move forward and backward to change the view as per need, also at leftmost there is expander control available for each resource which will show the details of booking or assignment per resource. Please find the highlighted part above.

If you look closely, then there are two types of colors/shades which refer two below conditions:

Booking Shortage:

  • This condition occurs when there is shortage of booking for particular resource (that means task assignments are more as compared to resource availability)
  • Project manager can take corrective action here and can extend the resource booking to aligned booking and assignments properly

Excess Bookings:

  • This condition occurs when there is an excess of booking for particular resource (that resource availability are more as compare to task assignments)
  • Project manager can take corrective action here and can cancel the resource booking to aligned booking and assignments properly

When you have a situation where you have task assignments in hand without any resource booking (i.e. Booking Shortage) then you can click the Extend Booking button from context menu as shown below:

Resource reconciliation in Project Service Automation

This will bring up a window where you can see the booking needed for resource’s shortage along with their bookings requirement.

Conclusion:

Resource Reconciliation is a useful feature of PSA, which gives the better insight into how much time a team member has been scheduled for the project. And help project manager to take corrective action by judging the booking and task assignments alignment.

To find out more about how we can help you get the most out of your Dynamics 365 for Project Service Automation, write to us on crm@inogic.com today!

Filter lookup by related records of a N:N relationship

$
0
0

Goal

On entity 'Proposal' I have a lookup to 'Account' and to 'Item code'.
Simply put, I want the 'Item code' entity to be filtered based on the chosen 'Account'.

Status

I have created N:N relationship on one of the entities (on item code) in which I have defined the 2 related entities ('Item code' and 'Account'). I am now able to go to both entities choose the relationship in the subnavigation and see created N:N relationships on both entities!

Now the part that doesn't work:

The lookup to 'Itemcode' can now be setup to show related records (where the 'Account' of the 'Proposal' is the same as the 'Account' on the 'Item code')

So it seems like it has been setup as it should be, published it

But it does not work.... the lookup is still showing all records....

Am I doing something wrong? 

Is there a setting that I should check? Perhaps on the newly created relationship between the two entities?

Under and Not Under Clauses in Dynamics 365 CRM

$
0
0

Introduction:

Dynamics CRM always surprises with something new. More we dig into it more we get new things in Dynamics CRM. Today we will discuss on one of such topic.

Have you seen the under and not under condition in Advance find. Well… When I saw, it surprised me too. So, what does these clauses do?

If you have hierarchy settings defined for an entity then for that entity you can see the above clauses defined in Advance find.

E.g. for Account entity to define Hierarchy settings

Navigate to Setting->Customizations->Components->Entities->Account->Heirarchy Settings.

Under and Not Under Clauses in Dynamics 365 CRM

Click on New. Form will be displayed to select the hierarchy relationship.

Under and Not Under Clauses in Dynamics 365 CRM

Data in the fields that needs to be filled is as below.

  • Name – Enter name for the hierarchy.
  • Default Quick view form – Choose the form from the list
  • Hierarchical Relationship – Choose the hierarchical relationship from the list. In the above we have selected Company Name

Below is the hyperlink “Mark a relationship as enabled for hierarchies” which shows the list of relationships which shows the list of relationships that can be enabled for hierarchy.

Under and Not Under Clauses in Dynamics 365 CRM

Select any relationship and click on Mark hierarchical. That relationship is marked as true and is set.

Now when you go to Advance Find you will see the Under and Not Under clause

Under and Not Under Clauses in Dynamics 365 CRM

Now, On Contact Jim Glynn the Account Name is set as Scott Konersmann (sample)

Under and Not Under Clauses in Dynamics 365 CRM

So in Advance find when we execute the below query we see the contact Jim in the result

Under and Not Under Clauses in Dynamics 365 CRM

Under and Not Under Clauses in Dynamics 365 CRM

Similarly, if we run the query for Not Under then all the contacts excluding Jim in seen in the result.

Under and Not Under Clauses in Dynamics 365 CRM

Under and Not Under Clauses in Dynamics 365 CRM

So the above clauses helps us to quickly view the Contacts which are under/not under the particular contact.

Also if the Hierarchy is defined for a particular record we can see a hierarchy symbol on the record.

Eg. On contact Scott Konersmann (sample) you can see the symbol as below.

Under and Not Under Clauses in Dynamics 365 CRM

On click of the above symbol the hierarchy card opens as shown below

Under and Not Under Clauses in Dynamics 365 CRM

Conclusion:

Using Under and Not Under Clauses in Dynamics 365 CRM user can quickly view the records which are under/not under the particular record.

Click2Clone-Promo

CRM V9.x : Export to excel button is disabled for selected record on Advanced Find and Views on home screen

$
0
0

Hi,

User is system administrator and not able to export the selected record in excel  from the advanced find.

Export to excel button is disabled for selected record on Advanced Find  and Views on home screen with CRM/D365 V9.x. Is it a new feature in D365 V9.0 or is it bug?

Kind Regards,

Neeti Rajgor


Create multiple territories quickly within map itself in Dynamics 365 CRM

$
0
0

Territory Management Dynamics 365

We have always been keen on making it easier for Sales Managers to manage territories for their salesperson. Previously, we introduced the concept of creating Geographies, which helps users to define created territories geographically. With the help of Territory assignment workflow, users are able to assign territories to records within the Microsoft Dynamics CRM based on their existence in respective geographical regions as per their geocoding. Sales managers can assign these created territories to their field sales team in order to distribute the responsibilities of sales opportunities.

With the latest release of October 2018, we have added a whole new section of Territory management into Detail map. We have enhanced Territory management to make the Territory mapping process much easier and precise. We have added a few more enhancements, where user can now view required regions on map and create territories out of those regions right through the map. With geographical view, managers can easily analyse the regions and create multiple territories within a short timeframe through single screen on the Detail map.

Let’s understand this with an example. Let’s say, we have Anna as the Sales manager of her organization. Anna is responsible for handling her Sales Team so as to meet sales target for financial year. She now needs to create territories and assign them to the respective Sales persons as per their efficiency to develop sales opportunities available and increase the sales conversion. She can follow the steps mentioned below to access Territory management section and start creating territories.

Go to Detail map > More Options > Territory Management

Dynamics CRM Territory Management

In order to create territories, Anna should be able to view all regions, analyse them and decide which regions to create the territories for. To plot the required regions, she has 4 options available:

  • By File
  • By Region
  • By Drawing
  • By Territory

By File

With the help of this option, Anna can plot Shape files and Excel files that store geographical information and attributes of geographic features. Plotting files will help Anna to view all the required geographic regions together on map, which makes it easier to understand, analyze and create territories. Based on regions with potential customers, Anna can select some of the regions and create new territories out of them. To proceed, we introduce the ‘Territory Alignment Tool’.

Dynamics CRM Territory Management

Using Territory alignment tool user can select regions, deselect all, select multiple regions or delete regions respectively.

Now Anna can easily use the Territory alignment tool to select some region(s) and create a new territory for the same.

Dynamics CRM Territory Management

She can either create a new territory for the selected region or add it to an existing territory.

Dynamics CRM Territory Management

The data of the files plotted on map will also be visible in view grid in the map. Anna can also deselect some records from view grid to remove the respective regions which are not required and directly click on ‘Create territory’ button to create a territory with plotted regions as its geographies.

Dynamics CRM Territory Management

By Region

The second option Anna has, is ‘By region.’ Just like plot functions in Detail map, Anna can search for regions on map by City, State, County, Country, PostalCode, PostCode Sector, PostCode (Outward Code), PostalCode Area. This option is really useful as Anna also needs to use regional boundaries like postal codes, counties etc. to create territories for her field sales team. Using this option, Anna can easily plot required regions and select some of them with the help of Alignment tool to create a territory for the same.

Dynamics CRM Territory Management

By Drawing

Let’s say Anna had created a Territory for Madison County in New York which is shown by Green color in the screenshot below. Now she needs to add some region that can’t be defined by a specific boundary, to this Madison County territory. To achieve this, she can easily use the redesigned Drawing toolbar to create shapes on map for required regions and add these regions to Madison County.

Dynamics CRM Territory Management

Dynamics CRM Territory Management

With the three options mentioned above, Anna has ease to choose any of the options to plot required regions/shapes on map, analyze them and create territories out of them right through the map. Without switching to any other screen, she has options to create multiple territories and even make changes in the same, right from Detail map.

Now that Anna has created territories, she can now align them in order to get a balanced territory distribution. To achieve this she has a fourth option ‘By territory.’

By Territory

This option will help Anna to plot existing territories on map. With existing territories plotted on map, Anna can compare and analyze territories. This will help her to understand areas covered by existing territories and which of them to align, in order to achieve the right territory distribution. With the help of Territory Alignment Tool, she has options to Move or Copy some of the geography(ies) of one or more territories to another territory. This way she can align territories so as to create appropriate territories that could be assigned to the sales team based on areas they need to focus.

This was our latest enhancement in regards to creating territories right through the Detail map. User can further align these created territories with our Alignment tool. They can update the territories by removing some part of it or add some regions to increase the area of the territory. Look out for our next post where we will discuss on the alignment capabilities of Territory management in Maplytics, stay tuned!

Enhance your Territory management process with the Advanced Territory Management within Maplytics. Start your free trial on your Dynamics 365 CRM today. Click here to download Maplytics solution for your Dynamics CRM version. Don’t forget to leave your comments and feedback in the comment box below, we are eagerly waiting!

Happy Mapping!

Create system views by using App Designer in Dynamics 365 CRM

$
0
0

In Dynamics 365, Microsoft has introduced App Designer where we can create different apps based on security roles where we can controls which entities, dashboards different people in an organization can see. As we all know, Dynamics 365 v9.0 came with Unified Interface, which provides the same user interface in all devices.

In this blog, we will see how we can create system views while creating the Apps by using App Designer.

To create a view follow the steps mentioned below:

1. Go to Settings > Customizations > Customize the System > Click on the Model-driven apps from the components and the required Hub in which we want to create views.

2. Click on the view of required entity in the Entity view section in app designer as shown in the below screenshot.

Create a system views by using App Designer in Dynamics 365 CRM

3. Click on the create new and it will open the window as below:

Create a system views by using App Designer in Dynamics 365 CRM

4. To define columns we can select it from the primary entity and also from a related entity.

Create a system views by using App Designer in Dynamics 365 CRM

5. Click on the Column Attributes to select fields of primary entity i.e Account to view in column. It will open the list of columns as shown below:

Create a system views by using App Designer in Dynamics 365 CRM

Here, we can search for the particular field and double click on that field or can drag and drop the field to the column section. If we want to change the order of the columns, we can simply drag the column in order which we want to be.

Create a system views by using App Designer in Dynamics 365 CRM

6. We can set the primary or secondary sort order to the column as below:

Create a system views by using App Designer in Dynamics 365 CRM

If you remove the column you selected for the primary sort order, then the column you selected for the secondary sort order becomes the primary.

7. We can also set the width of the particular column. For the same, select the required column and it will open the properties section where we can set the width for the column, can add the web resources and it also shows the data type of the field for the details as shown in the below screenshot.

Create a system views by using App Designer in Dynamics 365 CRM

8. To add the filters into view click on the filter criteria section, it will allow us to add the criteria as below:

Create a system views by using App Designer in Dynamics 365 CRM

9. As we are creating the view to shows Account records which are created by logged in user and created in this current month, we are adding criteria as below:

Create a system views by using App Designer in Dynamics 365 CRM

10. Then select the rows which are added and choose the condition as below:

Create a system views by using App Designer in Dynamics 365 CRM

11. Once we have completed with view creation then click on save button on the top right corner and your view is ready.

Conclusion:

Using the simple steps above user can easily create system views by using App Designer in Dynamics 365

Resource Reconciliation in Project Service Automation

$
0
0

Introduction:

With the release of Dynamics 365 v9.0 Project Service Automation has become more powerful in terms of project management capabilities, PSA version 3 has a new feature added called “Reconciliation View” which is available on Unified Interface.

In this blog, we will explore the new feature of reconciliation view of PSA and its resource scheduling capabilities in brief. Before moving ahead, let’s understand the use of Reconciliation view.

For any project, it is very important to manage the project team members efficiently, means resource booking and their dedicated task assignments should be perfectly aligned.

Ideally, the project manager should be able to align the resource booking as per the task assignments they have for them, which will help the resource to complete the task in time. But if you see the reality, it is very difficult to do so, as in entire project life cycle resource booking changes many times based on the resource availability and also, project task assignment fluctuates based on the project priority/deadlines.

In PSA, there is a tab on the project entity called Resource Reconciliation view to help project manager to be able to reconcile the team member bookings and their task assignments for their project team.

You can navigate to Reconciliation view for a project by clicking on the Resource Reconciliation tab on the project entity as shown below:

Resource reconciliation in Project Service Automation

The Resource Reconciliation view shows team member, their bookings and task assignments. Each cell represents the hours which shows time phases for months, weeks or days.

Resource reconciliation in Project Service Automation

As shown in the above screenshot, there are multiple timescale controls are available. Like Month, Week or Day.

Note: The Resource Reconciliation view uses “Week” timescale control as the default.

Resource reconciliation in Project Service Automation

You can use the calendar control to move forward and backward to change the view as per need, also at leftmost there is expander control available for each resource which will show the details of booking or assignment per resource. Please find the highlighted part above.

If you look closely, then there are two types of colors/shades which refer two below conditions:

Booking Shortage:

  • This condition occurs when there is shortage of booking for particular resource (that means task assignments are more as compared to resource availability)
  • Project manager can take corrective action here and can extend the resource booking to aligned booking and assignments properly

Excess Bookings:

  • This condition occurs when there is an excess of booking for particular resource (that resource availability are more as compare to task assignments)
  • Project manager can take corrective action here and can cancel the resource booking to aligned booking and assignments properly

When you have a situation where you have task assignments in hand without any resource booking (i.e. Booking Shortage) then you can click the Extend Booking button from context menu as shown below:

Resource reconciliation in Project Service Automation

This will bring up a window where you can see the booking needed for resource’s shortage along with their bookings requirement.

Conclusion:

Resource Reconciliation is a useful feature of PSA, which gives the better insight into how much time a team member has been scheduled for the project. And help project manager to take corrective action by judging the booking and task assignments alignment.

To find out more about how we can help you get the most out of your Dynamics 365 for Project Service Automation, write to us on crm@inogic.com today!

Resolved – Error when user trying to open Activities in UCI of Microsoft D365 v9.0

$
0
0

Introduction:

Microsoft has introduced UCI in v9.0 and above version. While exploring UCI, we noticed one of the user in system getting error, when user trying open Activities in UCI App.

This blog will help you to fix this issue and user will be able to open “Activities” in UCI app.

Below is the error which was face by user:

Error when user trying to open Activities in UCI of Microsoft D365

Something has gone wrong. Check technical details for more details.

 Session Id: f945f12b-049d-46cc-9347-1afed574c5c0

 Activity Id: 07432b57-7b90-4247-b44b-5dea73e1c905

 Timestamp: Mon Oct 29 2018 15:14:47 GMT+0530 (India Standard Time)

null is not a valid Guid value.

Error: null is not a valid Guid value. at new

e(https://xxxxxx.crm.dynamics.com/uclient/scripts/app.js?v=1.3.602-181003-215107:1261:301) at ye 
(https://xxxxxx.crm.dynamics.com/uclient/scripts/gridpage.js?v=1.3.602-181003-215107:10:8084) at U
(https://xxxxxx.crm.dynamics.com/uclient/scripts/gridpage.js?v=1.3.602-181003-215107:6:6754) at V
(https://xxxxxx.crm.dynamics.com/uclient/scripts/gridpage.js?v=1.3.602-181003-215107:6:6849) 
at https://xxxxxx.crm.dynamics.com/uclient/scripts/gridpage.js?v=1.3.602-181003-215107:10:7947

Workaround:

Below are the list of options that we tried to resolve this issue:

  • Checked Activities on Web Interface using same users (i.e. for e.g. “ABC”) credentials, but no error occurred when we open activities in Web Interface.
  • Checked security roles of “ABC” user who was unable to open and getting error while accessing Activities in UCI App as well as for testing purpose provided “System Administrator” Role to that user, but even then issue not resolved.
  • Cross checked Security roles with other User “XYZ” who is able to access “Activities” on UCI app and we noticed that User “ABC” also has the same security roles but even then he was getting above issue.

Solution:

After trying multiple options we observed that, Activities which are in Web Interface and had many views but no view was set as Default view(for that particular user who was facing this issue) i.e. not pinned up as shown in below screenshot.

Error when user trying to open Activities in UCI of Microsoft D365

So after logged in with that users credential we Pinned up view (i.e. set “My Activities”) as Default view as shown in below screenshot. Then went to UCI and refresh the page and Activities appeared on the app without throwing any error.

Error when user trying to open Activities in UCI of Microsoft D365

After refreshing the UCI app we were able to open activities using that users credentials who was facing this issue in UCI App earlier. As seen in the below screenshot.

Error when user trying to open Activities in UCI of Microsoft D365

Conclusion:

If there is no view set as “Default View” for Activities or any other entities in that case user may receive above kind of error on UCI app, so solution is set one view as Default View.

google-maps-dynamics-crm-turn-turn-gps-navigation

{Announcing} Attach2Dynamics – Drag, Drop and Manage Dynamics 365 Documents in SharePoint or DropBox – The Windows Explorer Way!

$
0
0

Attach2Dynamics

We have been popularily known as the clicks saving family ;-) .. after Click2Clone (One Click Solution to Clone your Dynamics 365 CRM records) and Click2Export (One Click Solution to Export your Dynamics 365 CRM reports and word templates using workflow). It was time to work on our next assignment to save clicks.

We have been often reading about users complaining on the clicks and time they spend to upload documents to CRM retrieving, managing was another challenge. We have been used to managing documents the Windows Explorer Way. Not just this, users also wanted flexibility and more cloud storage options.

Interesting, right! And that was obviously our next idea for Productivity App for Dynamics 365 CRM. We have been working on this for a while now and are happy to announce that “Attach2Dynamics” is our next new ISV solution that will help CRM users Drag, Drop single/multiple files/folders and manage their Dynamics 365 documents, the windows explorer way in systems like DropBox or SharePoint within their CRM.

Drag Drop and Manage Documents in Share Point or DropBox

Drag Drop and Manage Documents in Share Point or DropBox

Attach2Dynamics currently supports two cloud storages – Dropbox and SharePoint. We are planning to incorporate Support for Azure Blob Storage, One Drive, Box and Google Drive Storages as well in the near future. We will be glad to get your recommendations in case you are using any other cloud storages that you may like us to include in our solution. Also, it supports all types of entities, records, and documents. There is no native integration of Dropbox storage system available within Dynamics 365 CRM.

Let’s have a look at the various features and functionalities that are added to the solution.

Download

In the screen shot above you can see two tabs as SharePoint and DropBox so user has flexibility to choose cloud storage from where they would like to download documents using our solution within Dynamics CRM. Bulk download is also possible for downloading multiple documents in a single instance. This helps the user to save both clicks and time as they don’t need to navigate externally to their required cloud storage. Attach2Dynamics provides a native integration platform for users of various connectors within CRM.

Rename

User now has the option to rename documents (files and folders) by selecting the required document of Dropbox or SharePoint from within Dynamics CRM.

Email

Users can generate the Email with the selected document file as an Email Attachment and send it to the required user.

Copy a Link

Users can simply copy and paste the generated link for the selected document using this option when required to be sent outside the Dynamics CRM.

Create Folder

Users can create folder for both the storage systems using Attach2Dynamics.

Upload

User can upload single as well as multiple files and folders using our solution by choosing the required document storage system. The user gets user-friendly UI to see the list of files uploaded on Dropbox or SharePoint against the current record.

Global Search Tab (Deep Search)

User can deep search for files/folders related to the entered keyword in the search tab and obtain all the documents with the search name in the enlisted file area. Deep search allows you to search for files or folders based on your current path. If you are currently in a “/A.Datum/Sample” path and if there are more folders/files in that path and if you search for something, then it’ll go till the last file and folder and will return results.

Drag and Drop file and folder

User can drag and drop multiple files and folders at one time to Dropbox and SharePoint from Dynamics CRM.

Move Dynamics CRM notes

User can move Dynamics CRM notes attachments to Dropbox or SharePoint. This option is unavailable by default for both Dropbox and SharePoint within the CRM. For the configured entities, this feature will move the notes attached to the enabled connector and after the successful migration of the attachment, it’ll leave a path back in the notes body for the users to know the migrated path.

Document Location

With the help of this option, users can get a suitable path for the SharePoint storage system. In case of SharePoint, there are chances that a record has more than one Document Locations, in that case, it enables CRM user to select the exact location where you want to upload the file.

So its time once again to save those clicks with our Attach2Dynamics. Visit our Website for more about this clicks saving tool :-) or feel free to email us on crm@inogic.com for a Live Demo!

Calculate Age in Dynamics 365 as Number of Years using Microsoft Flow

$
0
0

Introduction:

If we want to calculate the Age in no of years using OOB Birthdate field in CRM we can use multiple ways here in this blog we tried to achieve this functionality using Microsoft Flow.

To calculate Age we have used contact entity, so this flow will trigger once the record is created in MS Flow

  • Click on ‘Create from Blank’ button.
  • You will be redirected to below screen then click on ‘When a record is created’ option which is highlighted in below screenshot.

Calculate Age in Dynamics 365 as Number of Years using Microsoft Flow

  • After this you will be redirected to below screen, Please select Organization Name (Your CRM Organization) and Entity name (In our case we will be using Contact entity)

Calculate Age in Dynamics 365 as Number of Years using Microsoft Flow

  • After this you need to add condition to check if Birthdate field is Empty or Not.

We have used below fetch expression to validate above condition

@empty(triggerBody()?['birthdate'])

Calculate Age in Dynamics 365 as Number of Years using Microsoft Flow

  • If we find Birthdate field empty then we need to Add Action to update the record and set Age field value as ‘Birthdate field is Empty’

To update record use highlighted action as shown in the below screenshot.

Calculate Age in Dynamics 365 as Number of Years using Microsoft Flow

After this you need to select Organization Name and Entity Name once again. Here we need to select one more field i.e. Record Identifier to identify the record which needs to be updated.

Please use below screenshot to set Record identifier.

Calculate Age in Dynamics 365 as Number of Years using Microsoft Flow

Click on Advance Option and write Message in ‘Age’ field which you want to display if ‘Birthdate’ is empty.

Calculate Age in Dynamics 365 as Number of Years using Microsoft Flow

  • Else we need to Add Action to update the record and set Age field value (Age in No of Years) from expression

We have used below expression to calculate the Age

sub(int(formatDateTime(utcNow(),’yyyy’)),int(formatDateTime(triggerBody()?['birthdate'],’yyyy’)))

Calculate Age in Dynamics 365 as Number of Years using Microsoft Flow

Conclusion:

Using the simple steps given above user can calculate the Age in Dynamics 365 CRM as a number of years using Microsoft Flow.

InoLink-QuickBooks-Integration-with-Microsoft-Dynamics-365-Dynamics-CRM

Cannot login to Plugin Registration tool

$
0
0

Hi,

I have downloaded plugin registration tool v9 sdk. When I try to login, it didn't login me and even didn't show any error message. 

https://xxxxxx.crm.dynamics.com/main.aspx

I tried with specifying region "North america" and "Don't know".

Can someone pls help me to sort this out ?


Scheduling Multiple Resource for a Work Order using Crew in Dynamics 365 v9.0

$
0
0

Introduction:

With its every new release, Dynamics 365 CRM never fails to surprise us! This time it has added another powerful feature to it. Now, when a user tries to assign multiple resources for 1 work order, the option to create resource as Crew. Also, two more options added ‘Facility’ and ‘Pool’ in Dynamics CRM 9.1.

In this blog, we will have a walk-through of how a Crew is created, and multiple resources are added in a  Crew. Further, we will also explore that after assigning resources to Crew, how it looks on the Schedule board.

First, we start with how and where you get option to create Crew Resource

Open Filed service app click on 3 dots () -> click on Field Service Settings as shown in the below screenshot.

Scheduling Multiple Resource for a Work Order using Crew in Dynamics 365

Click on “Resource” in ‘Scheduling Settings’ -> click on New in ribbon bar it will open create new BOOKABLE RESOURCE form in the Resource type you will get new option Crew, Facility & Pool as shown in the below screenshot.

Select crew as your resource type give name for your crew and select time zone which specifies the time zone for the resource’s working hours.

Scheduling Multiple Resource for a Work Order using Crew in Dynamics 365

When you create Crew resource you also need to add resource in that crew. To add resource in crew follows the below steps:

  • Go to Field service app >> Click on ( … ) >> Resource Scheduling >> Resources click on new in ribbon bar

Scheduling Multiple Resource for a Work Order using Crew in Dynamics 365

  • Select Resource type as Crew >> Enter Crew name and select Timezone >> click on save
  • After click on save click on Related button >> Related – Details >> click on Resource’s Children as shown in the below screenshot.

Scheduling Multiple Resource for a Work Order using Crew in Dynamics 365

  • Click on Add New Bookable Resource Group

Scheduling Multiple Resource for a Work Order using Crew in Dynamics 365

  • Enter name -> select Parent Resource -> select Child Resource -> From & To date resource available in that crew.

Scheduling Multiple Resource for a Work Order using Crew in Dynamics 365

After add member in Group you can schedule Crew resource for work order. After crew assign to any work order you can view crew resource in split view on schedule board as shown in below screenshot.

Scheduling Multiple Resource for a Work Order using Crew in Dynamics 365

Conclusion:

User can schedule multiple resource for a work order using crew in Dynamics 365 v9.0


Customizing Welcome Page for Dynamics 365 v9.0 in UCI

$
0
0

Introduction:

Microsoft has provided a functionality where for a different app we can display our own custom information in welcome page. This custom welcome page will be displayed in UCI as well as in Mobile app. Welcome page can contain information which can be useful to your users i.e. it can contain links to any video, instructions to use application.

Customizing Welcome Page for Dynamics 365 v9.0 in UCI

To proceed with this open your solution > click on Model-driven Apps and then click on New. This will open window as shown in the below screenshot.

Customizing Welcome Page for Dynamics 365 v9.0 in UCI

As shown in the above screenshot, fill data and check the ‘Choose a welcome page for app‘. This will open a drop-down control as shown in red selected box in below image. Then select your custom web page which you want to display as a welcome page in UCI and Mobile App.

Fill up all details as required for your UCI app as shown in the below screenshot. Save and publish your app.

Customizing Welcome Page for Dynamics 365 v9.0 in UCI

On reloading page, this app will be displayed under Dynamics 365 as shown in below screenshot. On click on this App UCI window will get open which will show a welcome page as shown below.

Showing custom web page in UCI

Showing custom web page in UCI

Conclusion:

User can easily so customized welcome page in Dynamics 365 CRM.

Upload Documents to SharePoint from Resco Mobile App

$
0
0

Introduction:

Resco Mobile app allow user to upload the documents to SharePoint. Users can upload PDF files, Office documents, images, audio/video files etc. to the SharePoint from mobile.

Below options are available for user to upload the documents from mobile app:

  • Signature
  • Capture Picture
  • Choose Picture
  • Select File
  • Record Audio
  • Record Video
  • Use Last Photo Taken
  • Open From

Consider a scenario where user wants to upload the SharePoint documents for particular account from Mobile. Below are the steps need to be follow in order to configure the SharePoint and uploading documents to SharePoint from Resco Mobile App:

1. First step will be configure the SharePoint for CRM.

Please refer https://www.inogic.com/blog/2014/07/server-based-sharepoint-integration-for-microsoft-dynamics-crm/  link to configure SharePoint for D365.

2. Next step is to configure setting for SharePoint for Resco mobile app.

In order to configure setting, we need to open Resco project in “Resco Woodford”. Since we need to upload documents for account entity, navigate to account entity form and add list by clicking “Add List” as shown in the below screenshot.

Upload Documents to SharePoint from Resco Mobile App

This will provide the grid for documents on the account entity form in the Resco mobile app.

Upload Documents to SharePoint from Resco Mobile App

3. While Using the Mobile app for uploading the documents, User need to add SharePoint credentials. For this Navigate to Resco MobileCRM app ->> Setup ->> SharePoint and enter the Username and password.

Upload Documents to SharePoint from Resco Mobile App

4. Now user can add documents to SharePoint for the account from Mobile add by clicking on “+” button from Resco Mobile app.

Upload Documents to SharePoint from Resco Mobile App

Upload Documents to SharePoint from Resco Mobile App

User can upload the document using any of the option mentioned in above screenshot.  Then Sync the app (if in Offline mode) and the documents will be uploaded in the SharePoint.

Upload Documents to SharePoint from Resco Mobile App

Upload Documents to SharePoint from Resco Mobile App

Conclusion:

User can easily upload documents to SharePoint from Resco Mobile App.

Read our blog series on Resco Mobile CRM

Activate plugin is triggering on Update event after V9 upgrade

$
0
0

Hi Experts,

Here is my issue,

I have two plugins registered on quote entity:

1. Plugin 1 triggers using a Calculate button(custom button) -> javascript -> calls save function and updates a field "abc_abc" -> on this field update a plugin is registered and it is called

2. Plguin 2 triggers on Activate button(OOB) of quote -> registered on setstate dynamic entity

They are both working fine when they are on 8.2

After V9 upgrade

if I click calculate somehow for no reason activate plugin is triggering and throwing error.

Tried below:

1. update plugin 2 to setstate message instead of Setstate dynamic entity -> result plugin 1 works but activate never triggers plugin 2

2. Disable plugin 2 -> result plugin 1 works

3. put plugin 2 in setstatedynamic entity -> run into same issue  as stated

Any help appreciated. Thanks

How to create a Work Order from Sale Order

$
0
0

Hi Team

I try to create a WO form SO, but I cannot get it - Could you tell me how to do it in Field Service?

Thanks.

Viewing all 3363 articles
Browse latest View live


<script src="https://jsc.adskeeper.com/r/s/rssing.com.1596347.js" async> </script>