Introduction
There are multiple ways provided in Dynamics CRM SDK to query and read data like
- Using ODATA
- Using FetchXML
- Using Query object
ODATA has a limitation where it can return only 50 records at a time. You can ofcourse query more than that but it would be in batches of 50 records at a time.
Fetch XML queries on the other hand will allow you to read upto 5000 records in one go with the ability to read the next 5000. Since requesting 5000 records at a time may not really be a good idea because of the network resources that would use and potentially slow down or even time out depending on the network speeds, it is always a good idea to read data in small manageable sets of records. Fetch queries when executed return paging cookies when you implement paging and this helps you to implement a system where you would like to read a fixed count of records and provide a next/prev button to access additional records.
Query Records using Fetch
<fetch mapping=”logical” output-format=”xml-platform” version=”1.0″ page=”1″ paging-cookie=”” >
<entity name=”account” >
<attribute name=”name” />
<attribute name=”address1_city” />
<order descending=”false” attribute=”name” />
<filter type=”and” >
<condition attribute=”ownerid” operator=”eq-userid” />
<condition value=”0″ attribute=”statecode” operator=”eq” />
</filter>
<attribute name=”primarycontactid” />
<attribute name=”telephone1″ />
<link-entity visible=”false” name=”contact” link-type=”outer” to=”primarycontactid” from=”contactid” alias=”accountprimarycontactidcontactcontactid” >
<attribute name=”emailaddress1″ />
</link-entity>
<attribute name=”industrycode” />
<attribute name=”donotbulkemail” />
<attribute name=”creditonhold” />
<attribute name=”accountid” />
</entity>
</fetch>
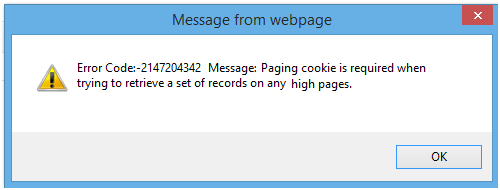
The above code works fine as long as there are less than 5000 records in the system. When the records fetched count went above 5000+ records we started getting following error:
![report]()
So if you notice in our above fetch xml we are providing “paging-cookie” as blank. So once the records retrieved count goes above 5000+ records we started getting the above shown error. For Fetch to bring records above 5000+ it requires paging-cookie to be set in the fetch tag
Setting the Paging Cookie
Where do we find the paging cookie? The answer is fetch response. Whenever we make a fetch request the response which we get back from fetch has paging-cookie in it. We need to extract that paging-cookie from response which we can send to our next page fetch request. In addition to paging-cookie we also get “MoreRecords” which is Boolean which tells us if there are any more records to fetch.
When we are on first page we provide the paging-cookie as blank as the first page doesn’t need a paging-cookie. When the fetch query is executed it brings the page-cookie with it in the resultant response which looks like this:
“<cookie page=\”1\”><name lastnull=\”1\” firstnull=\”1\” /><accountid last=\”{98B36F67-3A21-E511-80FC-C4346BAD2660}\” first=\”{A6B16F67-3A21-E511-80FC-C4346BAD2660}\” /></cookie>”
To get this page-cookie from response we extract it from resultant fetch response as follows:
Var pagecookie = $(resultXml).find(“a\\:PagingCookie”).eq(0)[0].text;
You can find that since we are on first page it returns the page as “1”. Since the fetch is for “Account” entity it returns the first accountid and last accountid for that page in page-cookie. When we request for the next page we provide this page-cookie from first page to the next page fetch query request.
In the same way we can extract “MoreRecords” as follows:
Var moreRecords = $(resultXml).find(“a\\:MoreRecords”).eq(0)[0].text
This returns “true” or “false” which helps us to determine if we reached last page or still there are any records to fetch.
Updated Code
var xmlDocument = parser.parseFromString(fetchxml, “text/xml”);
var fetch = $(xmlDocument).find(‘fetch’);
fetch.attr(‘page’, page);
fetch.attr(‘count’, pageCount);
fetch.attr(‘paging-cookie’, pagingCookie);
In above code we are providing “pagingCookie” variable to which we set the page-cookie which we get from response in fetch attribute along with page and pagecount.
So now when you checkout the fetch query it be as follows :
<fetch count=”250″ mapping=”logical” output-format=”xml-platform” version=”1.0″ page=”18″ paging-cookie=”<cookie page="1"><name lastnull="1" firstnull="1" /><accountid last="{98B36F67-3A21-E511-80FC-C4346BAD2660}" first="{A6B16F67-3A21-E511-80FC-C4346BAD2660}" /></cookie>” /></cookie>”>
<entity name=”account” >
<attribute name=”name” />
<attribute name=”address1_city” />
<order descending=”false” attribute=”name” />
<filter type=”and” >
<condition attribute=”ownerid” operator=”eq-userid” />
<condition value=”0″ attribute=”statecode” operator=”eq” />
</filter>
<attribute name=”primarycontactid” />
<attribute name=”telephone1″ />
<link-entity visible=”false” name=”contact” link-type=”outer” to=”primarycontactid” from=”contactid” alias=”accountprimarycontactidcontactcontactid” >
<attribute name=”emailaddress1″ />
</link-entity>
<attribute name=”industrycode” />
<attribute name=”donotbulkemail” />
<attribute name=”creditonhold” />
<attribute name=”accountid” />
</entity>
</fetch>
Note:
Make sure to encode the fetchxml request to cover for any special characters in the data. Let us explain with an example, for one of the result sets of the above fetch we found the paging-cookie received a special character – single quote (‘) in one of the records name field. This field was referenced in the paging-cookie.
Example:
“<cookie page=\”2\”><fullname last=\”Susan’s Burk (sample)\” first=\”Rene Valdes (sample)\” /><contactid last=\”{349DB5FF-DA1B-E511-80F1-C4346BACD1A8}\” first=\”{2E9DB5FF-DA1B-E511-80F1-C4346BACD1A8}\” /></cookie>”
In above example you can see that the fullname last=\”Susan’s Burk (sample)\” has (‘s). This (‘) used to break the fetchxml and hence started throwing “Page Cookie Malformed” exception when trying to execute fetchxml request.
To resolve this you need to encode the paging-cookie before it is insert in the fetch xml.
Traversing backwards
Using the paging-cookie you can traverse forward to the next set of results. But if you want to implement the previous button or you want to allow navigation to a specific page, you need to make sure you store the paging-cookie received for each of the pages.
To deal with this you can save the page-cookie for example in the array for the pages which you move forward and use this later to get the page-cookie for that particular page when moving backward in paging.
Conclusion
Using Paging-cookies effectively, you can implement paging without actually retrieving all the records at one-go. Query records only when requested and display for better performance results.
There's much more, for more Dynamics CRM Tips and Tricks head on to Inogic Blog. If you have any questions on Dynamics CRM or need any help in implementation, customization, upgradation of Dynamics CRM or are looking to get more out of your CRM, feel free to reach us at crm@inogic.com today!
The post Querying More than 5000 records in Dynamics CRM appeared first on Inogic Blog.