But i want to do for all my entities. But i have faced a problem. My SharePoint Integration with Dynamics is based on account entity. My folders in SharePoint follow this struture: Account_AccountId -> Entity -> Entity registers -> files. For example: test_1241/incidents/case1/ and i don't know how to do this with flow. A need to put the attcaments of account in the folder account, of contacts in the folder contacts....
wondering if I can get distinct group IDs using the same fetchXml by using some filter or otherwise have to write a separate query to get distinct groups?
Can you Copy or duplicate a quote made in CRM, so the second version can have one or two changes made to it, with the rest remaining the same, to result in two quotes, one slightly different, so I dont have to rebuild a 40 line item quote.
I am trying to find a way for our users to be able to clone a Quote record that has custom Applied Discounts and custom Quote Product child records associated to it.
I have no scripting knowledge. Is there an OOB workaround? Maybe using a workflow? If so, how would you build the workflow?
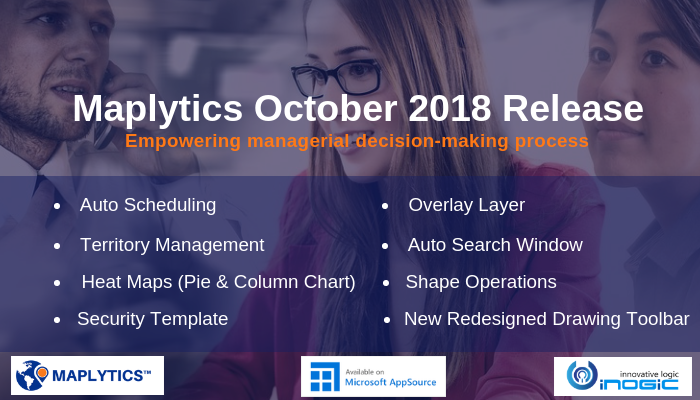
With the vision of empowering managerial abilities, Maplytics October 2018 Release has been an epitome of success! Our heartiest appreciation goes out to you, our Partners and Maplytics users who have been our constant companion all along the mapping journey.
To have a wonderful interactive session and get to know you better, we are conducting a webinar especially for you, our Maplytics users, Partners and peers. It will be an exciting session that will give you insight in what the recent release aspires to do.
With October release, we have tried to incorporate features that further strengthen the locational intelligence power of our productivity tool within Dynamics 365 CRM. Maplytics now enhances the analytical power of managers and takes their decision making ability miles ahead. Managers are now in a position to make powerful analysis of their Dynamics 365 CRM data, moderate the access level of users, and strategize an automated work schedule for field reps.
As Sales, Marketing and Service are the significant pillars of a business process, we have focused on all these modules dedicatedly to ensure none of the customer satisfaction metrics go unattended using Maplytics.
In this webinar there will be a walkthrough of the latest and enhanced features of Maplytics like:
Plan an automated schedule for field professionals using ‘Auto Scheduling.’
Create and align territories to achieve balanced distribution of Sales Territories using ‘Territory Management.’
Visualize shape files, territories along with the data on map as a layer using the feature of ‘Overlay.’
Make comparative analysis of data using ‘Pie Chart’ and ‘Column Chart’ graphs in new and improved ‘Heat Maps.’
Microsoft Flow has definitely leveraged the capabilities of Dynamics 365 to a next level and with the long list of connectors, it provides seamless integration across various different digital ecosystems.
In this blog we are going to discuss a workaround to retrieve records linked to each other via many to many relationship in Dynamics 365.
Currently, flow provides the capability to retrieve records linked to each other via One to Many relationship by using expand property but when we used the expand property to retrieve records linked to each other via Many to Many relationship, it didn’t provided the expected response. As a workaround we have to pull the records via a link entity (An intermediate entity that holds record of relationship between two different entities).
For our reference we would take the example of Marketing list and Contact records as they are linked to each other via Many to Many (N:N) relationship. We would perform some operation on list related contact records.
Following are the steps to achieve the above described objective:
Image may be NSFW. Clik here to view.
In the above image you can see that we have used the link entity named “listmembers” which holds the link between contacts and marketing list, this listmembers entity is not available by default but you can access it by selecting Enter custom value from the Entity Name dropdown and then write it manually in the Entity Name text field.
In order to filter the relevant records we have used a filter query that makes sure that only rows that contain link between the list and contact with the provided guid are retrieved and nothing else should be retrieved so we have used _listid_value eq <guid>.
Once we get the list of link entity records then we will use an apply to each to retrieve contacts from Dynamics CRM one by one and we can perform any further operation after the retrieve contact records(list record step).
Listmembers – It is the name of our link entity(may differ depending on your related entities)
_listid_value – It represents listid of Marketing list in link entity record
Entity(field name) – It represents contactid in link entity record
Note: The guid of the _list_value may differ as per your requirement. Also the unique identifier for the contactid is a parameter named Entity from the retrieved list which may also differ depending on the link entity.
Conclusion:
Using above steps user can retrieve records linked to each other via many to many relationship in Dynamics 365 using Microsoft Flow.
Angular, a TypeScript based framework that helps to build applications that work across all the platforms. We thought of writing a blog to help the developers of Dynamics community to build Angular Application as an HTML web resource in Dynamics 365 and further help them to set up a development process that speeds up the development.
What version of Angular we are talking about?
When you see the word “Angular” then you are looking at the latest version of Angular which is based on TypeScript and when you see the word “AngularJS” then you are in the older version of Angular which is a JavaScript library.
Here we are talking about Angular 4/6/7 the latest version of Angular at the time of writing this blog.
When to consider building of Angular application in Dynamics 365?
Before commencing the development or customization in Dynamics 365 CE it is important to understand which option is suitable for particular requirement.
If your requirement requires development of HTML application then you can consider Angular framework as an option. Angular is not for Form scripting, Ribbon button scripting it can be considered when you have HTML page development.
Let’s start with basic “Hello World” application. You can learn more about how to get started with Angular from here.
Prerequisites: Before you begin make sure your development environment has the following installed,
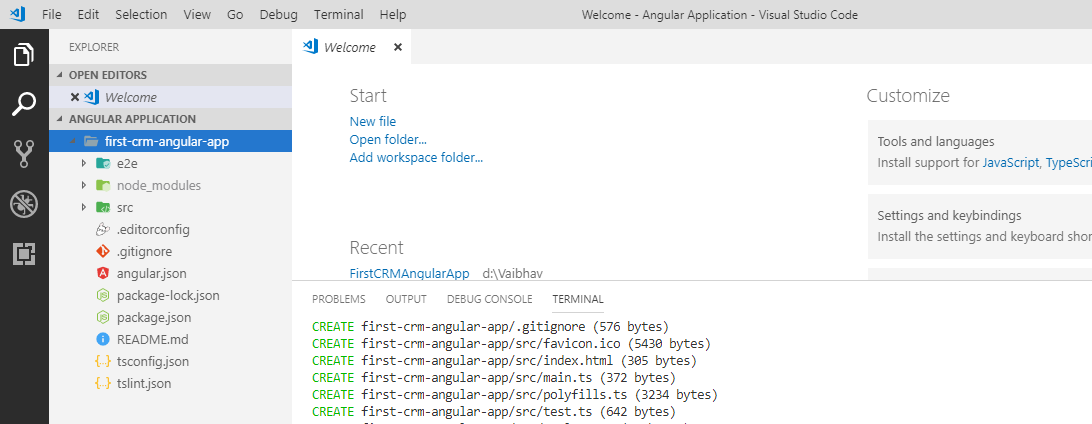
Step 1: Create working project directory and create Angular project
Create a folder where your Angular application source code will reside. In our case, we have created a folder in my local drive with named as “Angular Application”.
Open Visual Studio Code tool and open the created folder. Open a terminal by clicking on “Terminal” + “New Terminal” from top navbar.
Run the Angular CLI command ‘ng new’ and provide the name of your project as shown below,
ng new first-crm-angular-app
Image may be NSFW. Clik here to view.
This will create a sample Angular application which we will use as a starting point of our development.
Image may be NSFW. Clik here to view.
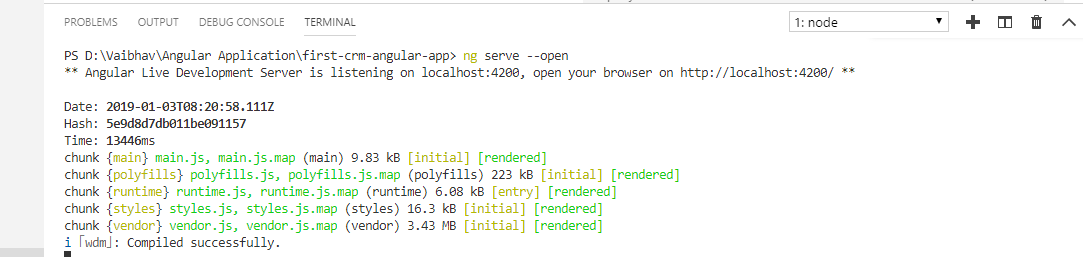
Step 2: Run the application on local host
Go to the project folder by using ‘cd’ as shown below,
cd first-crm-angular-app
Run ‘ng serve –open’ Angular CLI command to run the application in browser on local host.
Image may be NSFW. Clik here to view.
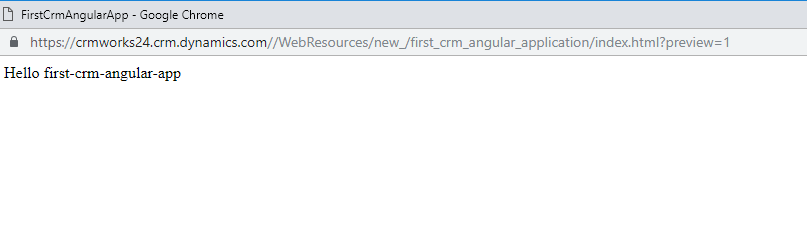
This will open an index.html in your default browser.
Image may be NSFW. Clik here to view.
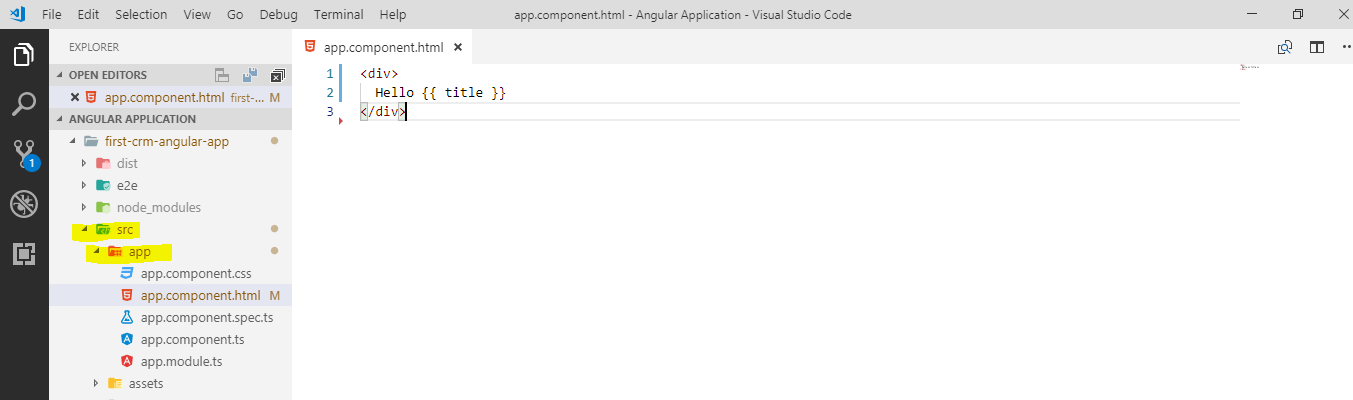
Step 3: Modify the application
In generated sample application you will see ‘app’ folder and you will see the app.module.ts, app.component.ts, app.component.html and app.component.css files. These files are referring to the Root component of your Angular application.
Open app.component.html and replace existing HTML code with following.
Image may be NSFW. Clik here to view.
As soon as you save the file you will see the changes reflected in the already opened page in the browser. This is pretty cool. Isn’t it?
Image may be NSFW. Clik here to view.
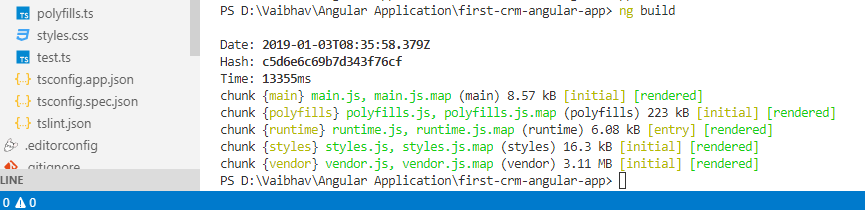
Step 4: Build the application to generate JavaScript files
As we said Angular is based on TypeScript so you write your logic or code in TypeScript. To generate the source code that can be then uploaded to CRM as a web resource you would need to build the project using ‘ng build’ Angular CLI command.
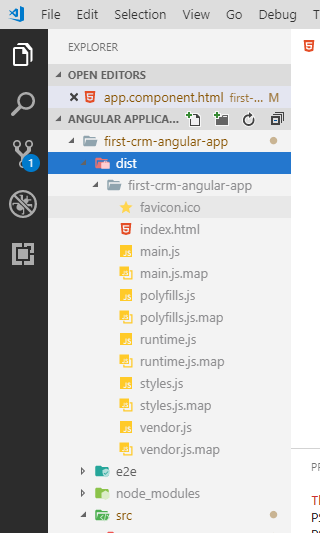
This command creates an indext.html and 5 other JavaScript files (main.js, polyfills.js, runtime.js, vendor.js and styles.js).
Image may be NSFW. Clik here to view.
You can find those files under the “dist” folder.
Image may be NSFW. Clik here to view.
You can change this folder structure where to these files get generated.
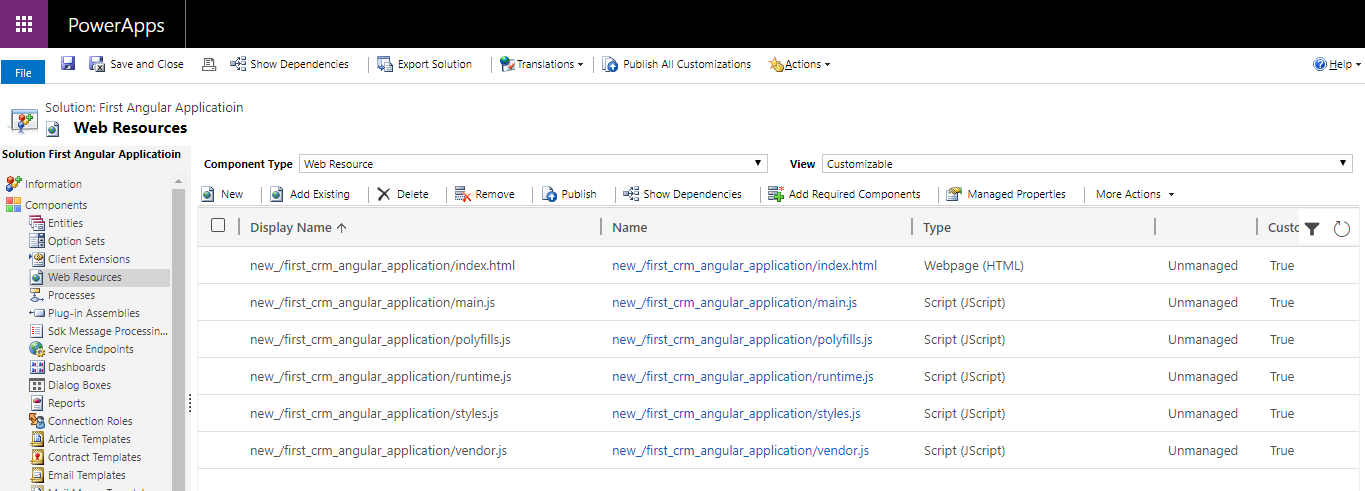
Step 5: Deploy source files in Dynamics 365 as a Web Resources
Now it’s time to run this application from inside Dynamics 365. Upload the aforementioned JavaScript files and index.html in your Dynamics 365 as a web resource. Refer the screenshot below.
Image may be NSFW. Clik here to view.
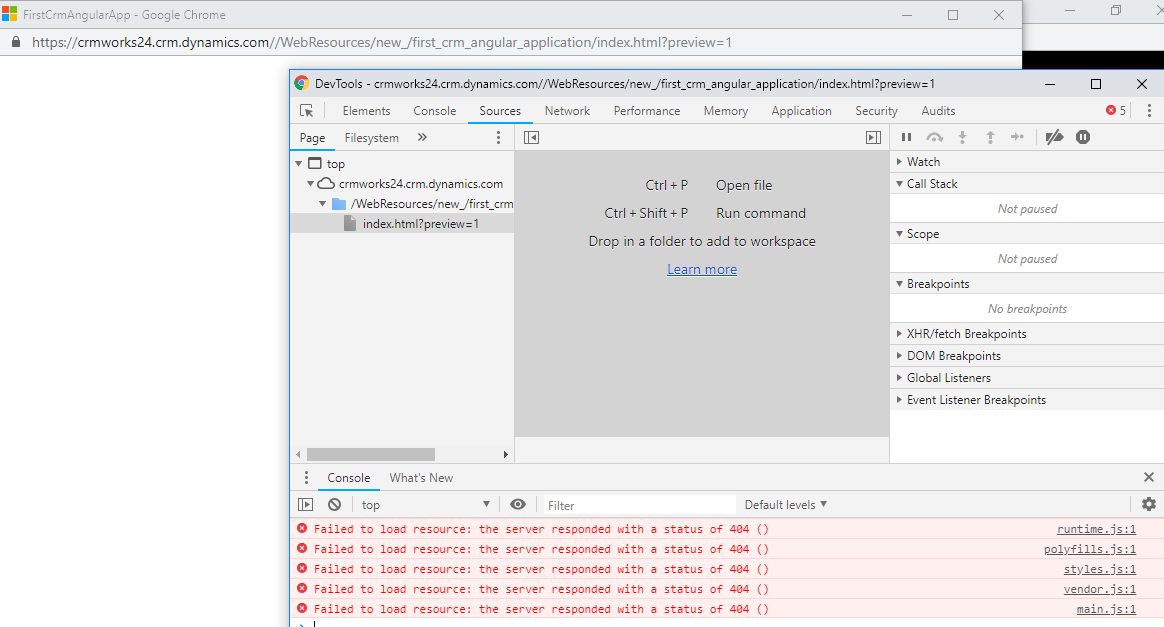
Now open index.html web resource and preview. Oops! What happened? Nothing rendered. If you do F12 you will see Failed to load resource errors.
Image may be NSFW. Clik here to view.
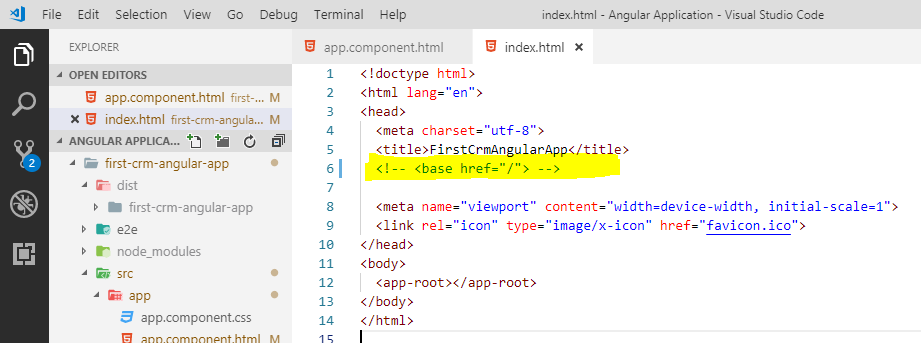
To fix this modify index.html as shown below. Comment the following line “<base href=”/”>”.
Image may be NSFW. Clik here to view.
Build the project again using ng build and upload the main.js in Dynamics 365. This time you will get the correct output.
Image may be NSFW. Clik here to view.
Conclusion:
In this blog we saw how to build Angular Application as an HTML web resource in Dynamics 365. In the next blog, we will see how to build the production release version of angular application and how to use Client API and Web API to perform operations on CRM data.
I created a view (using crm UI) and added phonenumber field (vanila field) but for no reason the values of the field aren't showen on the view.. phonenumber field is connected to skype.... what is the problem ?
But i want to do for all my entities. But i have faced a problem. My SharePoint Integration with Dynamics is based on account entity. My folders in SharePoint follow this struture: Account_AccountId -> Entity -> Entity registers -> files. For example: test_1241/incidents/case1/ and i don't know how to do this with flow. A need to put the attcaments of account in the folder account, of contacts in the folder contacts....
but it seens that didn't work with the PT-BR versions... How can I send my attachments to this plataforms? I'm trying to delevop a Plugin but i don't know how to start...
We are here once again with our new release. Thank you so much to our Partners and Maplytics users for their feedback time and again which helps us to take up new challenges and add strong new features in your favorite Maps integration solution for Dynamics 365 CRM.
In Maplytics March 2018 release, our core focus was to make field service reps life easier where we focused on increasing capabilities of Maplytics for Field Reps with features like along the route search, concentric proximity search, route redirect and many others. After this release, our team immediately started working on the next version and the core focus of this October release is on empowering the Senior Level Executives/Managers.
With this release, we have added some very important features that will enhance the level of analytical and planning power of Managers who are regularly using Maplytics – Maps integration in their Dynamics CRM. Managers will now be able to perform an even more powerful analysis of business data, control the access level of the users and plan an optimized work schedule for their field professionals!
So, here we are, with the new version of Maplytics!
Let’s have a quick summary on Oct 2018 release features;
(For a detailed overview, refer Part 1 and Part 2 of our pre-release blog)
With this release, Managers will be able to plan an optimized schedule for their field professionals. For this, we have added a new feature called ‘Auto scheduling’. They can enter the location, the required start & end timings and the working days and Maplytics will provide optimized routes for each working day along with the date.
Users can now create territories right through the detail map and align them to achieve a proper distribution of sales territories. They can upload a shape file or an excel file to create territories. Users can also search by region on the basis of City, State, Country, etc. or by drawing a shape on the map using the fully custom drawing tool. Now users can also plot their existing territories and perform the alignment. We have provided options of move or copy which allows the Managers to select a geography of the existing territories and move or copy the same into other territories, this is really a helpful feature as it will help you to manage workload of any territory.
Users love the Heat Maps feature in their Dynamics 365 CRM. We have now provided them freedom of choosing different colors for the heat map color scheme rather than using just the standard colors red, yellow and green. Not just this, in this release, we have taken heat map to an advanced level where users can even view their data in form of the Pie charts and Column charts which will allow them to perform advanced analysis on their Dynamics CRM business data.
This new release will allow a robust control to the managers in terms of managing the usage of Maplytics. In this release, we have provided managers with the privilege of providing selective access to the actions to their Maplytics users. With the help of Maplytics security template Managers will now be able to select the required actions and create a template out of it. Later they can add Maplytics users to whom the template has to be assigned. This way Managers can easily provide selective access to actions to their Maplytics users as per the requirement.
Overlay feature will allow you to visualize the shapes that you draw and the Dynamics 365 data as an overlay. Having the ability to visualize Dynamics CRM data that lies outside of the shape as well gives you extra flexibility to work with your data. Sometimes you need to see the data that lies outside the shape or region that you want to analyze. Using Overlay, users will now be able to plot records along with any shape file or territories in the form of layers. The user can also toggle between the layers of the overlay plotted. This will make it even easier to analyze the record spread over the regions of territories and shapes plotted on the map.
Whenever you needed to search records around an individual record, you needed to plot it on the map, set it as a current location and then perform the proximity search. With Maplytics October release, we are introducing Auto Search Window on the records where you can save the search criteria and every time you open the record; it will use that particular search criterion to plot the records around that individual record. You also have the By Region search option available.
New Redesigned Drawing Toolbar
Drawing Tool in Maplytics has always been a powerful feature, and the ability to draw a shape on the map and search records within that shape can prove beneficial in multiple scenarios. In October release, we have enhanced and redesigned the Drawing Tool to provide more freedom and control to the users.
Maplytics always supported drawing multiple shapes on the map but what if you wanted to perform binary operations on the shape like union or difference? With this release, we are bringing the binary shape operations. Now users can perform binary operations like Difference, Intersection, Union, Union Aggregate, and Disjunctive Union.
It’s time to start with this new release today!
Try it on your own Dynamics CRM/365 environment. Download free Maplytics trial today!
In our previous blog, we have seen how to create and deploy a simple hello world Angular application in Dynamics 365. In this blog, we will see how to work with CRM Client API, CRM Web API and how to use JavaScript libraries.
Work with Client API in Angular Application
The first thing that we would need to do is, add the reference of ClientGlobalContext.js.aspx. in index.html. Refer a screenshot below.
Image may be NSFW. Clik here to view.
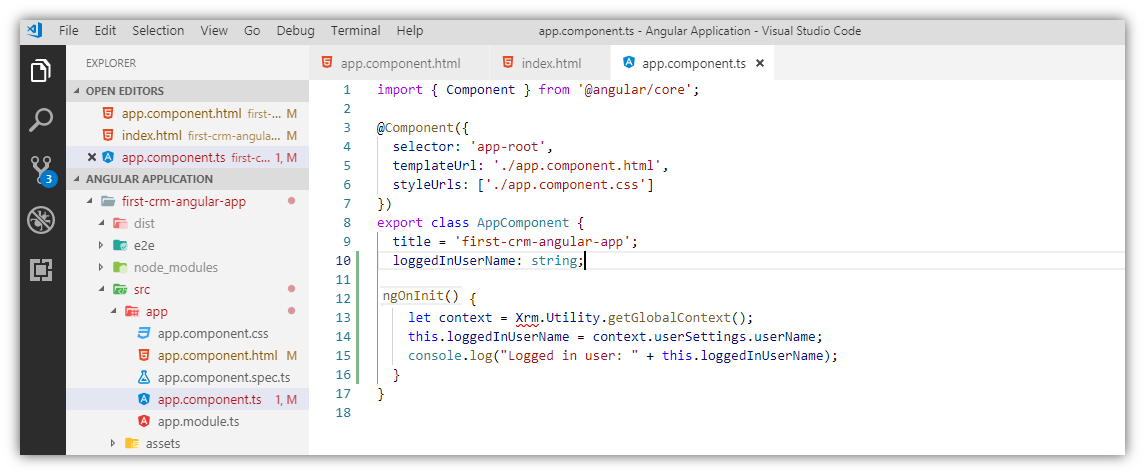
Now let’s use ClientGlobalContext.js.aspx to use some Client API. Open app.component.ts and write a code to get the logged-in user as shown below,
Image may be NSFW. Clik here to view.
When building the application using ng build you will get the below error,
Image may be NSFW. Clik here to view.
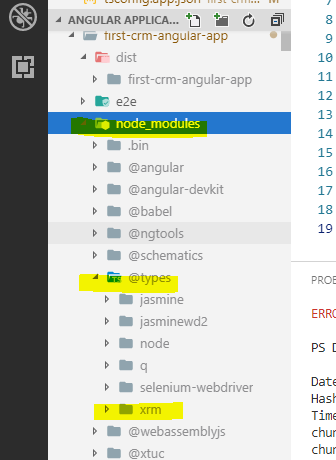
To fix this install @types/xrm. Open terminal and type following command, npm install –save @types/xrm
You will then see the xrm type get added in your node_modules -> @types folder.
Image may be NSFW. Clik here to view.
Add type ‘xrm’ in “types” of tsconfig.app.json file as shown below,
Image may be NSFW. Clik here to view.
Now build the application and update the main.js file in Dynamics 365. This should work now and lets give you the name of logged in user.
So this way you can use Xrm object in Angular application.
Work with CRM Web API in Angular Application
If you are on Dynamics 365 version 9.x and above then you can directly use Xrm.WebApi to perform CRUD operations on CRM data. But if you are on 8.x and below then you would need to add reference of Web API in your Angular Application.
Run “npm install –save-dev xrm-webapi” command in terminal. This will add xrm-webapi in your current project’s node_modules. Refresh the project folder if xrm-webapi folder not showing in the node-modules folder.
Image may be NSFW. Clik here to view.
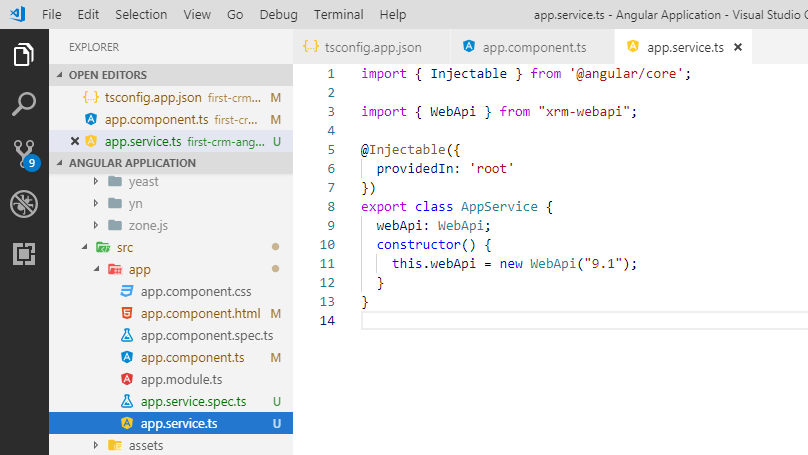
To use this import xrm-webapi in your component or in service of angular application. We recommend to initialize or add the reference of web api in service as it may be reused in several parts of Angular Application.
Below is how I have imported the xrm-webapi in app.service.ts.
//app.service.ts
import { Injectable } from ‘@angular/core’;
import { WebApi } from “xrm-webapi”;
@Injectable({
providedIn: ‘root’
})
export class AppService {
webApi: WebApi;
constructor() {
this.webApi = new WebApi(“9.1”);
}
}
Image may be NSFW. Clik here to view.
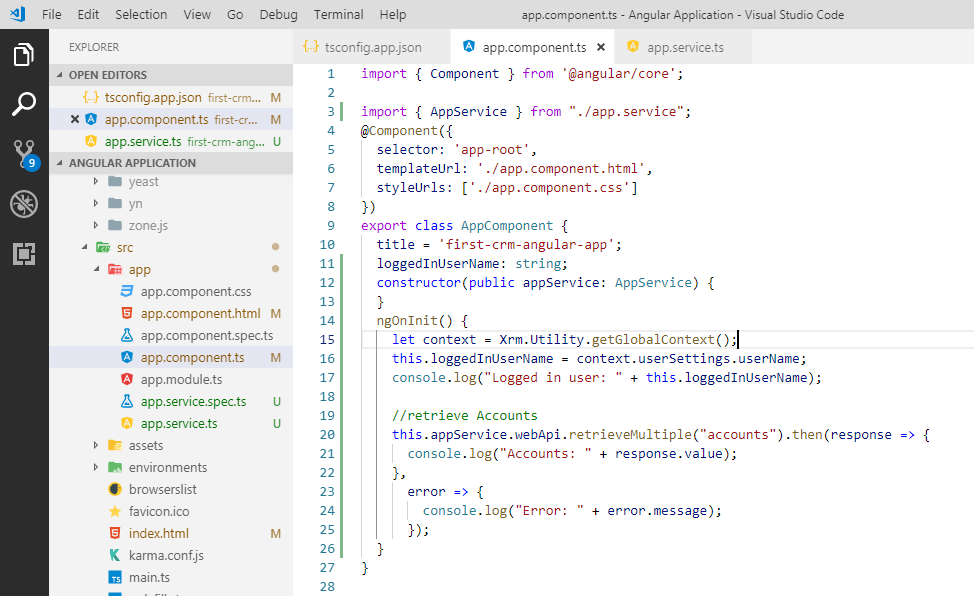
Below is how we have used the functions of xrm-webapi in app.component.ts.
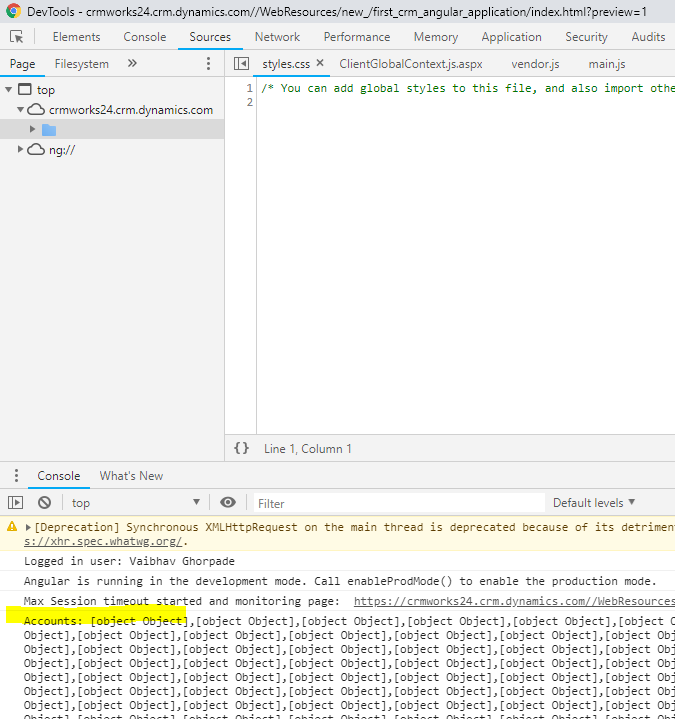
Build application and upload main.js and vendor.js file in Dynamics 365. Refresh the page and check the console. The Web API should work.
Image may be NSFW. Clik here to view.
How to use JavaScript library in Angular Application
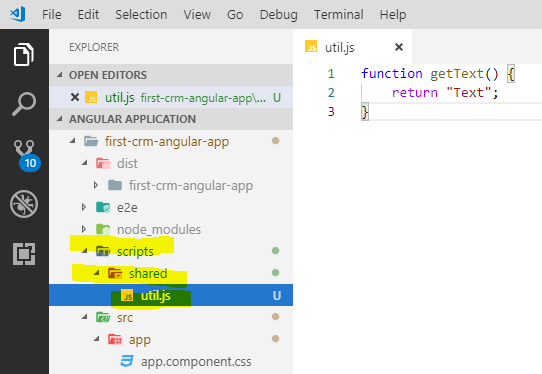
Suppose you have util.js a common JavaScript library in your system and you want to use it in your Angular application. This is also possible, there are several ways to achieve this. Here we will see the one of the way to use a JavaScript library. You would need to add the reference of your JavaScript library in index.html and to able add this reference in index.html you would need to this util.js file in your Angular Application project directory with structure.
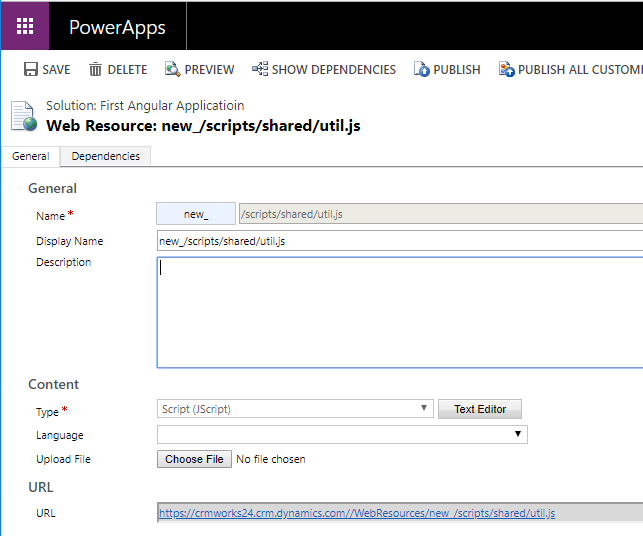
Here is how util.js web resource is created in CRM,
new_scripts/shared/util.js
Image may be NSFW. Clik here to view.
Here is how util.js added into Angular Application,
Image may be NSFW. Clik here to view.
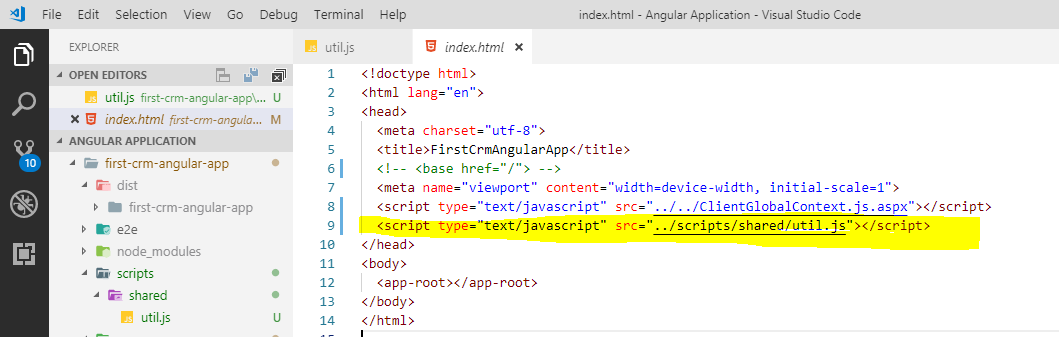
Here is how it being referenced in index.html,
Image may be NSFW. Clik here to view.
Finally, here is how it is being used in component,
//app.component.ts
import { Component } from ‘@angular/core’;
declare function getText(): string;
@Component({
selector: ‘app-root’,
templateUrl: ‘./app.component.html’,
styleUrls: [‘./app.component.css’]
})
export class AppComponent {
title = ‘first-crm-angular-app’;
constructor() {
}
ngOnInit() {
//call JavaScript Library Function
let text = getText();
console.log(“JavaScript Function Result: ” + text);
}
}
Conclusion
In this blog, we have seen how to work with CRM Client API, CRM Web API and how to use JavaScript libraries. In the next blog, we will see the development build and production build and will see how to increase the development speed as every time when we make any changes into our application we need to upload and publish the Web Resources in CRM to see the changes.
I've added a web resource to an account form to display a list of documents for an account. It will display a list of documents an allows me to add or delete documents. It works fine except after the form loads I get the generic error message in a pop-up and after I get an entry in the console log that states:
XML Parsing Error: no root element found Location: my-organization.crm.dynamics.com/.../areas.aspx;oId=E7CCB6FB-AB5A-E711-8106-E0071B66CFB1&oType=1&pagemode=iframe&rof=true&security=852023&tabSet=account_SharepointDocument Line Number 1, Column 1:
I can't find the XML document that is missing the root element. The generic messages refers to a ClientApiWrapper.aspx?ver=363723081 line 157 > eval:1:1, but that seems to be a handler for any error message. I'm not sure how to capture or handle this error which isn't really causing a problem.
In our previous blog, we have seen how to use Client API and CRM Web API in Angular application. We have seen how to build the Angular application and deploy the source files in CRM. In this blog, We will first illustrate what is production build version of Angular application and how to use it and secondly how to speed up the development using Fiddler and Web resource utility tool.
Production build and Development Build:
Angular provides the ability to build our application either for use of development purpose for production purpose. So when you should go with production build and development build?
Development Build: When your development is in progress or your application is not yet ready to use as a production release then you should go with development build. When you run “ng build” Angular CLI command, the Angular CLI generates the development mode source files. The following files get generated using “ng build”
Index.html
Main.js
Runtime.js
Styles.js
Polyfill.js
Vendor.js
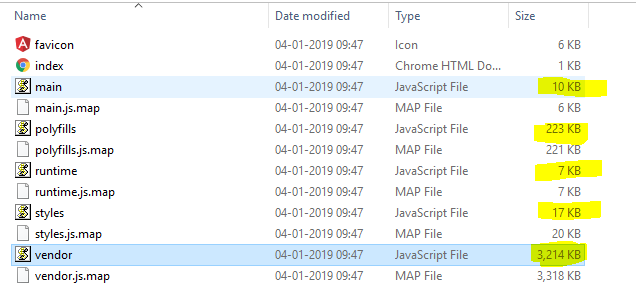
Since it is a development build these files get generated as un-minified version and that allow us to debug the code. Let’s check the size of each file,
Image may be NSFW. Clik here to view.
Production Build: When your development is complete and it is ready to use as a production release and you are not going to debug the code then go ahead and deploy the production version of your angular application in Dynamics 365.
You would need to run“ng build –prod –output-hashing=none” angular CLI command to generate the production source code files.
You will get following files in production build,
Index.html
Main.js
Runtime.js
Polyfills.js
Styles.css
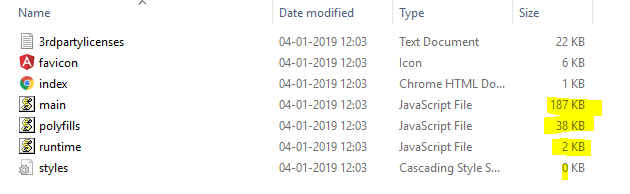
You can see the difference here, the production build omits the vendor.js which was around 3 MB in size. As your application gets evolved the file size get increased and your application may take time to load such files.
Production build files size,
Image may be NSFW. Clik here to view.
Production build generates the minified code and as a result file size get reduce. So when you are ready for production use then upload these files in Dynamics 365.
Speed up the development using Fiddler and Web resource utility tool:
In development process what you generally do, you update the code i.e. HTML file, ts file then build the application using “ng build” command then upload the files in CRM one by one and finally publish the customization to see the changes. For every change, you would need to perform all these actions. So these actions are quite repetitive and time-consuming. We spend more time on uploading and publishing files in CRM and also we spend more time on debugging.
You can save this time by making use of Fiddler and using Web resource utility tool.
Follow this article to learn how to make use of Fiddler in the development of Dynamics 365 web resource. Basically, Fiddler allows us to debug the local files rather than uploading it in Dynamics 365 Customer Engagement and publishing each time.
Secondly, you can save your time by automating the task of uploading and publishing multiple files in CRM. Use CRM’s OOB Web Resource utility tool to automatically upload and publish all selected Web resources in one click. Refer this article to learn about Web Resource utility tool. If this tool is not able to connect to your environment you probably would need to add the following line in the source code of Web Resource utility tool before connection code,
Image may be NSFW. Clik here to view.
If you have experience on XrmToolBox then you can use their plugin to automate the uploading and publishing multiple files in Dynamics 365 Customer Engagement instance.
Conclusion
So if you set up this development process once you will find that your lot of time is saving and you are just focusing on pure development rather than waiting for uploading and publishing files. We recommend having such tools in use in your development process speed up the development.
Microsoft keeps innovating its products and services persistently to keep abreast with the latest technologies, no wonder it is always much ahead of their competitors in the global market since ages. Its tools and products have been catering to diverse functionalities, and are extremely popular among the users. In this blog we are going to focus on an exceptionally classic tool of Microsoft i.e. ‘Power BI’ and show you how we at Inogic can help your business requirement in Power BI with respect to Dynamics 365.
Before we get into details of Power BI, let’s have a recap of how it came into existence. Introduced in 2004, SSRS (SQL Server Reporting System) is a business intelligence system of Microsoft that generates server-based reports. Its prime function is to design, test and deploy reports. SSRS, although a robust tool of Microsoft, requires development skills mandatorily if one has to generate reports or customize any requirement. This is huge a constraint but the robust functionality of SSRS kept its presence intact in the market. It has major advantages other than the installation complexities.
However, the SSRS team at Microsoft realized this intricacy and started working on simplifying its functionality. Thus came the inception of Power BI, a cloud based business analytics tool. It has come in existence only recently but, has taken the market by storm given its interactive nature and compelling visualizations. Power BI is the new era graphic tool that integrates with Dynamics 365 and has already become the preferred tool for reporting.
Let’s delve deep and have an understanding of why Power BI has made groundbreaking revolution in the market. Here are its needs and features.
Need for Power BI:
Interactive tool for laymen users
Now, with the help of Power BI, non-technical business end users can have better insights into their progress. By connecting to Power BI they can see generated reports within Dynamics 365 dashboards. This is an empowering feature which enables any user to create reports within Dynamics 365.
Collection of technical tools
Power BI is a collection of software services, apps and connectors working in unit to organize your unstructured data in form of graphically representative, engaging and potent insights within Dynamics 365. Power BI enables smooth connection to data sources giving the analyzing power to comprehend what’s significant, and what to share with the audience/end user.
Powerful SSBI tool
As the title suggests, Power BI is an extremely powerful Self-Service Business Intelligence tool. Given its cloud-based location, Power BI suffices with just a browser for accessibility. This cloud based SaaS (Software as a Service) is termed as Power BI service. Using this feature within Dynamics 365 you are exposed to a huge capability of accessing the Power BI services.
Easy analysis of Opportunities
With the help of Power BI users can view opportunities on single dashboard within Dynamics 365. With this integration the end-users can easily streamline their sales and take actionable decisions in alignment with their business growth. This not only leverages the business, but also keeps account of future behavior by studying patterns.
Pragmatic Customer Analysis
Within Dynamics 365, there is an insight into Customer Engagement. You can easily analyze this data based on geographies, priority and customer type. This also gives you a major insight into service performance by measuring the number of cases and rate at which issues are resolved. This enables the business user to target the customer and take informed actions.
So, this was an insight into how Power BI is emerging to be the business analytic tool of the age. Its features are of multiple usability that can quench your visualization needs profoundly. Our team of seasoned professionals provide services that cater to your Power BI requirements.
Below are listed few of the many Power BI services we deliver:
Customized dashboards: We build dashboards and reports customized as per your business need. You can view this dashboard or report within Dynamics 365 environment.
Holistic view of business: Our developers create API connections to the varied range of your data sources, empowering you to extract data from significant sources and interconnecting those sources to form a unit within Dynamics 365.
Filtering data: Now, with the advent of Power BI users filter data based on logged in user within Dynamics 365. This has made the task of visualizing data a huge notch efficient.
As you have seen, we know just how to take care of your Power BI needs. Here are the blogs that show advancement in our awareness and services for Power BI.
So chime in, and let us know what Power BI services you require. Our skilled team of professionals will get back to you with the best possible solution and ensure your needs are met by constant requirement analysis. We serve your reporting needs and others with best industry standards.
I created a view (using crm UI) and added phonenumber field (vanila field) but for no reason the values of the field aren't showen on the view.. phonenumber field is connected to skype.... what is the problem ?
I'm relatively new to the world of Dynamics and I'm running into an issue with a project we are currently working on. We are trying to find a better way to store documents. Before I came on, we had been using note attachments. Since that project was setup, there's been a big push toward SharePoint and at the same time our CRM storage is starting to get eaten up.
I have integrated Dynamics with SharePoint and we can now store and access documents saved in Dynamics on SharePoint, which is great. It still leaves us with the project that has saved and is still saving files in Notes. I've looked around Dynamics and Flow to see if there's a way I can move these files attached to Notes into Documents (and therefore, SharePoint) but I have yet to find a way to do that.
It doesn't look like Dynamics has a built in way of doing this. As far as I can see, the easiest way to take care of this only in Dynamics is to literally download the file from the note and upload it in the record's documents.
Flow got me a little closer, but it can't generate a decent entity-based naming scheme (it only allows for the GUID and not the record name string) and it creates a base64 file that can't be worked with.
Let me know if I forgot a piece of information that would be helpful in solving this problem. This is my first post on the forums and I appreciate all the help (on the program and the forum etiquette) that you're able to give me.
Recently, while trying to work on Microsoft Flow to perform some actions from Dynamics CRM on-premise, we discovered that to access on-premise data we needed to create connection with Microsoft flow.
So, in this blog we will show how you can connect your on-premise organization with Microsoft flow.
It is possible to connect Microsoft flow with CRM on-premise with the help of “On-premises data gateway” to perform CRUD operations. By using the data gateway we can create connection with Microsoft Flow via SQL server. Let’s see what are steps needed to be followed for the same.
1. First you need to install the “On-premises data gateway.” Click here to download the same and complete the installation process.
Note: You need to install a gateway on a machine that is in the same network as the SQL server. This machine must be always on and be alwaysconnected to the internet.
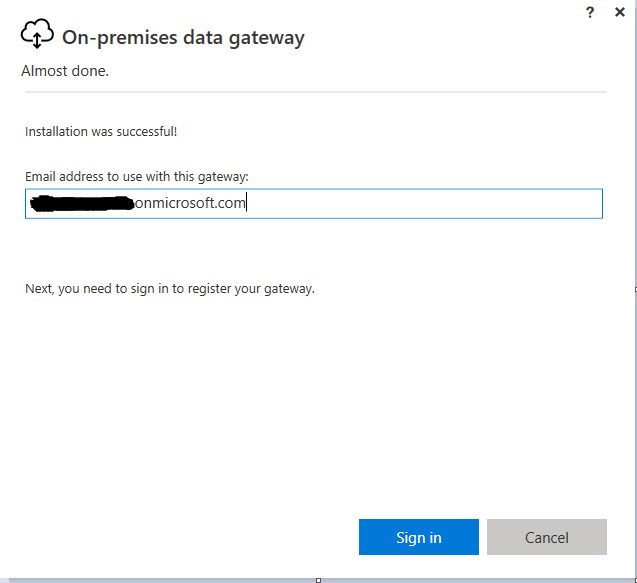
2. Post installation, you need to sign in to register the data gateway. See below screenshot:
Note: For signing in you need to use the same credentials which you are using to sign in to the Microsoft flow.
Image may be NSFW. Clik here to view.
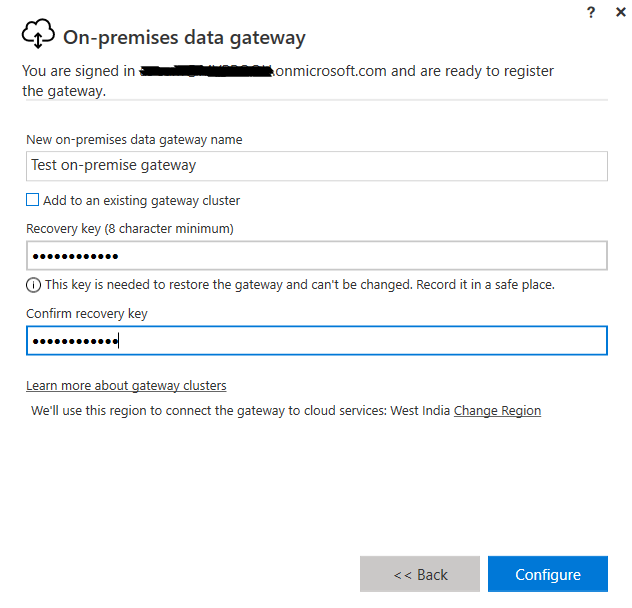
3. Once you sign-in you are ready to register the gateway as shown in screenshot below:
Image may be NSFW. Clik here to view.
In the above screenshot you will see that there are 3 fields:
New on-premises data gateway name: Used to define the name. You can give any name of your choice.
Recovery Key: The recovery key will be needed if you ever need to migrate, restore or take over a gateway. You can enter any value for key.
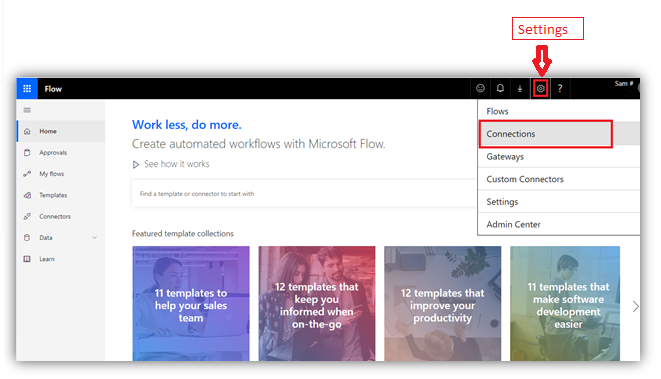
5. Then, click on settings icon on top right corner and select the “Connections” to create the new connection as shown in the below screenshot.
Image may be NSFW. Clik here to view.
6. Click on “New Connection” button on top left corner and select “SQL Server” as shown in below screenshot.
Image may be NSFW. Clik here to view.
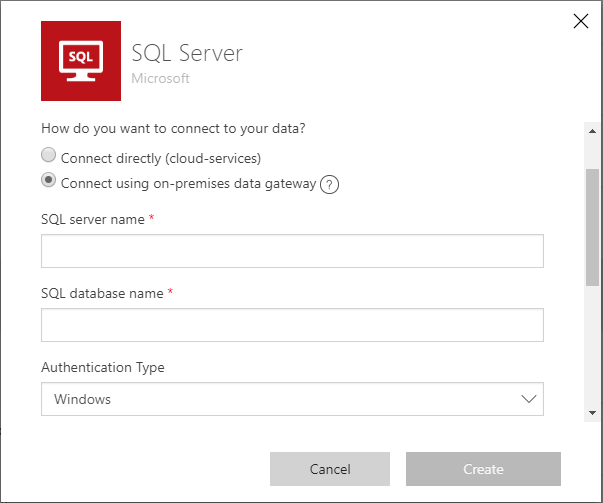
7. On clicking the “SQL server” connections a window will pop up as shown in the below screenshot.
Image may be NSFW. Clik here to view.
8. To connect to on-premises data choose the option “Connect using on-premises data gateway” as shown in the above screenshot.
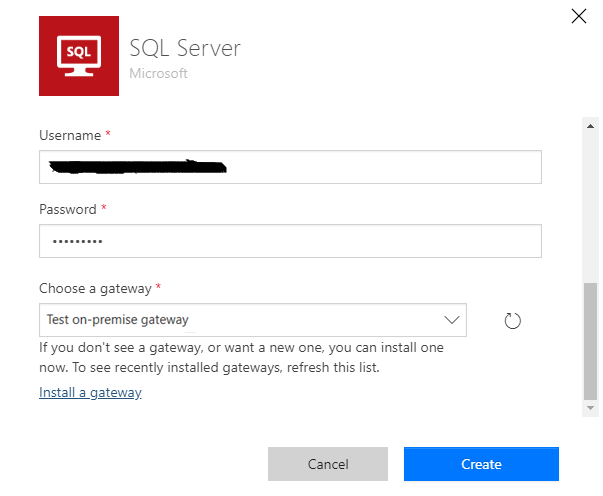
9. Then, fill all the details of SQL server and choose the gateway which we installed as shown in below screenshot and click on “Create” button to create the connection.
Image may be NSFW. Clik here to view.
10. Post successful creation of connection you can use the Microsoft flow for the on-premise organization using the SQL server connectors in the same way we use it for any online CRM.
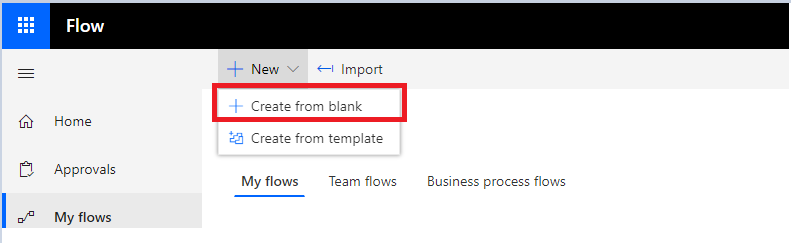
11. We have created one sample flow by using SQL server connectors to show how it works. In the example below, we have created a flow to send an Email whenever a new “Account” record gets added in the integrated SQL database. To accomplish the same we have selected the “Create from blank” option as shown in the below screenshot:
Image may be NSFW. Clik here to view.
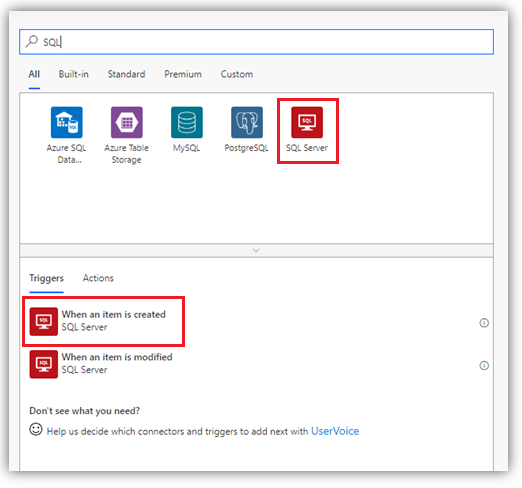
12. Now select the connectors as “SQL server” as shown below:
Image may be NSFW. Clik here to view.13. Here, we want to trigger this flow when new record gets created into the SQL database. So, we are selecting the 1st option i.e. “When an item is created” as can be seen in the above screenshot.
14. Here, we want to trigger this flow when new record gets created into the SQL database. So, we are selecting the 1st option i.e. “When an item is created” as can be seen in the above screenshot.
Image may be NSFW. Clik here to view.
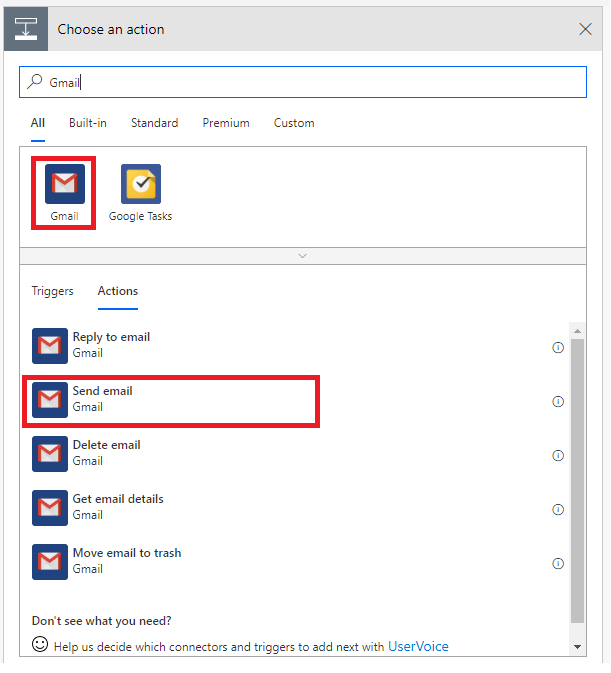
15. Next, select the action as “Send Email“ on Gmail account. Here, we need to sign in to Gmail account.
Image may be NSFW. Clik here to view.
16. Then, fill the necessary fields to be used for sending an email. We can also access the fields from the SQL database and map them in the attributes needed to send an email as shown below:
Image may be NSFW. Clik here to view.
Once we are ready by creating the flow then, just save it and we are good to go.
Conclusion
The On-premises data gateway enables one to use Microsoft Flow with their on premise dynamics CRM organization and thus perform CRUD operations on it.
We have a License from Partner and We have the Setup called Dev, Test and Production. Now i have Installed CRM in Dev Server and now i am trying to Install in Test Server but i am getting the below error. Can anybody please help what is the problem?
I have just configured a trial hosted Custom Portal against my CRM instance.
No matter what I do I simply cannot get an entity list to show up on my pages.
I have done this before on a different instance with the Customer Self Service portal installed and it worked fine.
Is there some sort of bug/issue with the Custom Portal that doesn't allow entity lists to be used? It's pretty useless without this functionality for us as of now.
We didn't bother installing the Customer Portal because we don't need the features it provides out of the box like Case Management etc and we want to start from scratch displaying our own custom entity lists and forms.