Quantcast
Channel: Sam's Activities
Viewing all 3363 articles
Browse latest View live

Dynamics 365 attachments with Flow

$
0
0

Hello, I m using flow to Attachments managemnts for incidents entity..

 I have used this documentation to made the flow -> https://www.inogic.com/blog/2018/05/move-dynamics-365-attachments-to-sharepoint-using-microsoft-flow/

But i want to do for all my entities. But i have faced a problem. My SharePoint Integration with Dynamics is based on account entity. My folders in SharePoint follow this struture: Account_AccountId -> Entity -> Entity registers -> files. For example: test_1241/incidents/case1/ and i don't know how to do this with flow. A need to put the attcaments of account in the folder account, of contacts in the folder contacts....

Thanks


How to send associated documents/attachments (from SharePoint) of a CRM record and send to CRM users in an email

$
0
0

Hi guys!

I am using the latest CRM version online.

Is there a way to attach associated documents/attachments and include it in the email to be sent using plugin/custom workflow? 

Also, pointing the SharePoint URL document location is not an option to the client.

I don't know much about Sharepoint development. Thanks!

Move Note Attachments into Documents or save them to SharePoint?

$
0
0

Hello there!

I'm relatively new to the world of Dynamics and I'm running into an issue with a project we are currently working on. We are trying to find a better way to store documents. Before I came on, we had been using note attachments. Since that project was setup, there's been a big push toward SharePoint and at the same time our CRM storage is starting to get eaten up. 

I have integrated Dynamics with SharePoint and we can now store and access documents saved in Dynamics on SharePoint, which is great. It still leaves us with the project that has saved and is still saving files in Notes. I've looked around Dynamics and Flow to see if there's a way I can move these files attached to Notes into Documents (and therefore, SharePoint) but I have yet to find a way to do that. 

It doesn't look like Dynamics has a built in way of doing this. As far as I can see, the easiest way to take care of this only in Dynamics is to literally download the file from the note and upload it in the record's documents.

Flow got me a little closer, but it can't generate a decent entity-based naming scheme (it only allows for the GUID and not the record name string) and it creates a base64 file that can't be worked with.

Let me know if I forgot a piece of information that would be helpful in solving this problem. This is my first post on the forums and I appreciate all the help (on the program and the forum etiquette) that you're able to give me.

Solution Import issue on Dynamics 365 CRM v9.1

$
0
0

As we all know Microsoft has recently released Dynamics V9.1. After release, most of the customers upgraded on v9.1. When we tried to import the managed solution from dev CRM instance to customer end then we got the below error. The customer CRM version is 9.1.0.30

Solution Import issue on Dynamics 365 CRM

Below is the error exact we got from Downloaded log file.

Form factor code 0 is missing a CustomControl declaration

Solution Import issue on Dynamics 365 CRM

This strange issue, we never encounter this kind of issue before. After some research and play around we found possible cause of this issue.

  1. We have exported the solution from older version of CRM i.e. 9.1.0.35.
  2. The lead which is failing has Editable grid Enable because form factor 0 used Editable grid control.

This issue got resolve when our customers upgraded to 9.1.0.274 and this time same solution imported successfully.

Hope this helps!

-QuickBooks-and-Dynamics-365-Integration

Clone Quote Records in Dynamics CRM Online 2015

$
0
0

I am trying to find a way for our users to be able to clone a Quote record that has custom Applied Discounts and custom Quote Product child records associated to it.

I have no scripting knowledge. Is there an OOB workaround? Maybe using a workflow? If so, how would you build the workflow?

Thanks!

Editable Grid on Case form not working?

$
0
0

Hello,


I can't get editable grids to appear editable on the case entity. Doesn't matter what entity the grid points to - custom entity, activities, child entities, standard entities... Nothing becomes grid-editable.

Editable Grid works on other entities including custom entities, but just not on the Case entity.

Is this working as intended? Known bug?

Dynamics 365 CRM On premise Installation

$
0
0

Dear Team,

We have a License from Partner and We have the Setup called Dev, Test and Production. Now i have Installed CRM in Dev Server and now i am trying to Install in Test Server but i am getting the below error. Can anybody please help what is the problem?

Error Message: "No license exist in MSCRM_CONFIG database" and attached is the screenshot.

5 Significant Ways User Adoption Monitor Helps Augment Your Business within Dynamics 365 CRM

$
0
0

In last few decades technology has evolved at a groundbreaking pace. We can keep in sync with this change in era only by studying and interacting with peers regularly. New software developed at a rapid rate have taken the market by storm as there is a multitude of options to select from. We are gradually beginning to outgrow the traditional methods and are drifting towards the technical aspects of business.

But, as technology is revolutionizing the users have also become smarter. They enroll in training programs and get well-versed with the emerging trends. If they can’t take up sessions, the Customer 2.0 gathers information from Internet. This is a smarter way to learn by being self-reliant. Customer 2.0 has migrated to the more modern ways of implementation.

The ability to adapt to these technologies is termed User Adoption. Powerful CRM systems as Microsoft Dynamics 365 require user adoption to augment the entire business process. It helps improve the Sales force automation, Customer Excellence, Vocational Experience and Data Management. We realized this intricacy and to bridge the gap came up with User Adoption Monitor.

UAM is an easy to use simple but, powerful tool designed to empower the managers to track and monitor the activities of user within Dynamics CRM. It allows tracking user access both On-Premise and Online. Using user adoption monitor manager can gain a close insight into user activity and make strong business decisions.

In our previous blog, we had an overview of the characteristics of User Adoption Monitor. Now, we are going to delve into how UAM within Dynamics 365 allows you to analyze your business needs better:

Low Infrastructure Costs

Native integration of UAM within Dynamics 365 allows monitoring and tracking of users to be done by being device independent. Users can access Dynamics CRM flexibly and adapt to the changes in the system from anywhere instead of waiting for a platform. As in most Online tools, UAM also has no hardware installation required to keep the system updated and maintained, thus saving infrastructure costs.

Visualize Dashboards

Dynamics CRM dashboards enable monitoring sales, viewing overall business opportunities, business processes, and performance. Using UAM there are two ways to configure dashboards, Entity/Action/Period and User/Period. This gives the manager a compelling visual insight into user activity thereby enabling him to assign tasks to them based entirely on competency.

Know your organization

Everyone doesn’t fit the same shoe and so do the users of an organization. User Adoption Monitor ensures that every user within Dynamics 365 is assigned task based on their performance by tracking their activity and timestamp. As this is a fact that howsoever tech savvy one may be it is daunting to learn new technologies within a snap. User Adoption needs time and training which we are going to cover in our next point.

Training Workforce

Microsoft Dynamics 365 is a system that requires early adoption by its users. Without understanding of the aspects of CRM, the users cannot perform to their utmost capacity. UAM helps the managers to track the performance of users and design a training program accordingly. Training can augment the communication between Sales and Marketing team in alignment with their goals. As the learning curve of users improves, so does the user adoption, and thus performance which ultimately helps in building business.

Helps in Implementation

With a CRM system as Microsoft Dynamics 365 there is constant evolution in its UI. This means their needs to be great adaptability in its users to adapt to the rapid changes. The managers can track this change in trend and suggests measures for early user adoption thereby preventing any loss of business.

Thus, we have seen how User Adoption helps in building your business by being proactive. If there is apt adoption to Dynamics 365 it turns out to be a tool of utmost potential thus leveraging your business’s ROI. Our solution User Adoption Monitor will help you achieve this goal with full potency.

Download it from the website or from Microsoft AppSource.

Keep writing to us with your suggested list of features you would like us to incorporate in our solution and our diligent team of Solution Architects will for sure work on it.

To get a demo mail at crm@inogic.com


How to send associated documents/attachments (from SharePoint) of a CRM record and send to CRM users in an email

$
0
0

Hi guys!

I am using the latest CRM version online.

Is there a way to attach associated documents/attachments and include it in the email to be sent using plugin/custom workflow? 

Also, pointing the SharePoint URL document location is not an option to the client.

I don't know much about Sharepoint development. Thanks!

Record name missing from lookup fields in Dynamics 365 Unified Interface

$
0
0

Introduction:

Recently while working, we came across a scenario where the entity name was not seen on the lookup field but only ICON for the entity is seen on UCI.

Record name missing from lookup fields in Dynamics 365 Unified Interface

But the same thing was working correctly in Classic UI.

Record name missing from lookup fields in Dynamics 365 Unified Interface

After some research and play around we found solution to this problem.

Solution:

The view in the lookup was a custom System view with only column in it.

The column selected was not primary field of the entity. So when we added the primary column which was “name” for this entity it started working correctly.

Record name missing from lookup fields in Dynamics 365 Unified Interface

Primary field for the entity “Bank” is “Name”

Record name missing from lookup fields in Dynamics 365 Unified Interface

When the primary field “Name” was added in the custom view “Banks” then the issue was resolved.

Record name missing from lookup fields in Dynamics 365 Unified Interface

Conclusion:

Using the solution above user can add record name missing from the lookup field in Dynamics 365 Unified Interface.

Improve-the-user-adoption-of-Dynamics-365-by-monitoring-user-activity-within-CRM

Save and refresh record entity after finishing dialog process

$
0
0

Hi All, I have created a dialog process, I call it when a button on the ribbon is clicked.
I wanna when dialog has finished its job( the dialog window closed and finished) the record entity save and reload.

Here is the code that run the dialog :

(function() {
Develop1_RibbonCommands_runDialogGrid = function(ids, objectTypeCode, dialogId) {
    if ((ids == null) || (!ids.length)) {
        alert(window.LOCID_ACTION_NOITEMSELECTED);
        return;
    }
    if (ids.length > 1) {
        alert(window.LOCID_GRID_TOO_MANY_RECORDS_IWF);
        return;
    }
    var rundialog = Mscrm.CrmUri.create('/cs/dialog/rundialog.aspx');
    rundialog.get_query()['DialogId'] = dialogId;
    rundialog.get_query()['ObjectId'] = ids[0];
    rundialog.get_query()['EntityName'] = objectTypeCode;
    openStdWin(rundialog,buildWinName(null),615,480,null);
}
Develop1_RibbonCommands_runDialogForm = function(objectTypeCode, dialogId) {
    var primaryEntityId = Xrm.Page.data.entity.getId();
    var rundialog = Mscrm.CrmUri.create('/cs/dialog/rundialog.aspx');
    rundialog.get_query()['DialogId'] = dialogId;
    rundialog.get_query()['ObjectId'] = primaryEntityId;
    rundialog.get_query()['EntityName'] = objectTypeCode;
    var hostWindow = window;
        if (typeof(openStdWin) == 'undefined') {
            hostWindow = window.parent; // Support for Turbo-forms in CRM2015 Update 1
        }
        if (typeof(hostWindow.openStdWin) != 'undefined') {
            hostWindow.openStdWin(rundialog, hostWindow.buildWinName(null), 615, 480, null);
            // window.location.reload(true);
        } 

}
})();

Depending on this source code, how can it be possible?

Create Environment in Common Data Service (CDS)

$
0
0

Introduction

Nowadays as we can see all the application available as APP. Suppose we want our application available through CDS we need to create CDS environment.

In this blog, we will see you how to create CDS environment.

To create CDS environment you have to subscribe for PowerApps. You can use below link to do so.

https://powerapps.microsoft.com/en-us/pricing/

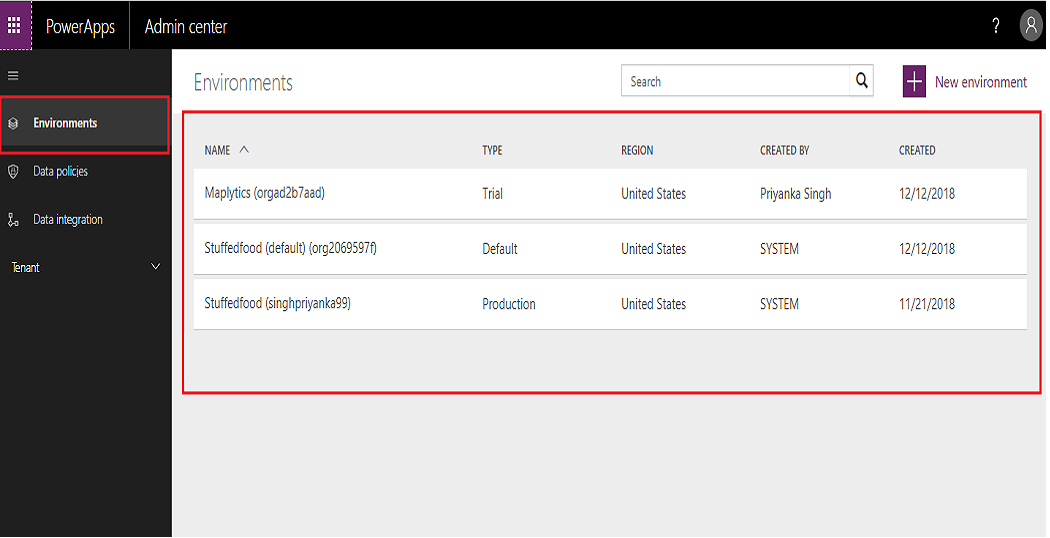
Once you subscribe for PowerApps then go to below link to create the CDS environment.   https://admin.powerapps.com/environments

After you login, following page will show. To create new environment clicks on “New environment” button as highlighted in green below.

Create Environment in Common Data Service

When you click on “New environment” button the following screen will be open in that enter name and clicks on “Create environment” button.

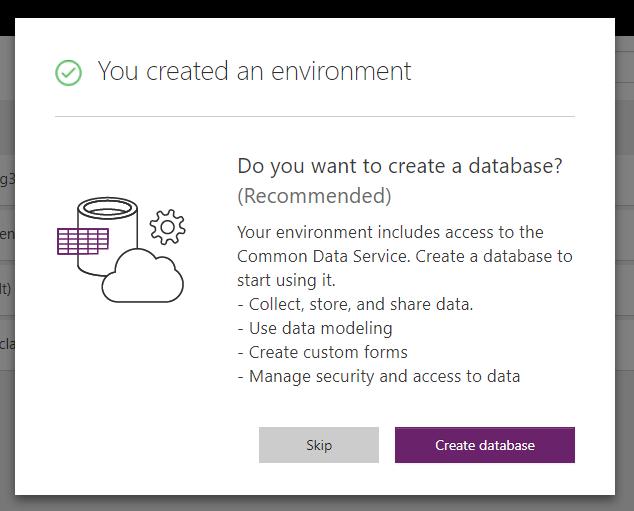
Once new environment created then following screen will be open.

Create Environment in Common Data Service

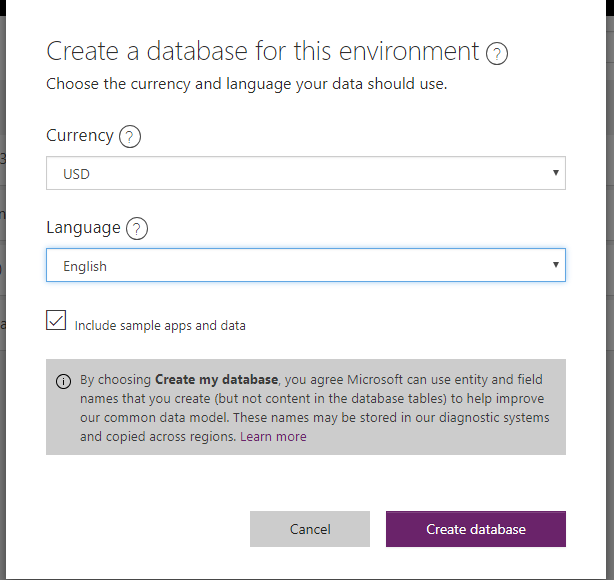
After that click on “Create database” button the following screens will be open in that select currency and language and clicks on “Create database” button.

Create Environment in Common Data Service

Then click on Create database and it will create database in CDS environment.

Create Environment in Common Data Service

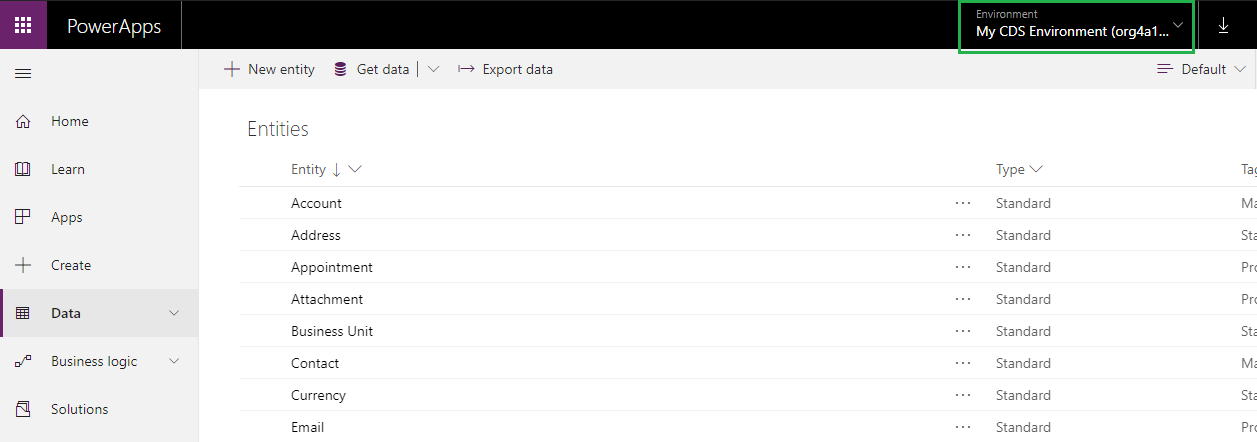
Once CDS environment is created then you can use below link to access it.

https://web.powerapps.com/environments/21019036-35b4-4402-8396-df3f7f41f30d

Create Environment in Common Data Service

By default, some of the entities are created. You can create new entity as well. Here you can create new Apps or write business logic or get the Data from other sources.

You can also import the Dynamics CRM solution as well.

Conclusion:

User can easily create CDS environment using simple steps given in this blog.

Generate-Your-Own-New-Leads-Now-Within-Dynamics-365-CRM-with-Maplytics-11

Show Lookup Dialog in Dynamics 365 v9.0

$
0
0

Introduction:

In Dynamics 365 v9.0 Microsoft introduces new development feature in Dynamics 365 to show lookup dialog using Xrm.Utility.lookupObjects method.

Xrm.Internal.Opendialog is most commonly used method to open dialog where we need to provide URL. But this method is not supported in UCI or mobile app.

So, open a lookup window using JavaScript can be achieved using Xrm.Utility.lookupObjects method.

Parameters for Xrm.Utility.lookupObjects method is as follows:

  • entityTypes: provide list of the entities to be displayed.
  • defaultEntityType: Specify the default entity to be shown in lookup window.
  • defaultViewId: Specify the Guid of default view need to be displayed in lookup dialog.
  • allowMultiSelect: Specify whether want to allow user to select multiple records.
  • viewIds: Provide the list of views that need to be available for lookup dialog.

Consider, an example where we need to open html webresource, on html page there will be a textbox and button to select the contact. When user click on “Select Contact” button, the lookup dialog of contact will gets open which allows user to select contact.

Steps need to follow:

1. We need to create html page with textbox and “Select Contact” button.

<!DOCTYPE html>

<html xmlns=”http://www.w3.org/1999/xhtml”>

<head>

<title></title>

<meta http-equiv=”X-UA-Compatible” content=”IE=11″ />

<style>

.bottomsection {

position: absolute;

float: right;

margin-top: 5%;

right: 10px;

bottom: 5px;

display: inline-block;

background-color: #F8F8F8;

border-top-color: #FFFFFF;

}

</style>

</head>

<body onload=”load();”>

<div style=”text-align:center”>

<h2>Contact Details</h2>

</div>

<div style=”height:50px”></div>

<div>

Please select Contact : <input type=”text” id=”TxtContact” /> <input type=”button” id=”btnContact” value=”Select Contact” />

</div>

<div>

<input type=”button” class=”bottomsection”  name=”Ok” value=”OK” />

</div>

<script src=”new_Jquery.js” type=”text/javascript”></script>

<script src=”ClientGlobalContext.js.aspx”></script>

<script src=”../../../../_static/_controls/lookup/lookup.js”></script>

<script src=”new_ShowContactLookup.js”></script>

<script type=”text/javascript”>

function load() {

this.OnContactSelectClicked();

}

</script>

</body>

</html>

2.  Next write a script for showing lookup dialog using Xrm.Utility.lookupObjects method.

function openWeb()

{

try {

var height = 360;

var width = 600;

//open the generate Work Order dialog

height = height != “undefined” ? height : null;

width = width != “undefined” ? width : null;

if (typeof Xrm != “undefined” && typeof Xrm.Navigation != “undefined” && Xrm.Navigation.openWebResource != “undefined”) {

var windowsOption = { height: height, width: width, openInNewWindow: true };

Xrm.Navigation.openWebResource(“new_ContactDetails.html”, windowsOption, null);

} else if (typeof Xrm != “undefined” && typeof Xrm.Utility != “undefined” && typeof Xrm.Utility.openWebResource != “undefined”) {

Xrm.Utility.openWebResource(“new_ContactDetails.html”, null, width, height);

} else {

return;

}

} catch (e) {

Xrm.Utility.alertDialog(e.message);

}

}

function OnContactSelectClicked()

{

try {

//bind click event of select contact lookup

$(“#btnContact”).click(function (e)

{

showContactLookupDialog();

});

} catch (e) {

Xrm.Utility.alertDialog(e.message);

}

}

function showContactLookupDialog() {

try {

var fetch = “<filter type=’and’><condition attribute=’lastname’ operator=’like’ value=’%a%’ /></filter>”;

var encodedURL = encodeURIComponent(fetch).replace(/’/g, “%22”);

var lookupParameters = {};

//specify the list of entity types to be displayed in lookup dialog

lookupParameters.entityTypes = [“contact”];

//Sepecify the default entityType need to be displayed

lookupParameters.defaultEntityType = “contact”;

//Default view need to be displayed

lookupParameters.defaultViewId = “{00000000-0000-0000-00AA-000010001004}”;

//allow multiple selection or not

lookupParameters.allowMultiSelect = false;

//list multiple views available on lookup dialog

// lookupParameters.viewIds = [“{0D5D377B-5E7C-47B5-BAB1-A5CB8B4AC105}”, “{A2D479C5-53E3-4C69-ADDD-802327E67A0D}”];

lookupParameters.customFilters = [encodedURL];

lookupParameters.customFilterTypes = [“contact”];

Xrm.Utility.lookupObjects(lookupParameters).then(DisplaySelectedContact, null);

} catch (e) {

Xrm.Utility.alertDialog(e.message);

}

}

function DisplaySelectedContact(selectedContact) {

try {

if (selectedContact != undefined &&  selectedContact != null && selectedContact != “”)


$(“#TxtContact”).val(selectedContact[0].name);

} catch (e) {

Xrm.Utility.alertDialog(e.message);

}

}

3. Add ribbon button “Contact Details” on Account form. Add “openWeb” function onclick of the ribbon button.

Show Lookup Dialog in Dynamics 365

4. Now when we click on the contact lookup button it will open the “Contact Details” html page.

Show Lookup Dialog in Dynamics 365

5. This html page consist of a textbox and “Select Contact” button. When user click on the button, lookup dialog with default entity and default view provided in parameters of lookupObjects method gets open.

Show Lookup Dialog in Dynamics 365

6. In UCI or Mobile app it opens the lookup dialog as shown in below screenshot.

Show Lookup Dialog in Dynamics 365

Conclusion:

Using the new feature introduced in Microsoft Dynamics 365 user can show lookup dialog using Xrm.Utility.lookupObjects method.

Microsoft Dynamics CRM and QuickBooks Integration

Cloning Records in Dynamics CRM

$
0
0

 Hello,

What is the best approach to clone records in CRM (specifically quotes and orders and their respective line items)?

I know this can be done by using an ASP.NET page and many other ways.

I also want to open the cloned record to user when the cloning process finishes.

Thanks :)

Is it possible to attach the documents uploaded to the Documents(Sharepoint) in an Email as attachments?

$
0
0

Here's the scenario: 

  1. Open a record.
  2. Upload a file in the Documents(Sharepoint) section of the form.
  3. Send an Email from that record and get the uploaded documents and add it as email attachments.

Is this even possible? Any ideas?


Save and refresh record entity after finishing dialog process

$
0
0

Hi All, I have created a dialog process, I call it when a button on the ribbon is clicked.
I wanna when dialog has finished its job( the dialog window closed and finished) the record entity save and reload.

Here is the code that run the dialog :

(function() {
Develop1_RibbonCommands_runDialogGrid = function(ids, objectTypeCode, dialogId) {
    if ((ids == null) || (!ids.length)) {
        alert(window.LOCID_ACTION_NOITEMSELECTED);
        return;
    }
    if (ids.length > 1) {
        alert(window.LOCID_GRID_TOO_MANY_RECORDS_IWF);
        return;
    }
    var rundialog = Mscrm.CrmUri.create('/cs/dialog/rundialog.aspx');
    rundialog.get_query()['DialogId'] = dialogId;
    rundialog.get_query()['ObjectId'] = ids[0];
    rundialog.get_query()['EntityName'] = objectTypeCode;
    openStdWin(rundialog,buildWinName(null),615,480,null);
}
Develop1_RibbonCommands_runDialogForm = function(objectTypeCode, dialogId) {
    var primaryEntityId = Xrm.Page.data.entity.getId();
    var rundialog = Mscrm.CrmUri.create('/cs/dialog/rundialog.aspx');
    rundialog.get_query()['DialogId'] = dialogId;
    rundialog.get_query()['ObjectId'] = primaryEntityId;
    rundialog.get_query()['EntityName'] = objectTypeCode;
    var hostWindow = window;
        if (typeof(openStdWin) == 'undefined') {
            hostWindow = window.parent; // Support for Turbo-forms in CRM2015 Update 1
        }
        if (typeof(hostWindow.openStdWin) != 'undefined') {
            hostWindow.openStdWin(rundialog, hostWindow.buildWinName(null), 615, 480, null);
            // window.location.reload(true);
        } 

}
})();

Depending on this source code, how can it be possible?

Create Model Driven App for CDS Environment

$
0
0

Introduction

To be able to use Applications in CDS, user must create App for CDS Environment.

For Creating Model Driven App for CDS Environment user must have an Environment in CDS.

In our last blog we saw steps to Create Environment in Common Data Service (CDS).

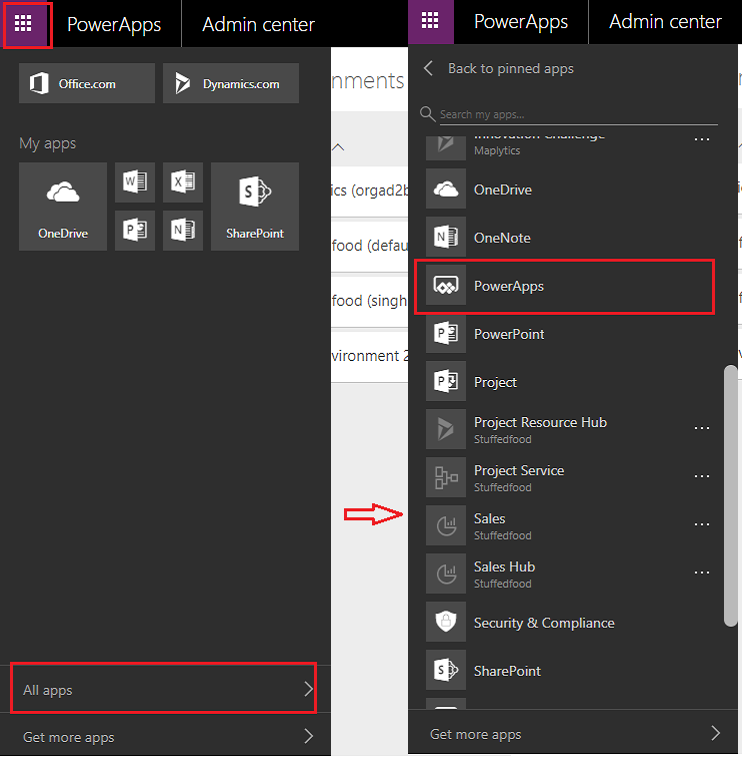
After creating CDS environment, users can see their environments as shown in below image.

Create Model Driven App for CDS Environment

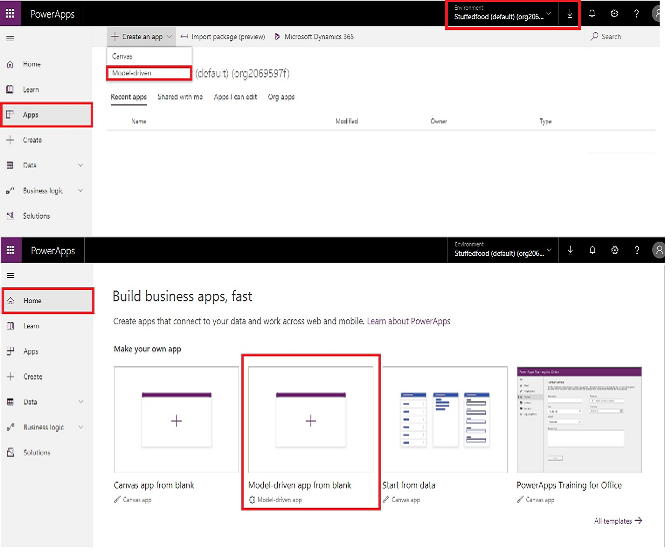
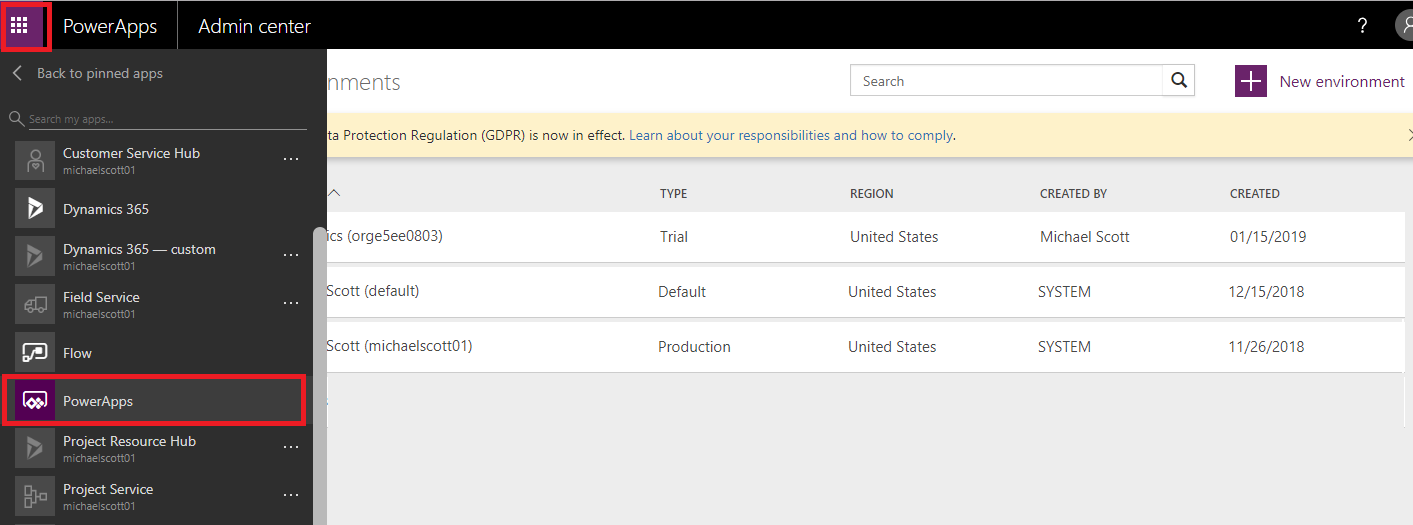
Now to create app for this environment please follow steps as shown in below screen:

Create Model Driven App for CDS Environment

After selecting power app user will be able to see below screen, where on top right side user can select their created environments and process further for creating model driven app.

Create Model Driven App for CDS Environment

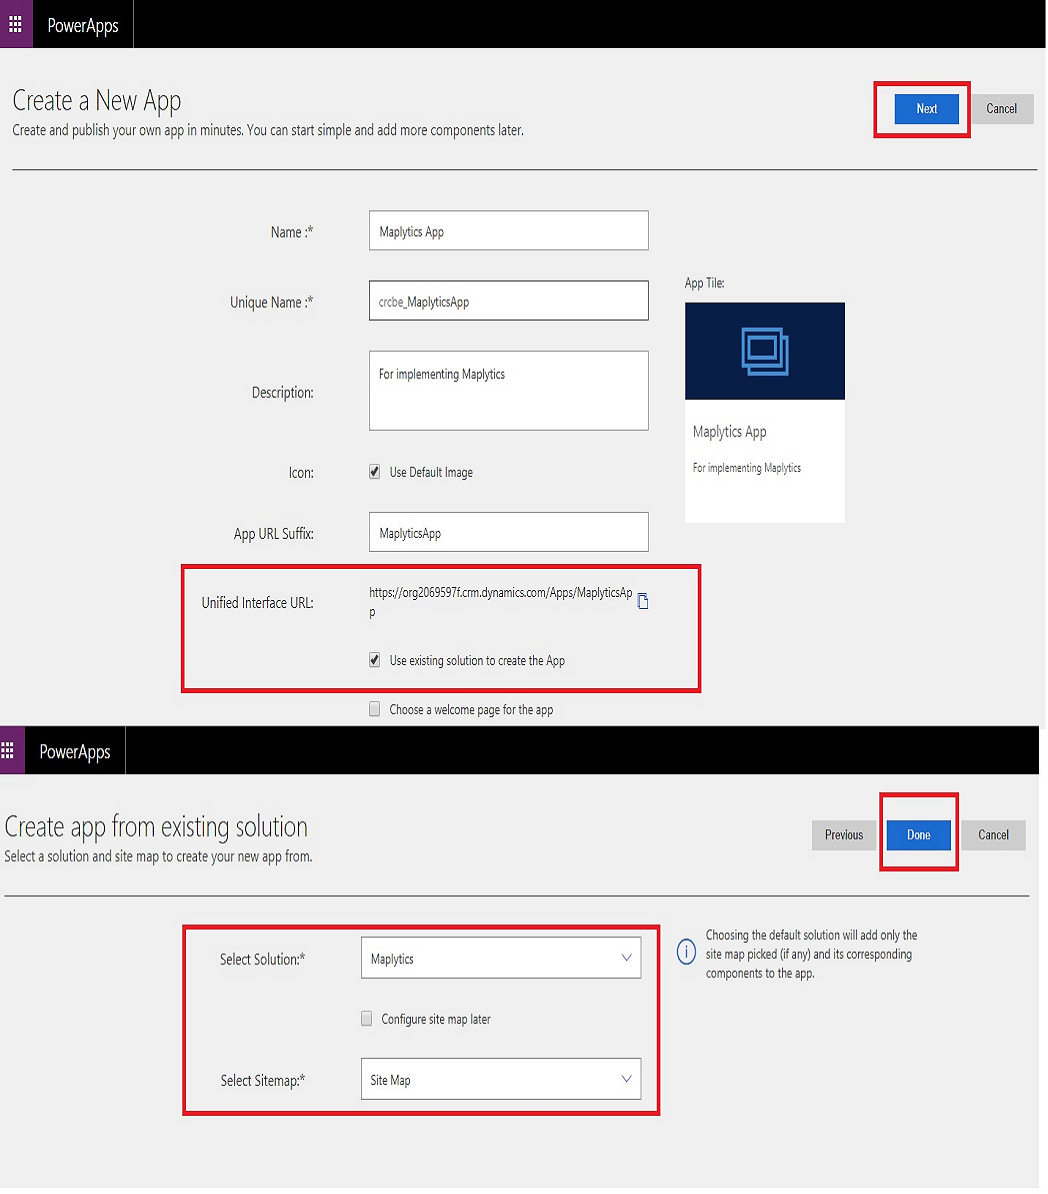
Once clicked on Model-driven option, user will able to create app as shown in below screen:

Create Model Driven App for CDS Environment

Here I have checked check box of use existing solution which allow users to select a specific solution for this app. Users can create a whole new design from scratch by not checking check box of use existing solution.

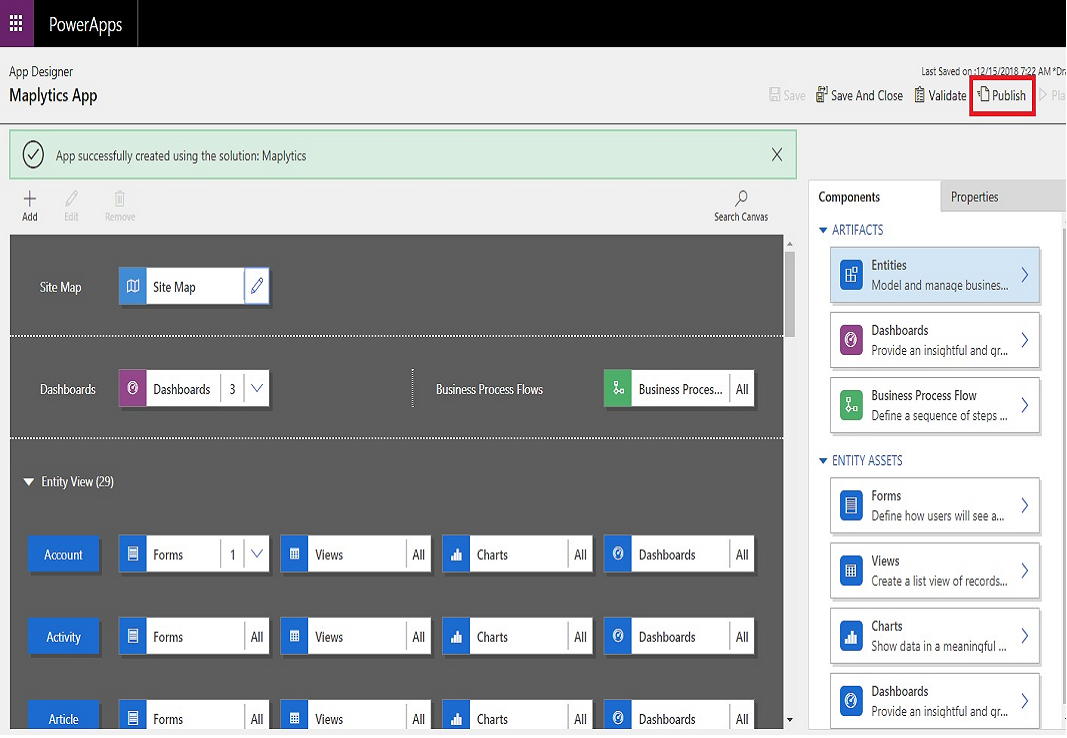
After clicking on Done button as given on above screen, user will see below screen where users’ needs to publish app by clicking on Publish button as shown in below screen.

Create Model Driven App for CDS Environment

After publishing the app user can click on Save and Close button to close current screen.

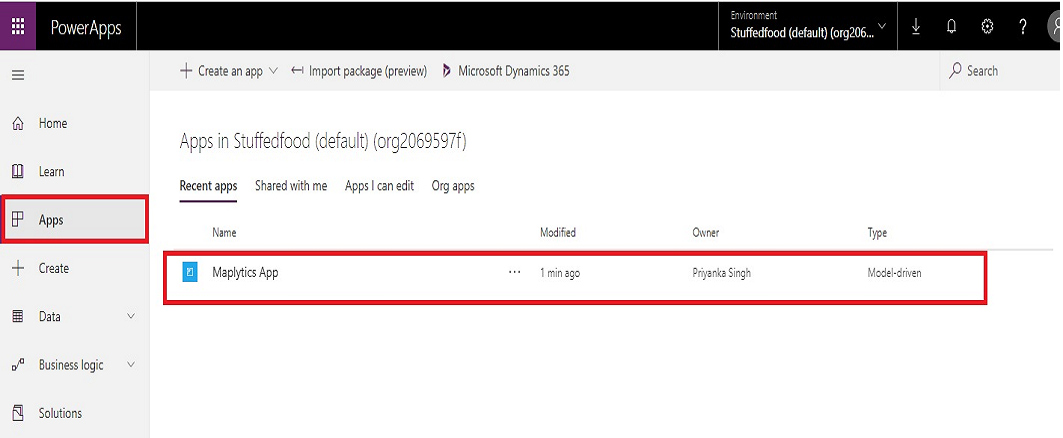
Now users can see their app in App section in CDS environment as shown in below screen.

Create Model Driven App for CDS Environment

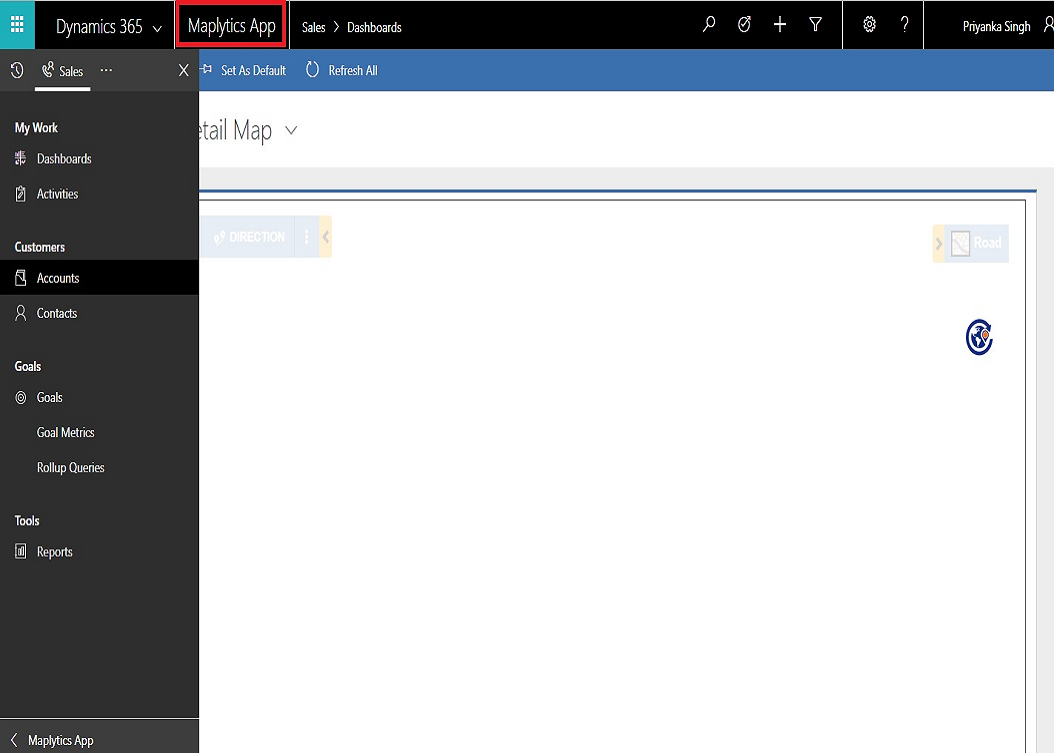
On clicking this app, user will be able to use their App as shown below:

Create Model Driven App for CDS Environment

For Creating Canvas App, please refer our blog – Create Records in Dynamics 365 with Canvas PowerApp

Conclusion

Users can Create and Use apps in power app for CDS Environment using steps given above.

Click2Clone-Promo

Is it possible to attach the documents uploaded to the Documents(Sharepoint) in an Email as attachments?

$
0
0

Here's the scenario: 

  1. Open a record.
  2. Upload a file in the Documents(Sharepoint) section of the form.
  3. Send an Email from that record and get the uploaded documents and add it as email attachments.

Is this even possible? Any ideas?

Creating Entity, Fields and Views for Common Data Service for Apps

$
0
0

Introduction

In our last two blogs we saw how to create CDS environment and steps for creating Model Driven App for CDS Environment.

In this blog we will see how to create entity, fields & view for CDS App.

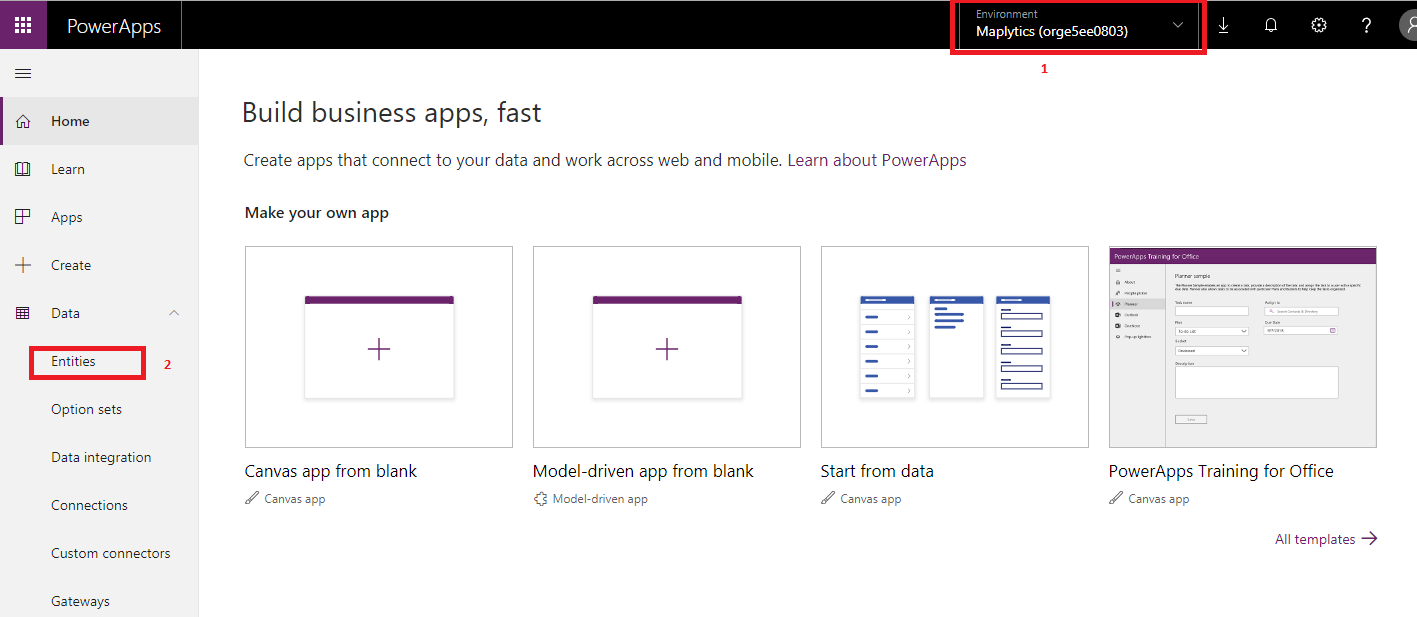
After Creating CDS environment, open that environment in PowerApps as shown in below screen:

Common Data Service for Apps

Or, you can directly open it from https://web.powerapps.com

After clicking on PowerApps, below screen will be displayed where you can select your created environment shown in top right corner.

Common Data Service for Apps

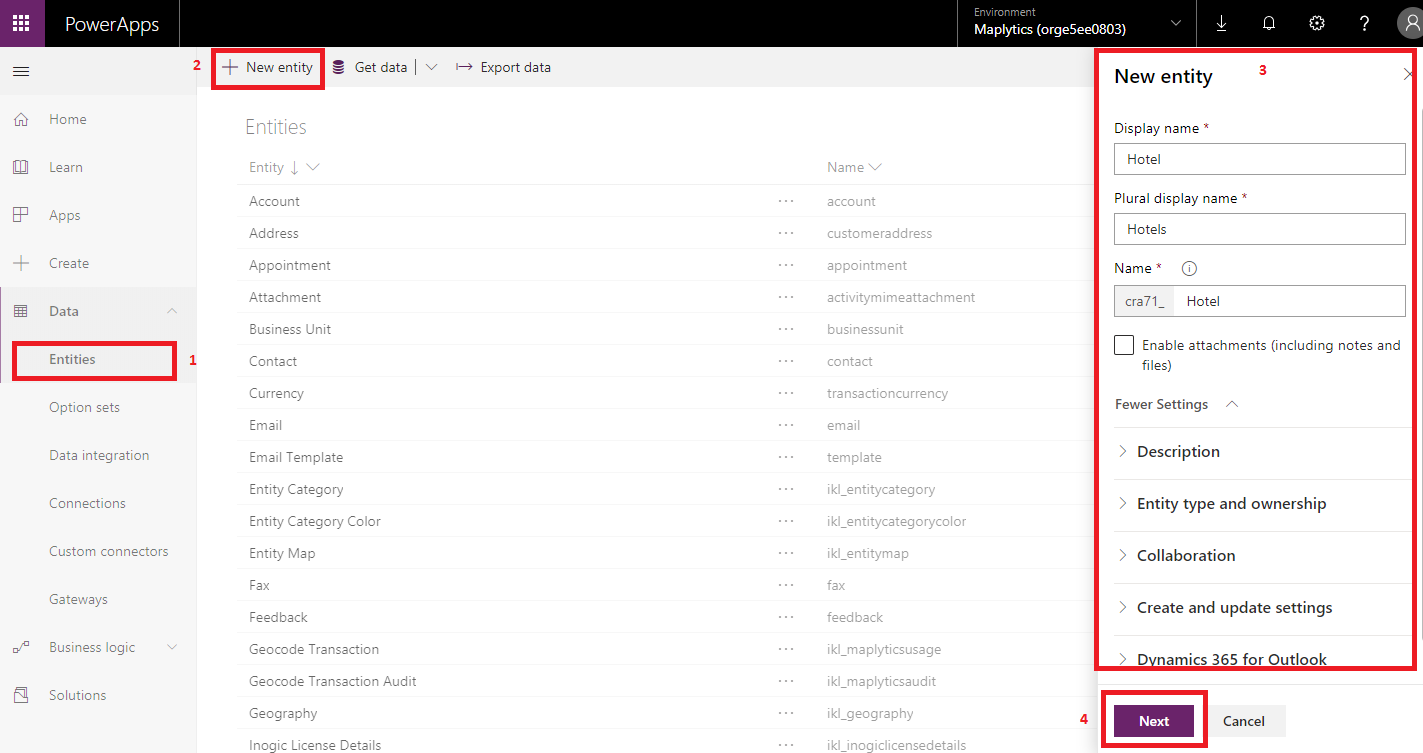
After selecting your environment, you can create new custom entity by clicking on “Entities” tab shown in left navigation bar under “Data”.

After clicking on Entities in above screen, you will be able to see all entities in this environment as shown in below screen.

Common Data Service for Apps

From above screen, for creating new entity click on “New entity”. This will show screen in right as in above image where you can enter details and click on “Next” button which will show below screen to add fields, views, forms, etc.

Common Data Service for Apps

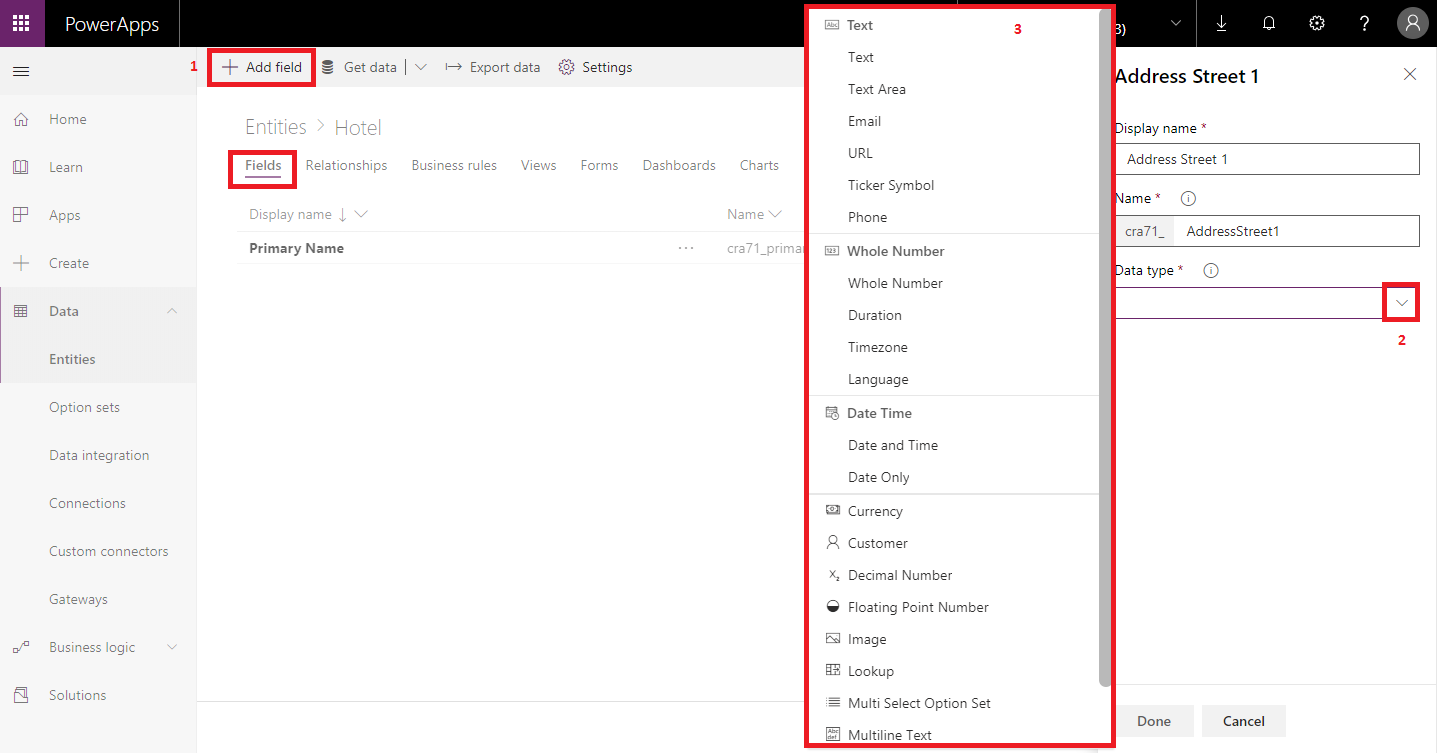
Now, for adding fields for entity click on “Add field” which will open a window from right side where you will enter details of the field and for selecting data type click on arrow in “Data type” field which will open list of all data types available for field as shown above.

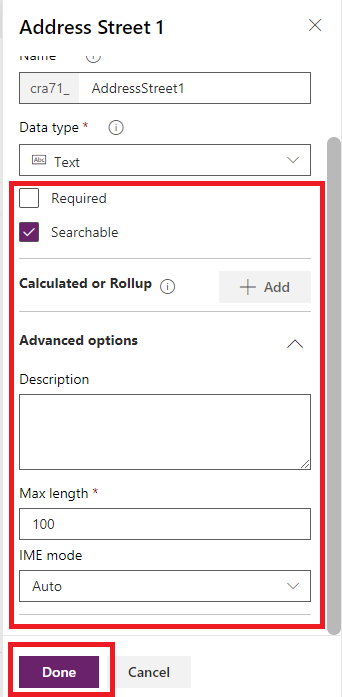
After selecting data type you will get option to make field as required or not and other details as shown below.

Common Data Service for Apps

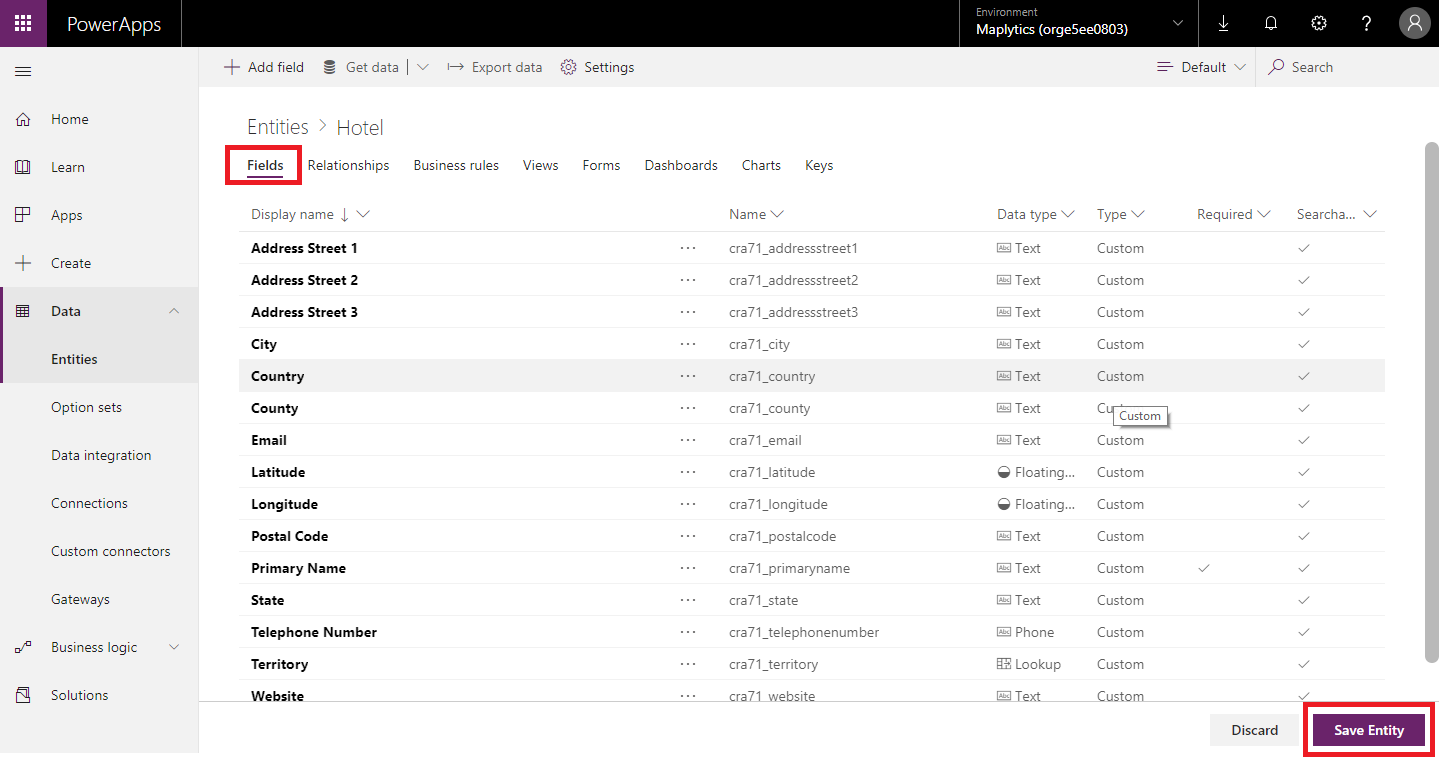
After clicking on “Done” button in above screen you will see your field in field section as shown below and then click on “Save Entity” button which will save your entity and fields.

Common Data Service for Apps

As you can see from screen all fields is shown in the fields section as I have created few more of them.

NOTE: Make sure to click on “Save Entity” button which will save you entity else your fields and entity will not be saved.

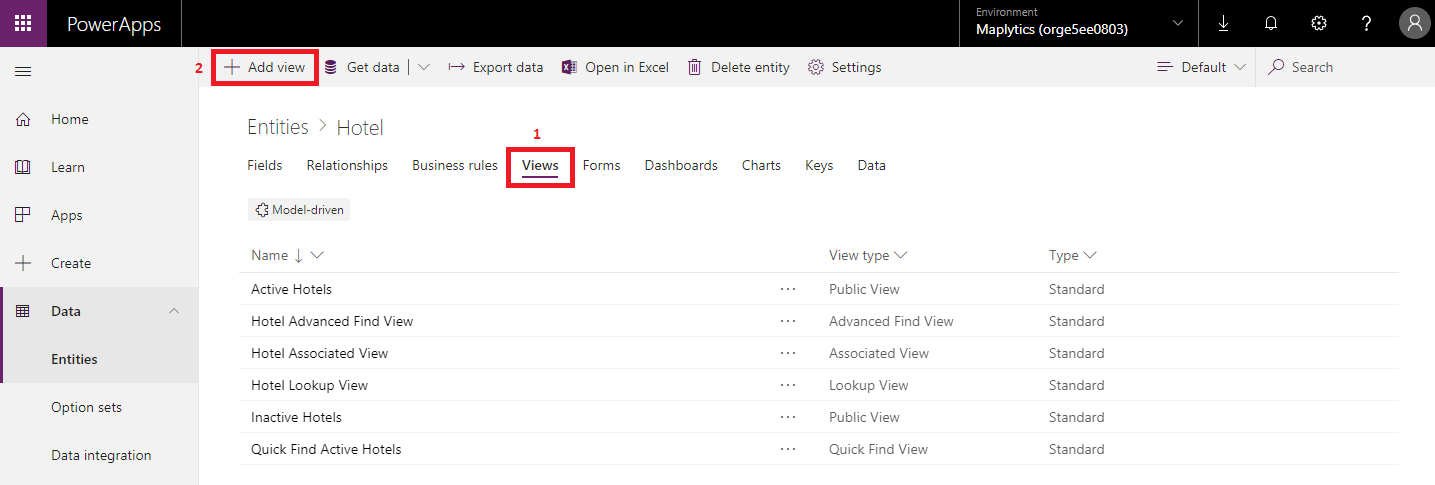
Now for creating views for entity click on “Views” tab and click on “Add view” from ribbon button as shown in below screen.

Common Data Service for Apps

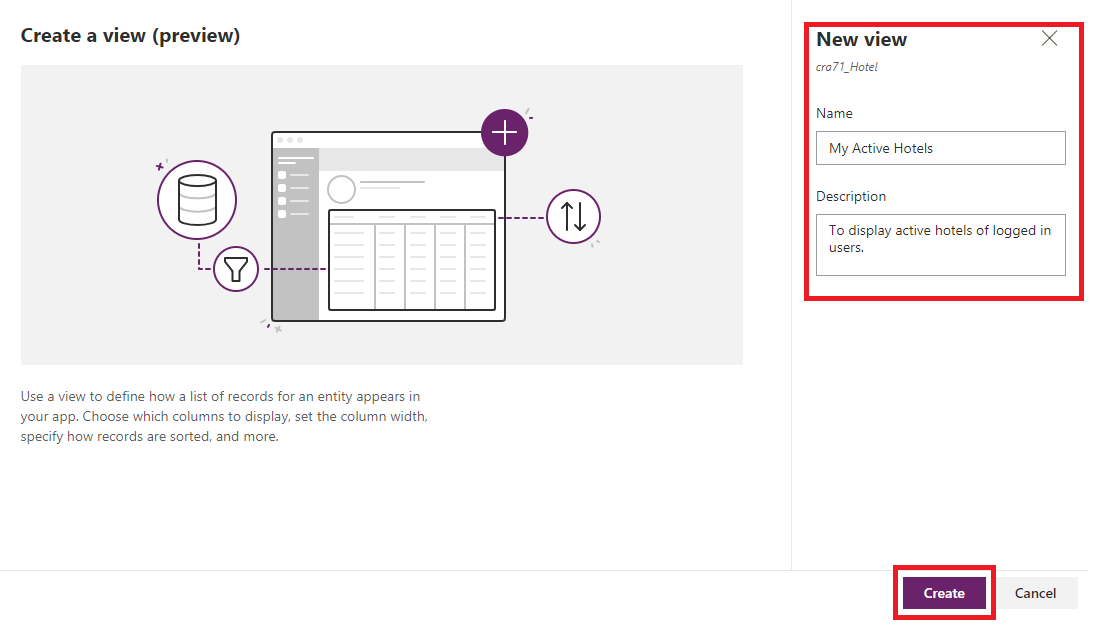
This will open a screen where you need to add “Name” of the view and “Description” if required. And then click on “Create.”

Common Data Service for Apps

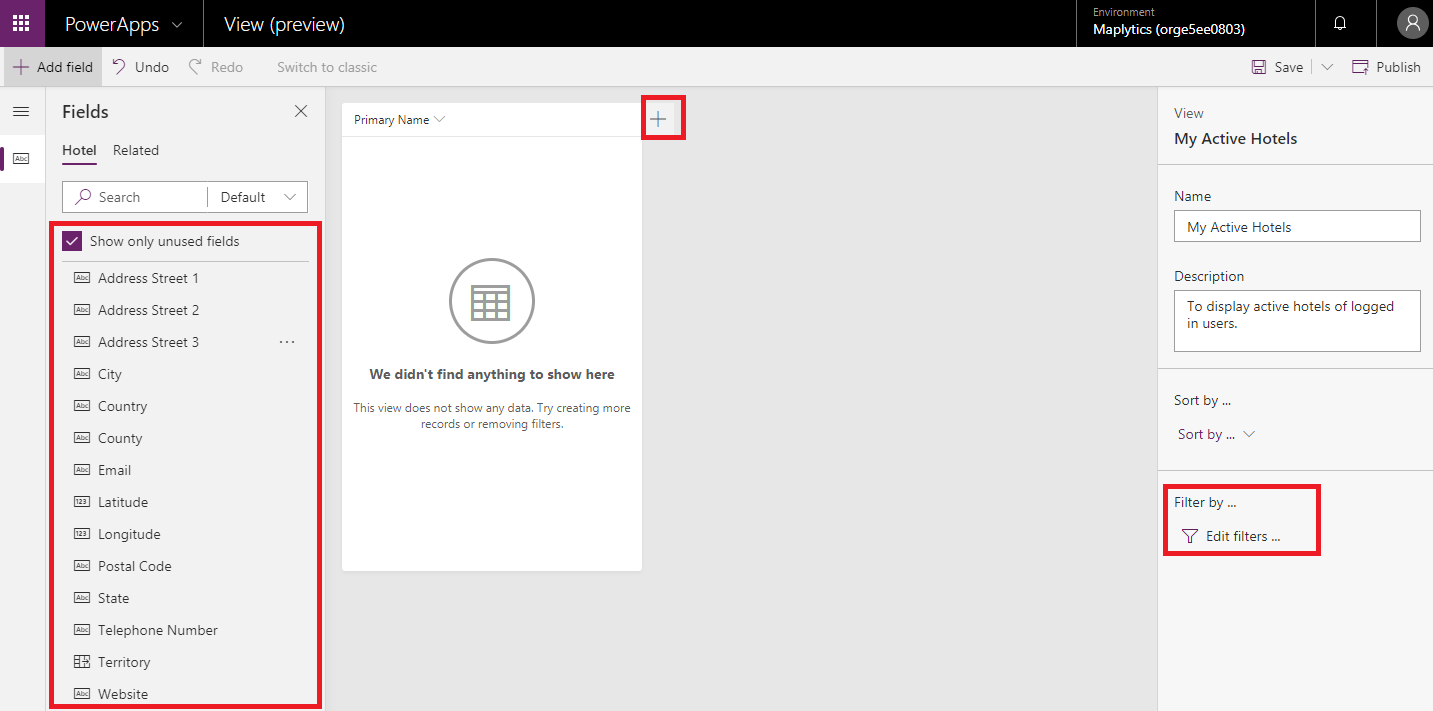
After clicking on “Create,” you will get below screen where you can add fields for the view:

Common Data Service for Apps

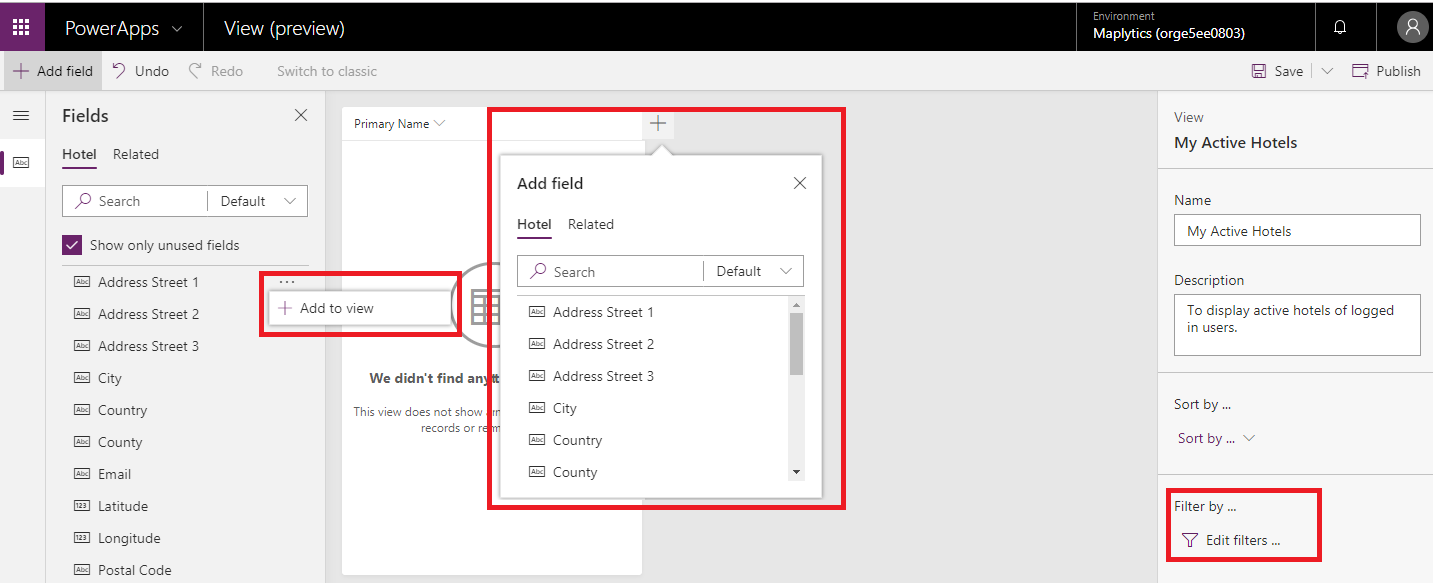
In above screen you can add fields to view from “Fields” section and another option is by clicking on that “+” sign in middle  of screen. There is also a filter section where you can add filters to view. Below screen shows adding fields from “fields” and “+” button.

Common Data Service for Apps

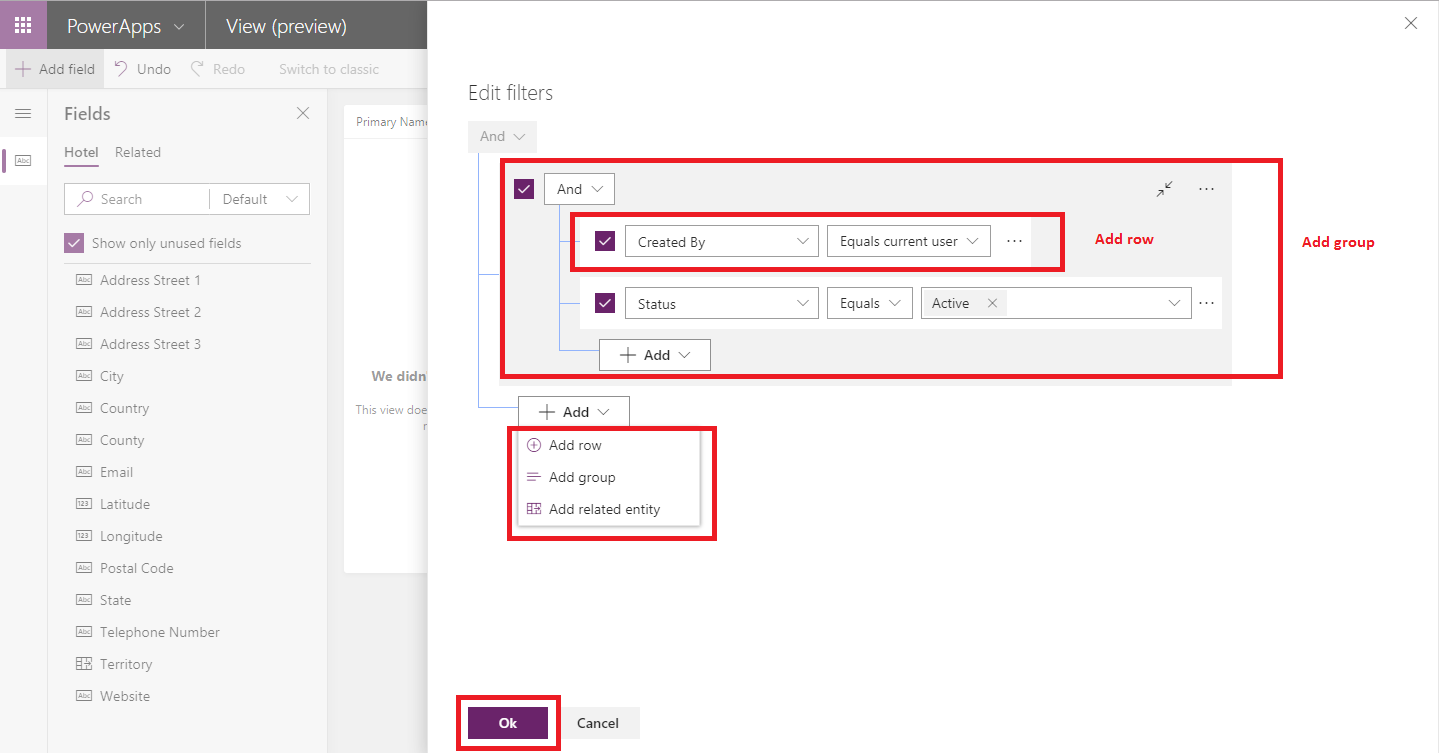
This will add fields in views. For applying filters to this view you can click on “Edit filters” on right side of the page, which will allow you to add filters for the view as shown in below screen.

Common Data Service for Apps

From above option you can add filters by clicking on “+ Add” button which will show option to create single field filter or grouping filters with “And” or “Or” option and Adding related entity.

After that click on “Ok” button and all details will be displayed as shown in below screen.

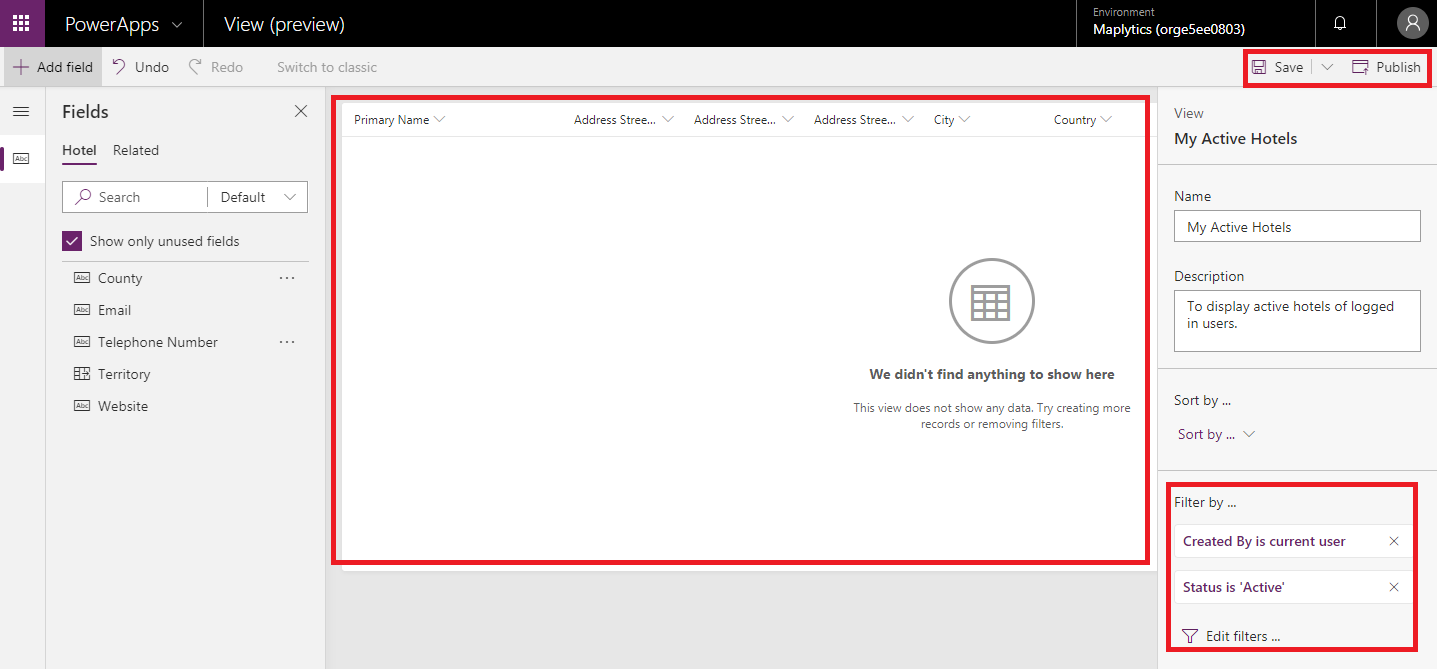
Common Data Service for Apps

In above screen all fields are added. Now click on “Save” button and then “Publish” button which is in top right corner. This view will now be available for your entity.

You can add this entity in your app and use it.

Conclusion

Using CDS users can easily build apps in PowerApps. This blog gives steps to create entity, fields and views for Common Data Service for Apps.

Get-started-with-QuickBooks-and-Dynamics-365-Integration

What is the name of the Existing Contact field from a Lead's Qualify section?

$
0
0

Hi. I would like to import data for the field Existing Contact and then find a way to bulk qualify the Leads into the corresponding Contacts (to fix Lead-Contact duplicates/non-qualified leads issues).

But I can't figure out which field is Existing Contact. How is it called in the Lead's Fields section? Which field to update?

Do you have any idea what is the name of this field? Or is it even there? Or maybe some workaround to set the value of this field from import?

Thanks,

Adrian

Viewing all 3363 articles
Browse latest View live


<script src="https://jsc.adskeeper.com/r/s/rssing.com.1596347.js" async> </script>